Showing posts with label or. Show all posts
Showing posts with label or. Show all posts
Friday, March 24, 2017
Thursday, March 23, 2017
How to Use Miracast Screen Mirroring from Windows or Android To Television
How to Use Miracast Screen Mirroring from Windows or Android To Television

Miracast is a wireless display standard included in Windows 8.1 & Windows 10, Android 4.2, and newer versions of these operating systems.if older versions Miracast is not available but you can also download from Google playstore Screen mirroring App, With a Miracast receiver plugged into a TV or another display nearby, casting your screen should be easy.This feature is also available on devices running Amazon’s Fire OS and Microsoft’s Windows Phone 8.1 and newer. Bear in mind that Miracast is notoriously finicky and problematic.
Windows 8.1+
If your computer came with Windows 8.1 or Windows RT 8.1,Windows 10, it should support Miracast. If you’ve upgraded an old PC to Windows 8.1, it may or may not support Miracast.
You may have to get the latest drivers from Windows Update or your computer Manufacturer’s website before you’ll see the “Add a wireless display” option below.
The below option also refused to show up until we uninstalled VirtualBox on our Surface Pro 2. Miracast depends on having a “clean” networking stack, so programs that interfere with the networking stack VirtualBox, VMware, and
similar applications may need to be uninstalled
before this option will appear.
To access the Miracast options, swipe in from the right or press Windows Key + C and select the Devices charm. Click or tap the “Project” option.

To access the Miracast options, swipe in from the right or press Windows Key + C and select the Devices charm. Click or tap the “Project” option.
If you see an “Add a wireless display" option,your computer supports Miracast. To actually project to a Miracast device, tap or click the Add a wireless display option and select the device in the list. To disconnect from the wireless display, open the Devices charm, tap or click the Project option, and click the Disconnect button under the wireless display.
You may have to get the latest drivers from Windows Update or your computer Manufacturer’s website before you’ll see the “Add a wireless display” option below.
The below option also refused to show up until we uninstalled VirtualBox on our Surface Pro 2. Miracast depends on having a “clean” networking stack, so programs that interfere with the networking stack VirtualBox, VMware, and
similar applications may need to be uninstalled
before this option will appear.
To access the Miracast options, swipe in from the right or press Windows Key + C and select the Devices charm. Click or tap the “Project” option.
To access the Miracast options, swipe in from the right or press Windows Key + C and select the Devices charm. Click or tap the “Project” option.
If you see an “Add a wireless display" option,your computer supports Miracast. To actually project to a Miracast device, tap or click the Add a wireless display option and select the device in the list. To disconnect from the wireless display, open the Devices charm, tap or click the Project option, and click the Disconnect button under the wireless display.

These options are also available in PC Setting. Click or tap the Change PC settings link at the bottom of the Settings charm to access it. Navigate to PC and devices > Devices. To scan for nearby Miracast receivers, tap Add a device. Miracast receivers you’ve added appear under Projectors on this screen.

Android 4.2+
Miracast is available on Android devices with 4.2 Jelly Bean and newer versions of Android. Android devices do need the appropriate hardware, so your Android phone or tablet may not support Miracast especially if it’s an old device that’s been updated to the latest versions of Android.We performed this process with a Nexus4 running Android 4.4.4.First, open your device’s settings screen that’s the Settings app in your app drawer. Under the Device section, tap Display. Scroll down on the Display screen and tap Cast Screen. (You can alsocast to
Chromecast devices from here, although those
don’t use the Miracast protocol.)

Tap the Menu button at the top of your screen and select Enable wireless display. Your phone will scan for nearby Miracast devices and display them in a list under Cast Screen. If your Miracast receiver is powered on and nearby, it should appear in the list.

Tap the device to connect and begin casting your screen.A notification will appear, providing a visible indication that you’re casting your screen.Pull down the notification shade at the top of your screen and tap the Disconnect button to stop casting your screen

You can also cast from the Quick Settings screen if you’ve enabled the wireless display feature under Cast Screen. Pull down with two fingers from the top of your screen to open Quick Settings, tap the Cast Screen button, and you’ll see a list of nearby devices you can cast to. Tap one to start casting.

If your computer, smartphone, or tablet supports Miracast and you have a Miracast receiver nearby, it should be this easy. Miracast uses Wi-Fi Direct, so the devices don’t even have to be on the same network to communicate with each other.Issues with your home network or router shouldn’t even be a factor. This should simplify things, but Miracast-enabled devices often refuse to work together or have issues with playback glitches and dropped streams even after they connect.
Available link for download

Saturday, March 18, 2017
Convert your Partition from FAT32 to NTFS with CMD without Formatting or losing data
Convert your Partition from FAT32 to NTFS with CMD without Formatting or losing data
Convert Your Partitions from FAT32 to NTFS Without Formatting or Losing your data through Command Prompt - No Need for any Software..
Dear Readers, today i will lead you to how to convert Partition of any drive attached to a Windows PC either its a Hard Disk Drive, Flash Drive or an External HDD from FAT32 to NTFS... Lets Start with the Basics...
What is a File System ?
A: A file system is the underlying structure a computer uses to organize data on a hard disk. If you are installing a new hard disk, you need to partition and format it using a file system before you can begin storing data or programs. In Windows, the three file system options you have to choose from are NTFS, FAT32, and the older and rarely-used FAT (also known as FAT16).
Advantages of NTFS over FAT32
Many a times you might have thought of converting your Partitions from FAT32 to NTFS because of the excessive features offered by the NTFS Partition and Suddenly a question arises that this might result in Loss of Data of your Partition.
What is a File System ?
A: A file system is the underlying structure a computer uses to organize data on a hard disk. If you are installing a new hard disk, you need to partition and format it using a file system before you can begin storing data or programs. In Windows, the three file system options you have to choose from are NTFS, FAT32, and the older and rarely-used FAT (also known as FAT16).
Advantages of NTFS over FAT32
- The capability to recover from some disk-related errors automatically, which FAT32 cannot.
- Improved support for larger hard disks.
- Better security because you can use permissions and encryption to restrict access to specific files to approved users.
- Maximum Volume Size is 2TB over 32GB of FAT32
- Maximum File Size for Storing is nearly Unlimited over 4GB of FAT32
- Allows Compression of Files and Folders where as FAT32 doesnt
- Has the ability to auto counter disk related problem that are not major, while FAT32 always performs Chkdsk command at startup when an error is encountered.
Many a times you might have thought of converting your Partitions from FAT32 to NTFS because of the excessive features offered by the NTFS Partition and Suddenly a question arises that this might result in Loss of Data of your Partition.
So, Heres how to get it done through Command Prompt..
Converting Your Partition File System From FAT32 to NTFS
Converting Your Partition File System From FAT32 to NTFS
- Open Command Prompt in Administrator Mode, To do this, click on start (Win XP/Vista/7) or Hit Windows button (Win 7/8) --> under the search bar, type in Command --> When you see a black icon labeled Command Prompt, Right click on it and select Run as Administrator.
- After the command prompt windows has appeared, enter the following command" convert C: /FS:NTFS " - without double quotes.(Replace letter C: with any drive you want to convert)
- You will be asked to confirm the Volume label of the Partition you want to convert.
- Thats it.. it will take some time depending on your system, running tasks and storage allocated to that partition.
- Take Sometime and perform " Chkdsk C: /F " command before converting your partition to any other filesystem. This ensures that you have a healthy partition and no errors occurs during conversion process.
Tags: convert partition without formatting, convert partition without losing data, fat32 to ntfs without software, convert ntf to fat32 with command prompt, command, cmd, dos
Available link for download
Sunday, March 12, 2017
Blocking Unblocking a Website or I P Address in Windows Environment
Blocking Unblocking a Website or I P Address in Windows Environment
How to Block or Unblock a Website or IP Address within your Computer
Follow the Procedure as under :
- Open the Hosts File, Go to Run Command (Win Key + R) and type in "C:WindowsSystem32driversetchosts" or alternatively go to My Computer->Windows Installation Directory (Usually Drive C: ) -> Windows -> System32 -> drivers -> etc -> hosts file
- Open the file with notepad.. (If you are using windows Vista/7 or 8, Right Click the hosts file and select properties --> under the Security Tab, Select all options under your Username and/or Administrator such as Write,Read,Read & Execute, Special Permissions --> Click Apply and then open that file with notepad - otherwise you wont be able to save changes to your hosts file)
- Find labels such as 127.0.0.1 localhost and move to the last line and enter the IP address of the Website you want to block along with its name.
- It should look like this --> 74.125.236.148 www.google.com ( IP Address SiteName)
- Save the changes made by pressing CTRL+S..
- You have successfully blocked www.google.com from being accessed within your computer
To Know the IP Address of a Website open command prompt and type "ping sitename" (without quotes) where site name could be any site name you want to block such as Facebook.. It should look like this --> 31.13.70.49 www.facebook.com
Available link for download
Monday, February 27, 2017
FREE Kaspersky Internet Security 2013 91 Days License Key or Activation Code Download
FREE Kaspersky Internet Security 2013 91 Days License Key or Activation Code Download
FREE Kaspersky Internet Security 2013 91 Days License Key or Activation Code Download

Kaspersky Internet Security 2013 is one of the best online security suite for Windows system with complete protection modules against Virus, Malware, Spyware and rest of the security threats that everyday we face it simply detects and automatically removes to keep PC always clean, safe and, that secures your privacy and prevent data leakage.
Read more »Kaspersky Internet Security 2013 is one of the best online security suite for Windows system with complete protection modules against Virus, Malware, Spyware and rest of the security threats that everyday we face it simply detects and automatically removes to keep PC always clean, safe and, that secures your privacy and prevent data leakage.
Available link for download
Thursday, February 16, 2017
Make Flash USB drive Bootable for Windows XP Vista 7 8 or Linux
Make Flash USB drive Bootable for Windows XP Vista 7 8 or Linux
Making your USB Drive Bootable for Windows XP, 7 and 8 and Linux and/or based Systems.. (Links Updated)
Dear Readers, Today i will tell you about Bootable USB Stick and how to create a Bootable USB Drive, you dont need to search the internet over and over again to find the right tool for creating a bootable usb device for your needs...
Bootable USB Drive is just like a normal usb drive but it lets you boot your PC directly from USB Stick eliminating the need of a CD/DVD drive... thatll allow you to perform actions such as Installing an Operating System and / or Running Bootable Iso Files such as Antivirus Rescue Disks or Other Softwares that Run in offline mode and needed to be burned on CD/DVDs in the form of .ISO file to become operatable... There are many tools available
- Windows 7 USB/DVD Download Tool (For Windows 7 and 8): This tool is provided by Microsoft itself. There is no need to find or search the internet for any other software/tool thatll make your USB bootable. This could be used for Making Bootable Windows 7 and Windows 8 Platform USB device... It wont work for Windows XP as it lacks the Install.wim file...
NOTE: DotNET Framework 2 or higher (.Net FX) is required for this tool to work/Works best with Dot Net Framework 3.5... You can easily obtain Dot Net Framework 3.5 for Windows 7 on Microsofts official Downloads Page while you need to follow this guide to install dotnetfx3.5 for Windows 8 --> "How to Install Dot Net Framework 3.5 on Windows 8 All Editions" - Novicorp WinToFlash: Novicorp WinToFlash has always been my first choice to create bootable usb drives when it comes to Windows XP. It is very simple to use, you only need to enter the path, where you had extracted your Windows .ISO file (or mount the .ISO file and then browse to path). It is very handy tool for Windows XP, Vista, 7 and now it also supports Windows 8...
- UNetbootin: When it comes to install rescue disks on bootable usb pen drives, UNetbootin has always been my first choice because not only UNetbootin allows you to create bootable Linux based .ISO image files but it also allows you to create bootable USB Pen drives for Linux Operating Systems and its variants such as Ubuntu etc. as well... and also allows you to download .ISO Image files and Create Bootable USB device directly from within..
So, whenever you need to make a bootable USB drive, no matter which family it belongs to, all you need is above listed three free tools... Nothing else.. Enjoy and Click on Name of tool to Download requisite tool...
Tags: bootable usb ; create bootable usb disk ; bootable rescue disk ; install iso image on usb ; install windows xp/vista/7/8 from bootable usb pen drive ; install ubuntu / linux from usb ; install windows from usb
Tags: bootable usb ; create bootable usb disk ; bootable rescue disk ; install iso image on usb ; install windows xp/vista/7/8 from bootable usb pen drive ; install ubuntu / linux from usb ; install windows from usb
Available link for download
Wednesday, February 8, 2017
Free Download Microsoft Windows XP Service Pack 2 Ultimate Professional Enterprise 32 Bit Software or Application Full Version For Windows
Free Download Microsoft Windows XP Service Pack 2 Ultimate Professional Enterprise 32 Bit Software or Application Full Version For Windows
 Windows XP 64 Bit ISO Free Download Bootable Image. Its Windows XP Professional 64 Bit SP1 ISO Direct Single Link. Download Windows XP Pro 64 Bit ISO Free.
 Microsoft Windows XP Service Pack 2

Microsoft Service Pack 2 for Windows XP as a complete download.
Microsoft pounces on the subject of security. With SP2 for Windows XP to Windows machine finally be better protected against worms and viruses. Microsoft wants to cover with SP2 following security techniques: Network security: protection against attacks from the Internet, especially against worm attacks like Blaster. Memory protection: protection against the dreaded buffer overflow or underflow Secure e-mail: protection against e-mail worms like Sobig through improved control of attachments in Outlook Express and Windows Messenger. Secure web surfing: malware protection by security zone changes and convenience additions such as pop-up blocker.
Improved recruitment options:
Central Management for security settings. Want to achieve the ambitious goals of the approximately 270 Mbyte thick SP2, which has a security center, where the new firewall, antivirus software and updates are managed. Furthermore, some security-critical services not automatically loaded and Windows sees itself with memory protection features of the new 64-bit CPUs. Known programs out version updates: Internet Explorer, Outlook Express, Movie Maker, Media Player.
During the installation, the Internet Explorer, Outlook Express, Media Player, and a number of other programs are automatically updated. Part of the update is also Movie Maker 2.1.
Conclusion
With Windows XP Service Pack 2, Microsoft has closed some loopholes in Windows XP. For safety reasons, however, the download of the recent Windows XP Service Pack 3
Hint
With Service Pack 2 for Windows XP may result in some programs initially compatibility problems. Especially firewall software from other vendors could come with the built-in Windows firewall to poach. Many software manufacturers do offer already on updates for their products, but many others can certainly wait a while longer.

Download Here
Available link for download
Sunday, February 5, 2017
Bluetooth device was not discoverable or An error occured changes could not be saved and the bluetooth device may not be plugged in
Bluetooth device was not discoverable or An error occured changes could not be saved and the bluetooth device may not be plugged in
Solution:
1] Click Start > Run > type devmgmt.msc and hit enter.
2] Device Manager window will be opened and expand Bluetooth radios.
3] Right click on Wireless Bluetooth Module > Properties > Power Management tab.
4] By default windows turn off the bluetooth and wireless device.
5] Make sure that there is no tick mark in Allow computer to turn off this device to save power as shown in picture below.
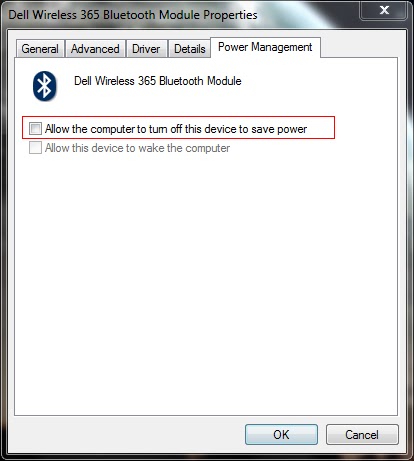
6] Click OK to close the properties box.
1] Click Start > Run > type devmgmt.msc and hit enter.
2] Device Manager window will be opened and expand Bluetooth radios.
3] Right click on Wireless Bluetooth Module > Properties > Power Management tab.
4] By default windows turn off the bluetooth and wireless device.
5] Make sure that there is no tick mark in Allow computer to turn off this device to save power as shown in picture below.
6] Click OK to close the properties box.
7] Also expand the Network Adapters in the device manager window.
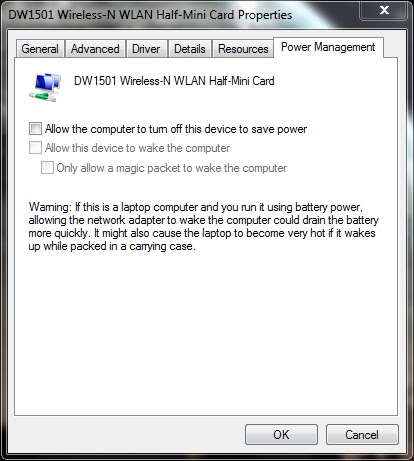
8] Right click on Wireless-N WLAN Half-Mini Card > Properties > Power Management tab
9] Make sure that there is no tick mark in Allow computer to turn off this device to save power.
10] If there is tick mark then the error will be pop-up saying your bluetooth device was not plugged in.
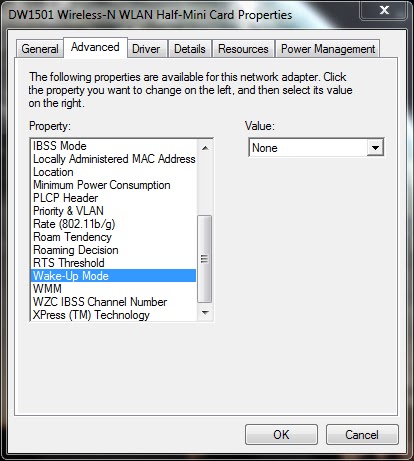
11] Now select Advanced tab > select Wake-up Mode > set Value as Disabled (or) None.
12] Click OK and close the Device Manager window.
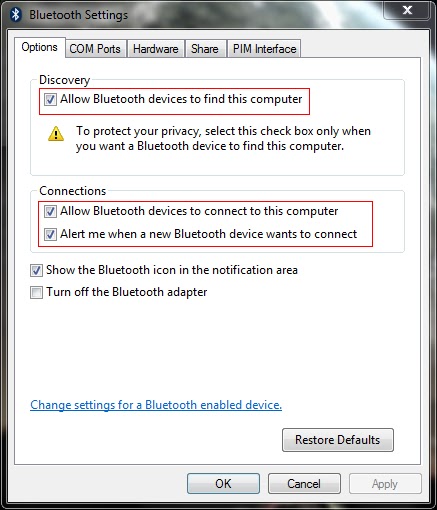
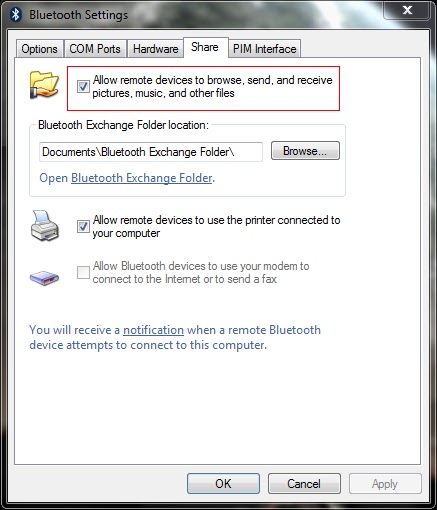
13] Now right click the Bluetooth radio button in the notification area of the taskbar and open settings.
14] Put the tick mark near the following options
- Allow bluetooth devices to find this computer
- Allow bluetooth devices to connect to this computer
- Alert me when a new bluetooth device wants to connect
15] Now select the Share tab and put the tick mark near Allow remote devices to browse, send and receive pictures, music and other files.
16] Atlast click Apply and OK.
========================================================================
If the problem still exist then you have to check the bluetooth service.
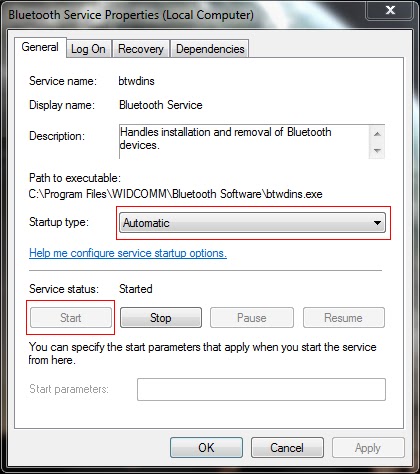
1] Click Start > Run > type services.msc and hit enter.
2] Services window will be opened.
3] Locate the Bluetooth service and right click > properties.
4] Set the Startup type as Automatic and Start the service if it has Stopped.
5] Click Apply and OK.
6] Locate the Bluetooth Support service and right click > properties.
7] Set the Startup type as Automatic and Start the service if it has Stopped.
8] Click Apply and OK.
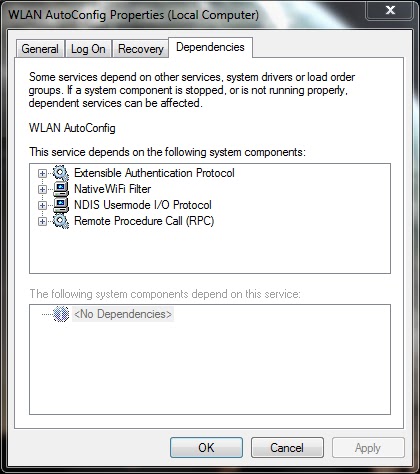
9] Similarly locate the WLAN AutoConfig service and repeat same procedure.
10] If you cant able to start the service, select the Dependencies tab and start all the services related to it by following the above steps.
Note: Also read my new post on "Bluetooth keyboard/mouse disconnects frequently in Windows 7 laptops"
Available link for download
Wednesday, January 25, 2017
Prevent or disable Remote Shutdown From Command Prompt on Windows 7
Prevent or disable Remote Shutdown From Command Prompt on Windows 7
How To Stop Remotely Shutting Down Computers

Windows 7 Shutdown Command - The Basics

Sooner or later everyone makes the mistake of accidentally shutting down the local machine instead of the target computer that they really wished to reboot. To recover from this mistake pay close attention to the syntax of the abort command Shutdown /a.

As can be seen in the example above, youll have different options to choose from in the Remote Shutdown Dialog. First specify the name or IP address of the computer you want to shutdown by clicking the Add button. Next, select Shutdown and keep the Warn users of the action checked if you want to warn the user of the shutdown before it occurs. Next, in the Shutdown Event Tracker, choose the Option you want the Event Log to show and enter a comment.
If you are running a training session and the delegate from hell keeps shutting down other students machines by abusing shutdown -s or -r, then configure a policy to prevent Force Shutdown From A Remote Machine.
Launch GPMC or SECPOL.MSC
Navigate to Local Policies, User Rights Assignment.
Experiment by assigning just your account, rather than all administrators.
Launch GPMC or SECPOL.MSC
Navigate to Local Policies, User Rights Assignment.
Experiment by assigning just your account, rather than all administrators.
Then click Apply and ok.
How can I remotely shutdown another Windows computer?
To start the GUI version of this command click Start, Run, and in the Run line type: shutdown -i and press enter. After running this command you should see a dialog window shown in the example below.
The shutdown executable is available at the command line in Windows 7, Vista, XP and also the Windows Server family. Once you launch the DOS box by typing cmd, your first decision is do you want to shutdown (/s), or reboot (/r) the computer?
CMD-->shutdown -i window appear
Sooner or later everyone makes the mistake of accidentally shutting down the local machine instead of the target computer that they really wished to reboot. To recover from this mistake pay close attention to the syntax of the abort command Shutdown /a.
As can be seen in the example above, youll have different options to choose from in the Remote Shutdown Dialog. First specify the name or IP address of the computer you want to shutdown by clicking the Add button. Next, select Shutdown and keep the Warn users of the action checked if you want to warn the user of the shutdown before it occurs. Next, in the Shutdown Event Tracker, choose the Option you want the Event Log to show and enter a comment.
Available link for download
Monday, January 23, 2017
Why laptop runs hot and turns off or freezes
Why laptop runs hot and turns off or freezes
Why laptop runs hot and turns off or freezes?
My laptop runs very hot and eventually turns off or freezes – this is one of the most common complaints I have been receiving from my customer for many years. Why it’s happening? Is there an easy fix for that?
Most likely this problem is heat related. Take a look at the following picture.
Any laptop has a cooling module which consists of heatsink and cooling fan. When laptop is working, the processor (CPU) heats up and because of that the heatsink is getting hot too. At some temperature level, the fan kicks in and cools down the heatsink.
The problem starts when the laptop cooling module collects too much dust inside. Usually dust collects between the fan and heatsink. Dust clogs the heatsink and kills normal airflow inside the cooling module. Eventually, the processor gets very hot and the laptop turns off unexpectedly or freezes. This problem can be fixed by cleaning the laptop cooling module.
Cleaning laptop cooling module.
Some laptops give you an easy access to the heatsink and fan. In laptops like that you can access the cooling module through the bottom cover.
In my example I had to remove the cooling module. Otherwise, I wouldn’t be able to remove the fan and access the heatsink. In some laptops you can remove the fan without separating the heatsink from the CPU.
After I removed the fan, I found a thick layer of dust inside the heatsink. Cleaning the heatsink should fix any heat related problems.
Apply thermal paste on the processor.
If thermal paste on the processor dried out, you should replace it with fresh thermal paste.
Remove old thermal paste from the processor and heatsink using alcohol swab.
WARNING: In some laptops the heatsink also covers the graphics chip. The part of the heatsink which covers the graphics chip might have thermal pad on it instead of regular thermal paste. Do not replace thermal pad with thermal paste! Do not apply thermal paste on the thermal pad! Just leave thermal pad alone and apply thermal paste only on the processor.
I usually use Shin-Etsu thermal paste which is relatively cheap and performs well.
What if cooling module cannot be accessed easily?
In some laptops the cooling module is buried deep inside the case and cannot be easily accessed and removed. In order to remove the cooling module it’s necessary to disassemble the whole laptop but it’s only for experienced users.
Blow air into the fan grill on the bottom of the laptop.
2. Blow air into the grill on the side of the laptop.
Switch direction a few times until all dust is gone. Most likely this quick cleaning will fix your laptop overheating problem.
Any Kind of Lenovo Problems Call Us
+1-855-517-2433 (Toll Free)
Available link for download
Sunday, January 22, 2017
How to Find Stolen or Lost Android Mobile Using Android Device Manager
How to Find Stolen or Lost Android Mobile Using Android Device Manager
I am Sure this is Awesome post for Android lovers and will enjoy.Yes! This is something big.Now you can find your lost,Misplaced and stolen Android device easily without any third party apps.In our previous post we explained how to Trace your lost android mobile with some apps but Here in this post you dont need any app to find your device where it is. This is can done by simply using Android device manager.
Android Manger is one which it will get installed directly on your device when you use Google play for the first time.So you dont need to download any third party apps.
Nobody knows that they will lost their device if they know that they will keep them safe for sure so maximum of people dont install any tracking app to trace their lost device.For this people android device manger can work like miracle.
Some Advantages:
- You can find your misplaced mobile or tab.
- You can erase data in your device from any where
- Helps you to trace your lost device.
- Lock your device from anywhere.
How to use Android device manger to find lost device:
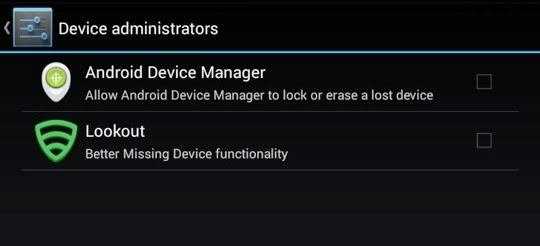
- First thing you need to do is using your device navigate to security in settings and then to device administrator.
- Now tap on it and activate if it is off.
Note: I suggest you to do this step right now because device administrator must be activate to take advantage of Android device manger.
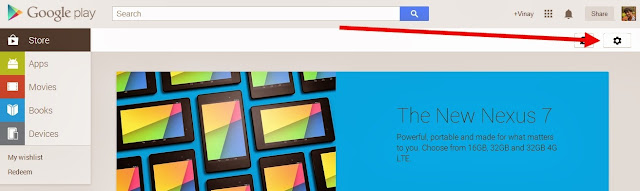
- Now go to Google Play Store.
- You can find Gear icon at right side top. Just like in below screen capture.
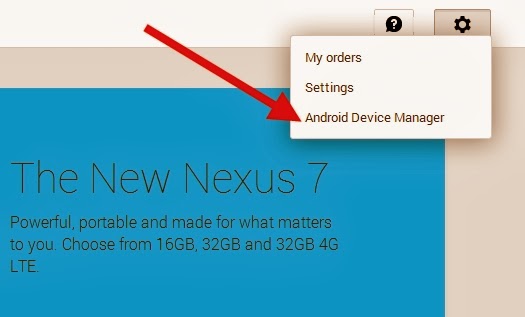
- Now Click on Gear icon then you can find three options My Order,Settings and then last Android device manager.Just click on Android device manager.
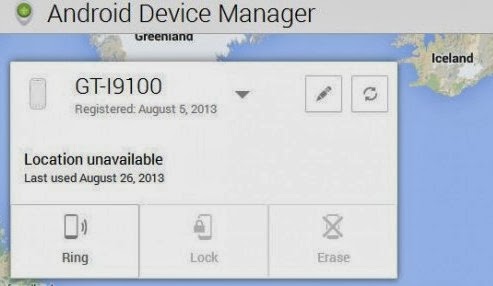
- As soon as you click on android device manager it will find the device with which it is associated.
- As soon as Android device manger find your device it will show you on Google maps. It will also indicate how far is your distance from you.
You can find 3 Options:
- Ring: If you click on Ring then your device mobile or tab will ring though it is in silent mode.This feature fails when device is switched off.
- Lock: If you click on Lock then it will lock your device and you can get new password to access your device.
- Erase: If you click on Erase then total memory in that device will be erased automatically.Make sure once you click erase then all the data will be deleted including android device manager so it wont work again.
Available link for download
Thursday, January 19, 2017
Recover Data from Damaged or Bad CD DVD HDD USB with IsoBuster 3 2 Pro
Recover Data from Damaged or Bad CD DVD HDD USB with IsoBuster 3 2 Pro
IsoBuster 3.2 Pro - CD/DVD Recovery tool now also supports recovery of HDD, SD Cards, USB drives etc.
 |
| Isobuster 3.2 |
- IsoBuster can recover data from CD/DVDs, USB flash / thumb sticks, Memory stick, compact media cards, MMC media cards, SD, Micro SD, Mini SD, xD, GSM, CF, SDHC, SDSC, SDXC, SDIO, mobile phone memory card, memory cards that are used in digital cameras, camcorders, cell phones, MP3 players and any other type media cards, Floppy, Zip and Jaz drives etc.
- Data Recovery from Hard Drives, USB flash / thumb sticks, Memory stick, compact media cards, MMC media cards, SD, Micro SD, Mini SD, xD, GSM, CF, SDHC, SDSC, SDXC, SDIO, mobile phone memory card, memory cards that are used in digital cameras, camcorders, cell phones, MP3 players and any other type media cards, Floppy, Zip and Jaz drives etc.
- All device access, media access, data gathering and interpretation is done exclusively by the software. It does not rely on Windows to provide or interpret the data and so can work completely independent from Windows limitations.
- Better error handling and several retry-mechanisms to aid you in getting the data anyway.
- The use of both generic and alternative ways to get to the data, get the best out of your CD/DVD-ROM drive.
- The use of primary and secondary file systems to get to the data and/or make use of file system data that might be ignored or forgotten by popular OS. Explore the alternatives.
- CDs stay readable after problems (such as Buffer Under-run,...).
- Read / Extraction from open sessions. Read more @ http://www.isobuster.com
Download Installation File - Keygen
OR you can try this direct link
Direct Download Keygen
OR you can try this direct link
Direct Download Keygen
Password: " kalyani-786 " - without quotes
Although the above listed keygen is repoted to be 100% Clean by Avira Internet Security and Avast Internet Security, I Still advice all my visitors to always run keygens and cracks under the supervision of Sandbox i.e. Run them under sandboxie or similar program. This eliminates the chances of your system getting infected.
If youre still unable to decide what to do, then just read the Read this first.txt file inside the archive.
NOTE:
SUPPORT THE AUTHORS IF YOU LIKE THE SOFTWARE OR APP, PURCHASE IT. IT HELPS THEM PAY BACK THEIR HARD WORK...!!!
Available link for download
Thursday, January 5, 2017
Remove dual boot options or boot choice menu in Windows
Remove dual boot options or boot choice menu in Windows
If you have recently installed new operating system in a separate partition other than the default/previous partition then the boot choice menu appears even if you have format the previous operating system.

To remove this boot choice menu, enter into the newly installed operating system and click Start > Run > type msconfig and hit Enter.
For XP users:
Select Boot.INI tab > locate the last two lengthy lines if you have two boot choices and delete the unnecessary os.
If you do not know which line to delete, compare with the third line, if they are not same for some extent [eg disk(0)partition(1) in third line and disk(0)partition(2) in last line] then delete that last line.

For Vista/7 users:
Select Boot tab > select the previously installed os in the list box (for eg:Windows 7 Ultimate (D:windows)) and click Delete button.
Click Apply > OK and Restart the PC.

Warning! Do not delete the default/current os line, then you will never boot into the PC thereafter.
To remove this boot choice menu, enter into the newly installed operating system and click Start > Run > type msconfig and hit Enter.
For XP users:
Select Boot.INI tab > locate the last two lengthy lines if you have two boot choices and delete the unnecessary os.
If you do not know which line to delete, compare with the third line, if they are not same for some extent [eg disk(0)partition(1) in third line and disk(0)partition(2) in last line] then delete that last line.
For Vista/7 users:
Select Boot tab > select the previously installed os in the list box (for eg:Windows 7 Ultimate (D:windows)) and click Delete button.
Click Apply > OK and Restart the PC.
Warning! Do not delete the default/current os line, then you will never boot into the PC thereafter.
Available link for download
Tuesday, January 3, 2017
How to disable automatic page or section break in MS word 2013
How to disable automatic page or section break in MS word 2013
By default MS word has auto page/section break in which the last line of the page gets jumped to next page/column before completion of the sentence. In order to disable this feature follow these simple steps.
1. Right click on a paragraph > select Paragraph option. (OR) Click Paragraph settings button from home menu or Page layout menu.
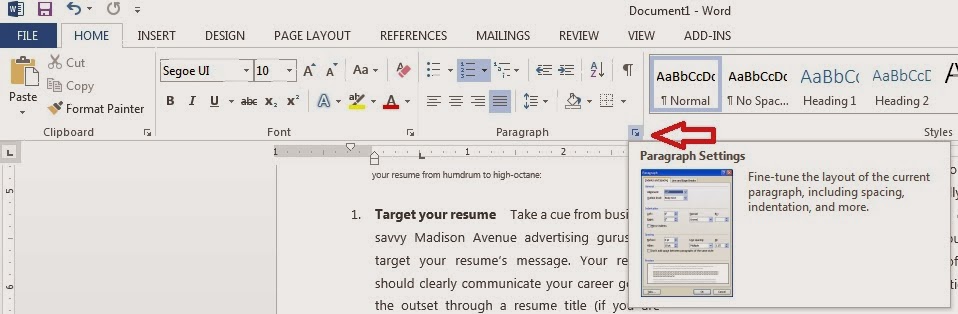
2. Clear the check box for Widow/orphan control under line and page breaks tab and click OK.
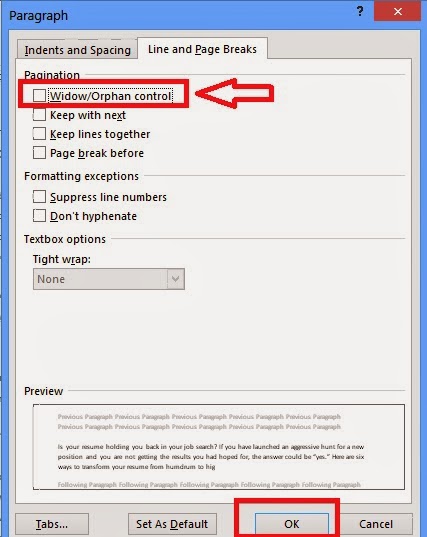
1. Right click on a paragraph > select Paragraph option. (OR) Click Paragraph settings button from home menu or Page layout menu.
2. Clear the check box for Widow/orphan control under line and page breaks tab and click OK.
Available link for download
Thursday, December 29, 2016
Make or Recover Bootable ISO from Bootable USB drive
Make or Recover Bootable ISO from Bootable USB drive
Create .ISO Image File from Bootable USB
Dear Readers, ever encountered with a situation where you created a Bootable USB disk from an .ISO Image file but got that file deleted accidentally ? Then, No need to worry about that any more. You can recover the lost .ISO Image file if you have it backed once either you have it burned onto a CD/DVD or have created a Bootable USB disk, Use the Novicorp Bootable USB Replicator tool to recover Bootable .ISO Image file back from your Bootable USB Disk... For Recovering Bootable .ISO Image file from Bootable CD/DVD disk, use PowerISO, UltraISO, Daemon Tools, MagicISO tools etc..
Click here to Download <---- Link Updated
OR you can try this direct link
Direct Download
Tags: create bootable image from bootable usb ; extract iso from usb ; create iso from bootable usb ; make iso from usb ; rip iso from prepared usb
OR you can try this direct link
Direct Download
Tags: create bootable image from bootable usb ; extract iso from usb ; create iso from bootable usb ; make iso from usb ; rip iso from prepared usb
Available link for download
Tuesday, December 27, 2016
How to play videos in widescreen or 16 9 format in Windows Media Player
How to play videos in widescreen or 16 9 format in Windows Media Player
1] Play your video file.
2] Click on the Notification area in the taskbar.
3] Double click on your video decoder, for example ffdshow video decoder.
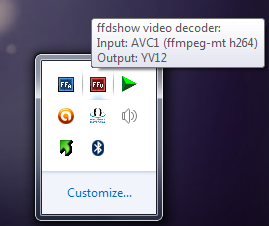
4] Select Resize & Aspect option > Select Resize to screen resolution and also select No aspect ratio correction under Aspect ratio column.
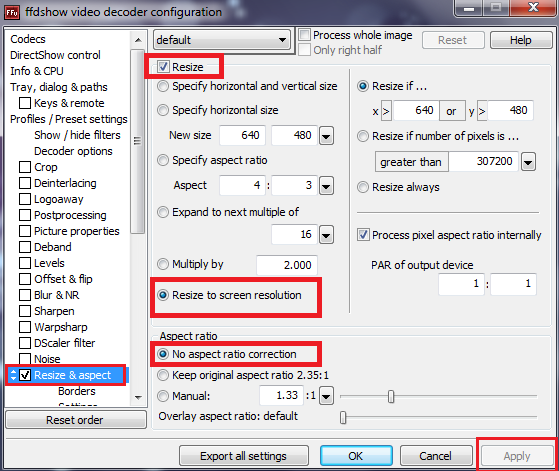
5] Finally click Apply button to save the changes and OK button to exit.
6] Now Windows Media Player should play your video in widescreen format.
Note: If you cant find any audio/video decoders then you should install codec pack.
2] Click on the Notification area in the taskbar.
3] Double click on your video decoder, for example ffdshow video decoder.
4] Select Resize & Aspect option > Select Resize to screen resolution and also select No aspect ratio correction under Aspect ratio column.
5] Finally click Apply button to save the changes and OK button to exit.
6] Now Windows Media Player should play your video in widescreen format.
Note: If you cant find any audio/video decoders then you should install codec pack.
Available link for download
Monday, December 12, 2016
How To Trace your Lost Or Stolen Laptop
How To Trace your Lost Or Stolen Laptop
Did you ever loose your personal laptop? Now-a-days all the important information is being stored in the personal or office laptops. Once they are stolen, everything is gone. Some people may also loose their jobs because of this issue. If you are worried about loosing your laptop or it getting stolen, you have to install a tracking device on your device so that you can trace it back if it goes missing. - See more at:

Prey is an open source app that allows you to keep track of all your electronic devices(laptop,tablet and mobile phones). Once you install pray on your laptop, it will silently run in the background and will wait to receive a signal through the internet from you. trace it When you have lost your laptop, you can log in to the web interface of pray from anywheretrace it in the world and send a signal to your laptop. Once the signal is received by the Prey software on your laptop, it will allow you to perform the following actions,all remotely through the internet.

Features of Software:
1. Show the location of your device on a geographical map.


To manage the tracking settings related to a specific device, simply go to the Prey Control Panel. This page will allow you to specify what actions can be performed in case your device is stolen.

Prey is an open source app that allows you to keep track of all your electronic devices(laptop,tablet and mobile phones). Once you install pray on your laptop, it will silently run in the background and will wait to receive a signal through the internet from you. trace it When you have lost your laptop, you can log in to the web interface of pray from anywheretrace it in the world and send a signal to your laptop. Once the signal is received by the Prey software on your laptop, it will allow you to perform the following actions,all remotely through the internet.
Features of Software:
1. Show the location of your device on a geographical map.
2. Take photo of the person using your device using the inbuilt camera.
3. Lock down your laptop so that it cannot be used.
4. Take a screenshot of your computer screen to find out more information about who is using your laptop. For example you may be able to capture the email account and facebook account that the user is logged into.
5.Set off a loud alarm on your missing laptop.
6. Display an alert message on your laptop screen with the text of your own choice.
7. Erase all saved passwords and history.
After completing the above steps, you can seek the help of police to trace down your laptop. But for all this, you need to install the prey software on your laptop. You can download it from the website.
· After downloading the software, start the installation wizard. Select the Configuration Prey Settings. Click on New User.
Enter your contact details and click on create button in order to create your Prey account and add your devices to it.
Log into your email account to verify your identity by clicking on the link sent to you by the Pray Project.
Once you activate your account, Prey will start working and tracks your laptop when it is lost or stolen. You can login to your web control panel and manage all the settings.
To manage the tracking settings related to a specific device, simply go to the Prey Control Panel. This page will allow you to specify what actions can be performed in case your device is stolen.
Click on Save Changes button once you complete the settings. In case your device goes missing, log in to the prey website, open the control panel change the status from OK to MISSING. After a few minutes, You will receive a detailed report about your missing device from the Prey Project.
This report may contain a bunch of information related to your missing device.
Available link for download
Subscribe to:
Posts (Atom)