Showing posts with label screen. Show all posts
Showing posts with label screen. Show all posts
Thursday, March 23, 2017
How to Use Miracast Screen Mirroring from Windows or Android To Television
How to Use Miracast Screen Mirroring from Windows or Android To Television

Miracast is a wireless display standard included in Windows 8.1 & Windows 10, Android 4.2, and newer versions of these operating systems.if older versions Miracast is not available but you can also download from Google playstore Screen mirroring App, With a Miracast receiver plugged into a TV or another display nearby, casting your screen should be easy.This feature is also available on devices running Amazon’s Fire OS and Microsoft’s Windows Phone 8.1 and newer. Bear in mind that Miracast is notoriously finicky and problematic.
Windows 8.1+
If your computer came with Windows 8.1 or Windows RT 8.1,Windows 10, it should support Miracast. If you’ve upgraded an old PC to Windows 8.1, it may or may not support Miracast.
You may have to get the latest drivers from Windows Update or your computer Manufacturer’s website before you’ll see the “Add a wireless display” option below.
The below option also refused to show up until we uninstalled VirtualBox on our Surface Pro 2. Miracast depends on having a “clean” networking stack, so programs that interfere with the networking stack VirtualBox, VMware, and
similar applications may need to be uninstalled
before this option will appear.
To access the Miracast options, swipe in from the right or press Windows Key + C and select the Devices charm. Click or tap the “Project” option.

To access the Miracast options, swipe in from the right or press Windows Key + C and select the Devices charm. Click or tap the “Project” option.
If you see an “Add a wireless display" option,your computer supports Miracast. To actually project to a Miracast device, tap or click the Add a wireless display option and select the device in the list. To disconnect from the wireless display, open the Devices charm, tap or click the Project option, and click the Disconnect button under the wireless display.
You may have to get the latest drivers from Windows Update or your computer Manufacturer’s website before you’ll see the “Add a wireless display” option below.
The below option also refused to show up until we uninstalled VirtualBox on our Surface Pro 2. Miracast depends on having a “clean” networking stack, so programs that interfere with the networking stack VirtualBox, VMware, and
similar applications may need to be uninstalled
before this option will appear.
To access the Miracast options, swipe in from the right or press Windows Key + C and select the Devices charm. Click or tap the “Project” option.
To access the Miracast options, swipe in from the right or press Windows Key + C and select the Devices charm. Click or tap the “Project” option.
If you see an “Add a wireless display" option,your computer supports Miracast. To actually project to a Miracast device, tap or click the Add a wireless display option and select the device in the list. To disconnect from the wireless display, open the Devices charm, tap or click the Project option, and click the Disconnect button under the wireless display.

These options are also available in PC Setting. Click or tap the Change PC settings link at the bottom of the Settings charm to access it. Navigate to PC and devices > Devices. To scan for nearby Miracast receivers, tap Add a device. Miracast receivers you’ve added appear under Projectors on this screen.

Android 4.2+
Miracast is available on Android devices with 4.2 Jelly Bean and newer versions of Android. Android devices do need the appropriate hardware, so your Android phone or tablet may not support Miracast especially if it’s an old device that’s been updated to the latest versions of Android.We performed this process with a Nexus4 running Android 4.4.4.First, open your device’s settings screen that’s the Settings app in your app drawer. Under the Device section, tap Display. Scroll down on the Display screen and tap Cast Screen. (You can alsocast to
Chromecast devices from here, although those
don’t use the Miracast protocol.)

Tap the Menu button at the top of your screen and select Enable wireless display. Your phone will scan for nearby Miracast devices and display them in a list under Cast Screen. If your Miracast receiver is powered on and nearby, it should appear in the list.

Tap the device to connect and begin casting your screen.A notification will appear, providing a visible indication that you’re casting your screen.Pull down the notification shade at the top of your screen and tap the Disconnect button to stop casting your screen

You can also cast from the Quick Settings screen if you’ve enabled the wireless display feature under Cast Screen. Pull down with two fingers from the top of your screen to open Quick Settings, tap the Cast Screen button, and you’ll see a list of nearby devices you can cast to. Tap one to start casting.

If your computer, smartphone, or tablet supports Miracast and you have a Miracast receiver nearby, it should be this easy. Miracast uses Wi-Fi Direct, so the devices don’t even have to be on the same network to communicate with each other.Issues with your home network or router shouldn’t even be a factor. This should simplify things, but Miracast-enabled devices often refuse to work together or have issues with playback glitches and dropped streams even after they connect.
Available link for download

Saturday, February 25, 2017
how to fix blue screen error
how to fix blue screen error
Samsung hard disk blue screen error problem solve for life time.
1) download this ISO file click here & download.
2) write it to USB or CD. how to write USB pen drive download this software click here.
screenshots

3)booting your PC or laptop from USB fast boot.
4)open hdd tools .
 5)open HDD Regenerator
6)enter choice 1 then enter just wait removing bad sectors.
I hope your blue screen error will be solved .
1) download this ISO file click here & download.
2) write it to USB or CD. how to write USB pen drive download this software click here.
screenshots
3)booting your PC or laptop from USB fast boot.
4)open hdd tools .
5)open HDD Regenerator6)enter choice 1 then enter just wait removing bad sectors.
I hope your blue screen error will be solved .
THANK FOR VISIT
Available link for download
Thursday, February 16, 2017
STOP c0000135 the program cant start because hs is missing Try reinstalling the program Blue Screen error
STOP c0000135 the program cant start because hs is missing Try reinstalling the program Blue Screen error
This BSOD error occurs due to corrupted registry files and it is caused by some hijackers, viruses, malwares etc. More recently my PC crashes frequently and restarts every time. Then I decide to boot my PC with the function "Disable Automatic Restart on system failure" during start up and it stops at this blue screen of death.

After spending several time in fixing this issue with offline registry editors, again PC crashes with another BSOD error soon after fixing the previous one. It was a fatal system error report and now it was really a bad time for me.

STOP: c000021a {Fatal System Error} - This was the error faced by me. Very soon, (by luck) Ive have found another solution which saves my whole work and no longer the bad time continues. I think this was the entire solution for both the BSOD errors mentioned above.
Solution: (for Vista/7 Users)
[Last Updated on July 8, 2012]
[Last Updated on July 8, 2012]
By luck, if you found to have RegBack folder in C:WindowsSystem32Config then this was perfect fix. Simply copy all those files which is inside this folder and paste it outside the folder and replace all with same name. Hurray, you have won!
- Also check if there was any *.LOG1, *.LOG2 files in config folder and dont forgot to delete these since they are the virus programs which infects the registry files and make us unable to logon by crashing.
- These virus LOG files can be easily identified since it does not have any file type. In actual, all log files have file type as text document. To verify you can see their file properties.
If you are clueless on how to access this folder without encountering this BSOD error, I suggest some methods here.
Method1
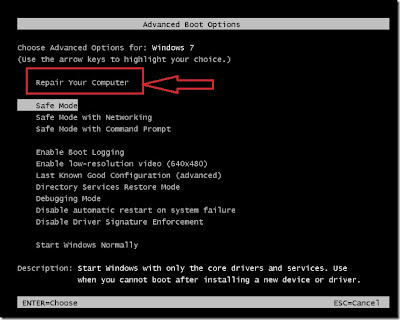
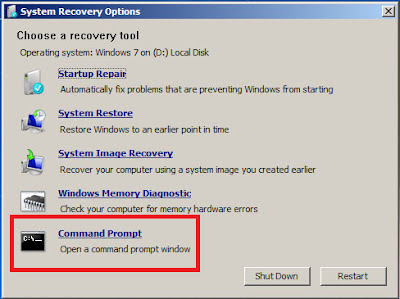
Launching Recovery Console by pressing F8 key before Start-up screen appears to bring up eight functions menu > select Repair your computer option > Select your language for keyboard layout > Type the password for user account > Select command prompt from System Recovery options.
Method2
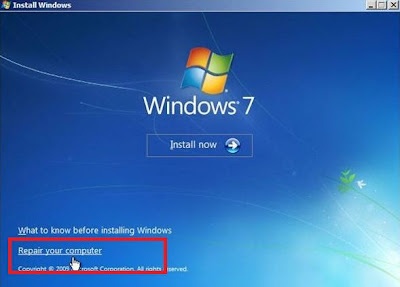
Using windows setup dvd (or) recovery disc. Boot the PC from dvd drive > press any key to boot from cd (if it asks) > select your language > click Repair your computer below the Install button.
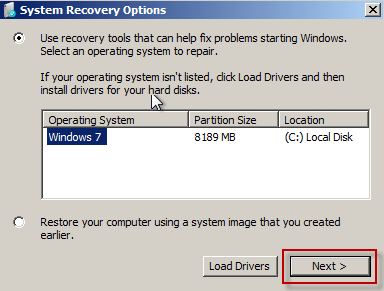
click "Use Recovery tools that can help fix problems starting windows" radio button and select the operating system and click Next > and then select command prompt from System Recovery options.
Method3
If you have installed two OS on same PC, then it is easy to access this folder by logging into the other operating system whether it is XP/Vista/7/RedHat linux/Ubuntu/Fedora.
Method3
Using other third-party bootable dvds like Ophcrack LiveCD, Ubuntu LiveCD, Hirens BootCD.
Method4
Connecting your internal hard disk to another PC or laptop via IDE/SATA to USB adapter. For more to know read my post on How to use internal Hard disk as an external USB device.
Using Command prompt
1. Type cd<space>C:WindowsSystem32Config and hit Enter key.
2. Now type dir and hit Enter key.
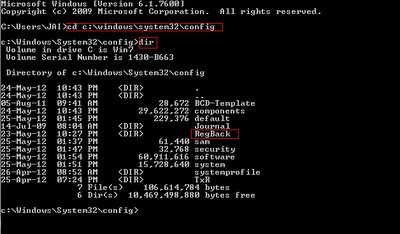
3. Type the following commands as follows and press Enter key after each.
- cd RegBack
- copy *.* c:WindowsSystem32config

4. If it ask for overwrite any existing files (y/n) > type Y and press Enter.
5. If all files were successfully copied message is displayed, type exit to leave the command prompt and restart Windows.
Finally, if you couldnt find RegBack folder; thinking that I was wasting your time.
GO AHEAD! - FORMAT YOUR PC! - INSTALL NEW OS!
But this is not the end for XP users. Read this Microsoft article on How to recover from a corrupted registry that prevents Windows XP from starting.
Overall, the above choice is my best advice rather than editing registry files directly.
Note: If you are still interested in editing those registry files, read my post on STOP: c0000135 error - Solved using Registry Editor.
But this is not the end for XP users. Read this Microsoft article on How to recover from a corrupted registry that prevents Windows XP from starting.
Overall, the above choice is my best advice rather than editing registry files directly.
Note: If you are still interested in editing those registry files, read my post on STOP: c0000135 error - Solved using Registry Editor.
Available link for download
Sunday, February 12, 2017
Adjust screen resolution in Kali Linux
Adjust screen resolution in Kali Linux
1. Click on Applications --> System Tools --> Preferences --> System Settings
2. Click on Display
3. Click Drop down box, next to Resolution to adjust resolution of the monitor
4. Click on Apply to take effect
Available link for download
Wednesday, January 18, 2017
How to remove the BIOS splash screen Tamilnadu government laptop scheme
How to remove the BIOS splash screen Tamilnadu government laptop scheme

Are you tired of seeing the Tamil Nadu logo every time you switch on your laptop? Then this easy tutorial is for you!
EDIT: 08.02.2013 - If youre good at experimenting with technology and setting your own (any image of your choice) BIOS image, read on. For those of you who are bad at technical stuff, just download this zip file, extract, and run the .exe file as Administrator (Right click -> Run as Administrator)
Before we go any further, Id like to add that none of the steps mentioned here voids your agreement with the Government as we are still using it for personal use which is all that the agreement we signed states. The boot splash was meant to prevent you from selling the laptop which we are not going to do but actually use it more for ourselves now that the boot splash is not irritating us anymore.
A couple of days back, I got an email from one of the visitors to my website. Im always happy to actually hear from you guys so never hesitate even if it is just a comment or an email. So, his name was (also) Deepak. He was an Electronics Engineer and he had followed my tutorial on "How to make your TN Govt. Laptop AWESOME!" and was satisfied with it but he asked me if there is a way to remove the ugly bios splash screen you see above. So I took it upon myself and did a little digging around. Heres what I found:
There was this Youtube Video which shows that the splash screen has indeed been changed and this guy named Arun Lance has done it. So far so good. But things dont look so good after this cuz hes expecting people to contact him so that he can SELL his software to change the splash screen. It makes me sad that such things are actually being monetized rather than being shared with the world. So, I did some work and managed to change it using another method and decided to SHARE it with the world. The last time I attempted a BIOS flash was back in the days when it was done using FLOPPY drives but not to worry. It has evolved so much that you can easily do it from within Windows itself. So here you go. Lets get to Step 1 - click next to continue.
Before we make any changes to your current BIOS, we will first make a backup in case you ever want the TN logo again (I dont know why anyone will want that though) or if something goes wrong.
So in order to do that, we need to download a tool by Davidxxw which can be found here.
- Once downloaded, extract the contents using WinRAR (we will be using WinRAR in future also so make sure you have it installed.) and then right click the .exe file and select "Run as Administrator". You should be at a window like shown below.

- Now click the "Read" button.
- Once the read operation is complete, click the "Backup" button and you will be asked to save your file somewhere. Save it in a safe place and also keep a backup of the file as this is the original bios file. Your backup is now complete.
Now we will edit your bios file to change the splash image. Click next to find out how.
We will now see how to edit your BIOS file and change the splash image.
- Make a copy of your bios file that we made in the previous step and name it "44CN43WW.fd"
- Windows will ask if youre sure that you want to change the extension of the file. Click Yes.
- If Windows did not ask you that, make sure you did not name it as "44CN43WW.fd.rom". You need to change the extension of the file as well.
- Now our bios uses the Insydeh20 framework so we need an Insydeh20 editor. You can download it from here.
- Download the Ezh20.zip file and extract it.
- Right click the EZH20.exe file and select "Run as Administrator".
- In the EZH20 window, select File -> Load file and select the renamed "44CN43WW.fd" file.
- It will show you the files properties. Click Ok.
- Now go to Components -> Logo and you should be presented with the windows as shown below.
- You should click the "Image Information" drop-down and select the JPG(1024*768) option.
- Now in the "Logo Image To Load" section, click "Browse" and select the image file you need to use. (Scroll down for a few splash screen images I made in the correct format or go to the next section to know how to make your own image as using incorrect format will damage your BIOS.)
- Now click on "Patch" and wait (do not click or move anything at all) till it completes. It should say "FD file modify finished" on the bottom left.
- Now select the option File -> Save and wait till it says "FD file save data finished" on the bottom left.
- Now you can close the window. You have finished replacing the splash screen.

Here are a few splash screens I made to replace the TN logo. They will look a bit skewed but will look perfect on boot.
Bios Splash screen collection:

You can download this collection from here.
If you want to know how to make your own splash images, click next.
Or if you like, you can skip to Flashing a modified BIOS.
If you would like to make your own BIOS Splash Images, follow the steps below.
NOTE: The usual standard resolution for BIOS Splash Images is using a 640 x 480 px, 16-bit Bitmap. But for the B460e BIOS we will use a 1024x768 px resolution.
The BIOS splash screen uses a 1024x768 px image with a white 97x99 px overlay on the bottom right. For this reason, your Splash Image will look best with a white(#ffffff) background.
The other notable thing is that the screen resolution of the B460e is 1366x768 px and during boot, the 1024x768 px image is stretched across this resolution. Also, the image will only work if it is a 16 bit (important) Bitmap. So in order for the image to work and also for it to NOT appear stretched, follow the steps below. If you use improper settings, your splash screen will not appear or the laptop might not boot. I used Photoshop for these operations. If you cant afford Photoshop, use GIMP - a free open-source software.
- Open Photoshop and select the File -> New option with the below settings exactly.
- Create whatever artwork you like, taking note that the right bottom corner will get cut off a little so dont put anything much in the right bottom.
- Do not make your artwork too complex and avoid gradients or using too many colors. The flatter the colors the better. This is because the image file size must not be too high. If it becomes too high, there wont be enough space on the EEPROM chip where the BIOS is saved and it might corrupt your BIOS making it unable to boot. So just keep your artwork as minimal as possible.
- Now you must resize your image to 1024x768 px (to avoid stretched look, we work on 1366x768 px and resize to 1024x768 so that even though the output after this step will look stretched, when booting it will look normal.)
- To resize, go to Image -> Image size and in the dialog box, untick "Constrain proportions" checkbox (Important) and in width box enter 1024 and leave the height box at 768.
- Choose the option File -> Save As and select any name for your image file and select the format as "BMP" from the drop-down menu.
- On the next dialog box, choose 16 Bit as color depth and Windows mode as shown below.


Or go to the next page to see how to flash the modified BIOS file to your motherboards EEPROM chip.
Now that we have the modified BIOS file, "44CN43WW.fd" (if you followed all the previous steps correctly), we need to find a utility that will be able to flash the modified BIOS file to the EEPROM chip on the motherboard. It is advisable to not flash your BIOS too many times. 3-4 times is a safe number.
Now since the Lenovo B460e is a locked laptop, we will not be able to find a flash utility for our model so we will use the flash utility of the B450 model and replace the BIOS file with our modified BIOS before flashing.
- Go to the Lenovo Download Center to download the BIOS flash utility. or Here
- Ignore the fact that it says "for Vista 32 bit". It works on all OS above Vista and both on 32 bit and 64 bit systems. Im using a Windows 8 x64 system.
- Right click the file "1DCN26WW.exe" If you have WinRAR installed, you shoud see "Extract to 1DCN26WW" option, select it. (This is the step people usually go wrong at. You must use WinRAR to extract the exe. ) If you dont get the option when you right click, open WinRAR and browse to the exe and then extract it.
- Open the newly created "1DCN26WW" folder.
- Delete the file "1DCN26WW.fd".
- Copy the modified BIOS file "44CN43WW.fd" into this folder.
- Now make sure your laptop is charged more than 30% AND ALSO connected to a charging port via the AC adapter. Otherwise the Flashing utility will NOT start. Also make sure not even one window is open as it will cause problems when the laptop tries to automatically restart.
- Right click "InsydeFlash.exe" and select "Run as Administrator".
- Click OK to flash your BIOS. Do not touch your track-pad, mouse or keyboard until the laptop completes the automatic restart.


Note:If any of them do this wrongly or they put a lower version of bios means they got a problem,like keyboard mismatch, charger indication failure, audio not working due to wrong version of bios Then Enter key works as space bar,End key works as a enter key like that,then again you update a proper bios means problem solved.
Available link for download
Subscribe to:
Posts (Atom)