Showing posts with label start. Show all posts
Showing posts with label start. Show all posts
Thursday, February 16, 2017
STOP c0000135 the program cant start because hs is missing Try reinstalling the program Blue Screen error
STOP c0000135 the program cant start because hs is missing Try reinstalling the program Blue Screen error
This BSOD error occurs due to corrupted registry files and it is caused by some hijackers, viruses, malwares etc. More recently my PC crashes frequently and restarts every time. Then I decide to boot my PC with the function "Disable Automatic Restart on system failure" during start up and it stops at this blue screen of death.

After spending several time in fixing this issue with offline registry editors, again PC crashes with another BSOD error soon after fixing the previous one. It was a fatal system error report and now it was really a bad time for me.

STOP: c000021a {Fatal System Error} - This was the error faced by me. Very soon, (by luck) Ive have found another solution which saves my whole work and no longer the bad time continues. I think this was the entire solution for both the BSOD errors mentioned above.
Solution: (for Vista/7 Users)
[Last Updated on July 8, 2012]
[Last Updated on July 8, 2012]
By luck, if you found to have RegBack folder in C:WindowsSystem32Config then this was perfect fix. Simply copy all those files which is inside this folder and paste it outside the folder and replace all with same name. Hurray, you have won!
- Also check if there was any *.LOG1, *.LOG2 files in config folder and dont forgot to delete these since they are the virus programs which infects the registry files and make us unable to logon by crashing.
- These virus LOG files can be easily identified since it does not have any file type. In actual, all log files have file type as text document. To verify you can see their file properties.
If you are clueless on how to access this folder without encountering this BSOD error, I suggest some methods here.
Method1
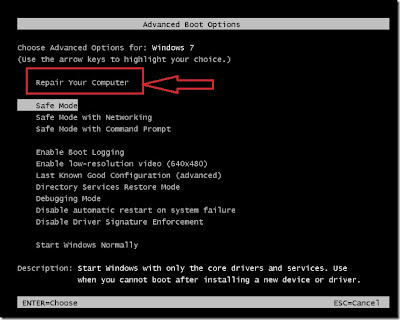
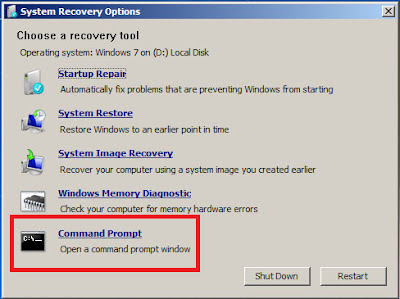
Launching Recovery Console by pressing F8 key before Start-up screen appears to bring up eight functions menu > select Repair your computer option > Select your language for keyboard layout > Type the password for user account > Select command prompt from System Recovery options.
Method2
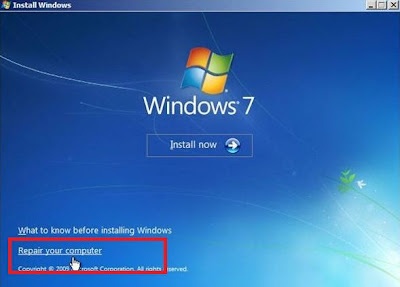
Using windows setup dvd (or) recovery disc. Boot the PC from dvd drive > press any key to boot from cd (if it asks) > select your language > click Repair your computer below the Install button.
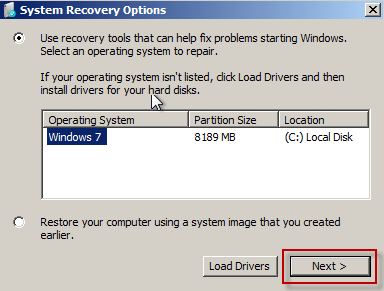
click "Use Recovery tools that can help fix problems starting windows" radio button and select the operating system and click Next > and then select command prompt from System Recovery options.
Method3
If you have installed two OS on same PC, then it is easy to access this folder by logging into the other operating system whether it is XP/Vista/7/RedHat linux/Ubuntu/Fedora.
Method3
Using other third-party bootable dvds like Ophcrack LiveCD, Ubuntu LiveCD, Hirens BootCD.
Method4
Connecting your internal hard disk to another PC or laptop via IDE/SATA to USB adapter. For more to know read my post on How to use internal Hard disk as an external USB device.
Using Command prompt
1. Type cd<space>C:WindowsSystem32Config and hit Enter key.
2. Now type dir and hit Enter key.
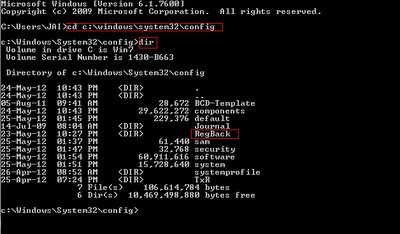
3. Type the following commands as follows and press Enter key after each.
- cd RegBack
- copy *.* c:WindowsSystem32config

4. If it ask for overwrite any existing files (y/n) > type Y and press Enter.
5. If all files were successfully copied message is displayed, type exit to leave the command prompt and restart Windows.
Finally, if you couldnt find RegBack folder; thinking that I was wasting your time.
GO AHEAD! - FORMAT YOUR PC! - INSTALL NEW OS!
But this is not the end for XP users. Read this Microsoft article on How to recover from a corrupted registry that prevents Windows XP from starting.
Overall, the above choice is my best advice rather than editing registry files directly.
Note: If you are still interested in editing those registry files, read my post on STOP: c0000135 error - Solved using Registry Editor.
But this is not the end for XP users. Read this Microsoft article on How to recover from a corrupted registry that prevents Windows XP from starting.
Overall, the above choice is my best advice rather than editing registry files directly.
Note: If you are still interested in editing those registry files, read my post on STOP: c0000135 error - Solved using Registry Editor.
Available link for download

Monday, January 30, 2017
Three Suggestions For Online Business Start ups
Three Suggestions For Online Business Start ups
Millions of people across the world have long said goodbye to a traditional, nine-to-five office job and have decided to pursue their dreams of becoming an entrepreneur. Many people have created successful and lucrative businesses all from the comforts of their own home. Many entrepreneurs today have totally based their businesses online, saving thousands of dollars a year in typical office-related costs and are enjoying the freedom and luxury of working from home. If you are currently in the midst of starting your own home-based, online business here are three suggestions on how to power up your new online start-up.
In the end, it is important to always research the best and most cost-effective tools you can use in order to strengthen your new start up. There are plentiful opportunities to make money online when you put the right resources in place.
Outsource:
In order to truly maximize the success of your business, you should take advantage of outsourcing critical business functions like web design, marketing materials creation, SEO, etc., to a worker overseas. Believe it or not, there are a plethora of online outsourcing websites like guru.com, freelance.com, and odesk.com, that allow online businesses to outsource projects to highly qualified individuals in countries like India, China and South America.Finances and Bookkeeping:
You should learn from the get go not to scrupulously spend money without having in place a thorough and interactive bookkeeping system that will allow you to properly manage your monthly finances. There are a wide variety of online bookkeeping systems available that are completely user-friendly. Services such as Quickbooks and Outright allow small business owners such as yourself to track everything from business expenses, client payments, salaries, etc. Do your due diligence and find the right bookkeeping system that is suitable for your needs.Leverage social media:
More and more people are increasingly using social media platforms such as Facebook, Instagram and Twitter as a source of information. Whether its researching new businesses, getting advice from friends about particular products, or even staying on top of the latest fashion trends; many people are relying on the opinions generated by social media users to drive their buying decisions. Make sure that you cultivate a healthy and sustainable presence on these social media sites. You are missing out on potentially tens of thousands of customers if you do not take social media serious. In fact, major search engines such as Google and Yahoo are incorporate social media into their search algorithms. Likable content on these social media sites means higher SEO rankings.In the end, it is important to always research the best and most cost-effective tools you can use in order to strengthen your new start up. There are plentiful opportunities to make money online when you put the right resources in place.
Author Bio:
This post comes courtesy of Pure Bookkeeping, a revolutionary bookkeeping system that is sure to make things simpler for business owners who work online.Available link for download
Thursday, January 5, 2017
Node Mcu ESP8266 Quick Start
Node Mcu ESP8266 Quick Start
ESP8266 Quick Start
This page is meant to be a quick introduction to the ESP8266 for those who are confused by all of the information available on the various blogs and forums who just want to try out this exciting board in the shortest possible time. This guide is for Windows users who want to use the NodeMCU environment.
Not counting waiting for hardware to ship to you (1-10 days), you should be able to use your ESP8266 for something useful in less than an hour. Ready?
What do I need to buy?
You will need an ESP8266 development board. There are several ESP8266 boards available, usually numbered ESP-01 through ESP-12. Check the pins of the actual board you order with the information from your source as the rapid development of these products has led to confusion and duplication of board identification numbers.
A 3 volt power supply. The ESP8266 runs on anything from 2.8 to 3.5 volts, so a couple of AA batteries will work. Most of us use a 3.3 volt regulated power source. Maximum current draw is 300 mA, so use a supply that can supply 500 mA to be safe. More is better. A weak or poor quality supply will cause the board to reset unexpectedly and make debugging difficult. The NodeMCU Development Board has a USB to 3.3V power supply on the board.
A USB to serial adapter. This should be a 3.3 volt compatible model. It is possible to level convert if you already have a 5 volt adapter. The NodeMCU Development Board has the USB to serial interface on the board. When you receive your adapter, verify that the actual voltage output is 3.3 volts as some cheap adapters have been found to be mislabelled. Any of the following should work: FTDi,CH340, FT232RL.
What do I need to download?
The ESP8266 board you bought may have one of many different firmware versions on it. Many come with AT firmware for serial communications. Some come with no user firmware at all. I recommend the NodeMCU Lua firmware as a starting point because it gives you an interactive programming language which allows you to experiment and build simple working programs without a lot of effort. If you are not familiar with Lua, you will find that it is not hard to learn, at least for the simple tasks needed to get started.
The tool you will use to flash the NodeMCU firmware on your ESP8266 board is thenodemcu-flasher. It is open source on github. Go to the nodemcu-flasher page and choose Win32 or Win64 depending on your computer system. Click on ESP8266Flasher.exe and then right click on View Raw and Save Link As... to download the application to your PC. Or use the direct links below:
ESP8266Flasher.exe for Win32
ESP8266Flasher.exe for Win64
ESP8266Flasher.exe for Win64
What do I have to connect?
The actual connections will depend on the board you have and the USB to serial adapter you are using.

- Power.
- +3.3 volts to Vcc
- ground
- Communications.
- TxD on the board to RxD on the adapter
- RxD on the board to TxD on the adapter
- Ground
- Jumpers.
- Connect Vcc to CH_PD to enable the chip
- Connect GPI0 to GND to enable flash reprogramming
How do I install NodeMCU on my ESP8266?
Plug the USB to serial adapter into your PC. Most adapters are automatically recognized by Windows 7 and 8. Users of XP or older versions of Windows may need a driver which should be supplied by the manufacturer of the USB adapter. The adapter will appear as a new COM port on your system. Check the Device Manager if necessary.
Run ESP8266Flasher.exe

If you only have one COM device, the port will appear automatically. If you have more than one, select the correct one from the drop down menu.
The flasher program comes with default NodeMCU firmware in memory. This is unlikely to be the latest version, but to get started quickly, use the default internal image. Later, you can download the latest firmware, then select the [Config] tab and choose the new .bin file. Select the 0x7C000 default and 0x7E000 blank sections. Uncheck the box for the 0x10000 IROM section.
Click on Flash(E) to start the programming process. If the MAC addresses dont appear within a few seconds, disconnect the power to the board and reconnect it. If it still doesnt work, check your connections. Make sure that the jumper between GND and GPIO0 is there so that the board is in reflash mode.
Reflashing the chip will take a couple of minutes. When the job is done, disconnect power from the board and remove the jumper from GND to GPIO0 to leave reflash mode.
You are now ready to program the ESP8266 for your own application.
How do I communicate with the ESP8266?
The NodeMCU Lua firmware you have just installed communicates with the PC over the serial link. You can use PuTTY, SimpleTerm, or any other terminal program that you like to write Lua programs or enter direct commands to the board. The default speed is 9600 baud, but that can be changed to any other baud rate once you have established communications.
LuaLoader
LuaLoader is a Windows program for uploading files to the ESP8266 and working with the Lua serial interface. As well as being a simple terminal program, it has built in Lua command buttons that make it easy to interact and experiment with the ESP8266 board.
Download: LuaLoader.zip
LuaLoader.exe is a simple Windows application that requires no special installation.

From the Settings menu, select COM Port Settings and choose the appropriate COM port for your USB to serial adapter. Dont change any other setting.
Clicking buttons on LuaLoader sends commands to the board. Power your board and watch for the initial message. After displaying some funny characters (these are firmware reset parameters sent at 74880 baud), you should see the version information of the NodeMCU build:
NodeMCU 0.9.5 build 20150107 powered by Lua 5.1.4
LuaLoader will warn you if a later firmware build is available.
After booting, NodeMCU will attempt to run a file called init.lua in flash memory. Since you havent put it there, it will report an error and show the > prompt. You are now ready to interact with Lua on the ESP8266.
 Click the Heap button to display the amount of RAM available. LuaLoader will type the command = node.heap()and the ESP8266 will respond with 23016 or some other value, followed by the > prompt again.
How do I connect to an Access Point?
 Enter the SSID and password of your closest access point in the appropriate text box on LuaLoader. Click Set AP. LuaLoader will type the commands to set the WiFi mode and connect. This information is saved in flash memory and will be remembered until changed, even if the board is powered down.
Click the  WiFi button to check the connection status.
WiFi button to check the connection status.Click Get IP to confirm that the ESP8266 is connected to your access point.
 Click the Survey button to list the available access points visible to the ESP8266. The SSID, authentication mode, signal strength, MAC address and channel are shown.
Sunday, October 23, 2016
Start Menu X Pro 4 97 Full Version Crack Download
Start Menu X Pro 4 97 Full Version Crack Download
Start Menu X Pro 4.97 ML Crack-Patch-Keygen-Activator Full Version Download
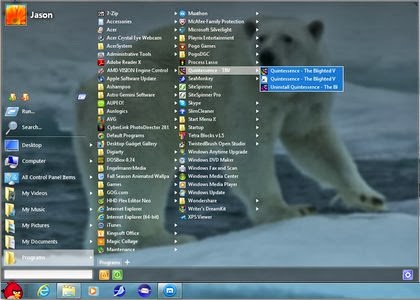
Full Softpedia Present’s Start Menu X Pro 4.97 ,an application that allows users to customize the Windows Start menu. In case of Windows 7, it changes the format to classical mode. When it comes to Windows 8, the app integrates a Start button and is able to hide the Start screen at startup as well.
Full Softpedia SPECS
| Title: | Start Menu X Pro 4.97 |
| Filename: | setup.exe |
| File size: | 15.30 MB |
| Requirements: | Windows 2000 / XP x32/x64/ Vista x32/x64/ Windows7 x32/x64 8 32-bit / 8 64-bit |
| Languages: | Multiple languages |
| Date Added: | Oct 05 , 2013 |
| License: | Commercial Freeware |
Download Latest/final Crack,keygen,patch,serial keys,license keys,activator,reg/dll crack full version download
Full Softpedia FEATURES
- Single-click launch. The PRO version allows you to assign a primary program to any folder and start it simply by clicking this folder.
- Years of experience. Start Menu X is an embodiment of 7-year experience in developing alternative menu solutions.
- Virtual Groups. Group programs by purpose (office applications, graphics, etc) without changing their location on the hard drive.
- Flexible configuration. Customize the menu to your taste! Change the structure and add tabs.
v Click Here To Know How to Download this file
DOWNLOAD LINKS
Tusfiles Download Link
Zippyshare Download Link
Available link for download
Subscribe to:
Posts (Atom)