Showing posts with label error. Show all posts
Showing posts with label error. Show all posts
Monday, February 27, 2017
unarc dll error while installing large application file
unarc dll error while installing large application file
[last Updated on 26th June, 2013]
Error 1:
"unarc.dll error" appears while installing/extracting large or highly compressed file especially for Game.
This error appears because you have only limited free space for installation/extraction even-though the installing application shows enough free space.
To avoid this error, you must have at least free space of 17.5GB in your drive where you want to install and run.
Info:
unarc.dll is used for decompression of files like installers, installer scripts, archives etc. This dynamic link library file is created along with the software/game application in order to decompress the software/game during installation in Windows based PC.
This procedure is similar to decompression of .rar files using winrar but quiet different.
For example: if you try to extract a .rar file of 2GB but the actual size is 4GB and you have only 3GB of space in your drive, then winrar displays a error message stating that "there is no space in drive" (or) Windows will displays a error message stating that "winrar encountered a problem/winrar.exe error".
The above example is very similar to unarc.dll error.
So [winrar.exe for eg] unarc.dll error will not appear if you have enough free space for installation/extraction and if still appears then you have to increase your free space.
Error 2:
Unarc.dll also reflected as "an error occurred while unpacking: archive corrupted/unable to read data (decompression fails)! unarc.dll". Which is quite different from the above error.
This error occurs due to that the software/game setup has some corrupted installers, archives etc so that it cannot be extracted by unarc.dll.
The following codes indicate different issues based on your specs, OS type or even the setup file itself.
Code 1: "INVALID_FUNCTION" and your archive is corrupted
Code 2: "FILE_NOT_FOUND" (i.e) unarc cannot find the file specified
Code 3: "PATH_NOT_FOUND"
Code 5: "ACCESS_DENIED"
Code 6: "INVALID_HANDLE"
Code 7: "STORAGE_BLOCKS_WERE_DESTROYED"
Code 7: "STORAGE_BLOCKS_WERE_DESTROYED"
Code 11: "BAD_FORMAT"
Code 12: "INVALID_ACCESS"
Code 14: "OUT_OF_MEMORY"
To avoid this error, try to install the software/game with a new complete setup file which is genuine.
Note1: Dont install any ultra high compressed game.
Note2: Dont install any pirated game.
Note3: The downloaded iso image files of game from any torrent site may work 100% but not for all types of OS with different versions.
Available link for download
Saturday, February 25, 2017
how to fix blue screen error
how to fix blue screen error
Samsung hard disk blue screen error problem solve for life time.
1) download this ISO file click here & download.
2) write it to USB or CD. how to write USB pen drive download this software click here.
screenshots

3)booting your PC or laptop from USB fast boot.
4)open hdd tools .
 5)open HDD Regenerator
6)enter choice 1 then enter just wait removing bad sectors.
I hope your blue screen error will be solved .
1) download this ISO file click here & download.
2) write it to USB or CD. how to write USB pen drive download this software click here.
screenshots
3)booting your PC or laptop from USB fast boot.
4)open hdd tools .
5)open HDD Regenerator6)enter choice 1 then enter just wait removing bad sectors.
I hope your blue screen error will be solved .
THANK FOR VISIT
Available link for download
Friday, February 24, 2017
My PC wont boot error code 0xc00000e9
My PC wont boot error code 0xc00000e9
My PC wont boot - error code 0xc00000e9:
 |
error code 0xc00000e9 |
My computer randomly (at least seemingly) froze a couple days ago. I had to manually restart my computer with the power button. After I restarted it, my computer would not get past the opening windows screen. It would usually just freeze and after a couple more trys, I was greeted with an error message that says:
Windows has has encountered a problem communicating with a device connected to your computer.
This error can be caused by unplugging a removable storage device such as an external USB drive while the device is in use, or by faulty hardware such as a hard drive or CD-ROM drive that is failing. Make sure any removable storage is properly connected and then restart your computer.
If you continue to receive this error message, contact the hardware manufacturer.
Status: 0xc00000e9
Info: An unexpected I/O error has occurrred.
I then shut down my computer and made sure that everything was connected (HDD, CD Drive, etc.) was connected properly. However, nothing I have tried so far including startup repair has worked. Ive searched around forums for a while now with no results.
Any help or suggestions?
Thanks.
1.UEFI, Tiano, BIOS Courses
Courses on UEFI, Tiano and legacy BIOS firmware and boot sequences.
2.A virus has infected your Bios and changed the drive from a SATA to a PATA or ATA or vice versa.
3.reboot and log into the BIOS and change the hard drive setting
So i went into my BIOS but IIm not sure what Im looking for. The only thing i found related to SATA is Sata ports settings where u have 3 choices (AHCI, RAID, IDE) but ive tried all 3 of those and none of them produce any good results. Anything else I should be looking for?
Available link for download
Tuesday, February 21, 2017
Application failed to initialize properly error code 0xc0000135
Application failed to initialize properly error code 0xc0000135
- If you are receiving this error, you need to install .NET Framework v1.1.
- Click the link below to download it from the Microsoft website which is about 23MB in size http://www.microsoft.com/download/en/details.aspx?displaylang=en&id=26
Available link for download
Thursday, February 16, 2017
STOP c0000135 the program cant start because hs is missing Try reinstalling the program Blue Screen error
STOP c0000135 the program cant start because hs is missing Try reinstalling the program Blue Screen error
This BSOD error occurs due to corrupted registry files and it is caused by some hijackers, viruses, malwares etc. More recently my PC crashes frequently and restarts every time. Then I decide to boot my PC with the function "Disable Automatic Restart on system failure" during start up and it stops at this blue screen of death.

After spending several time in fixing this issue with offline registry editors, again PC crashes with another BSOD error soon after fixing the previous one. It was a fatal system error report and now it was really a bad time for me.

STOP: c000021a {Fatal System Error} - This was the error faced by me. Very soon, (by luck) Ive have found another solution which saves my whole work and no longer the bad time continues. I think this was the entire solution for both the BSOD errors mentioned above.
Solution: (for Vista/7 Users)
[Last Updated on July 8, 2012]
[Last Updated on July 8, 2012]
By luck, if you found to have RegBack folder in C:WindowsSystem32Config then this was perfect fix. Simply copy all those files which is inside this folder and paste it outside the folder and replace all with same name. Hurray, you have won!
- Also check if there was any *.LOG1, *.LOG2 files in config folder and dont forgot to delete these since they are the virus programs which infects the registry files and make us unable to logon by crashing.
- These virus LOG files can be easily identified since it does not have any file type. In actual, all log files have file type as text document. To verify you can see their file properties.
If you are clueless on how to access this folder without encountering this BSOD error, I suggest some methods here.
Method1
Launching Recovery Console by pressing F8 key before Start-up screen appears to bring up eight functions menu > select Repair your computer option > Select your language for keyboard layout > Type the password for user account > Select command prompt from System Recovery options.

Method2
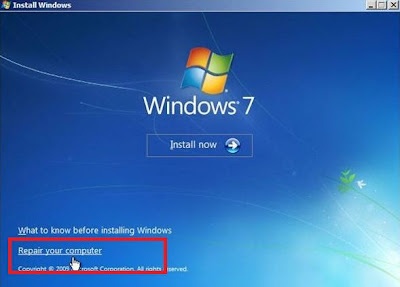
Using windows setup dvd (or) recovery disc. Boot the PC from dvd drive > press any key to boot from cd (if it asks) > select your language > click Repair your computer below the Install button.
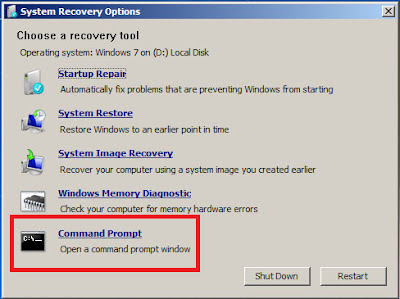
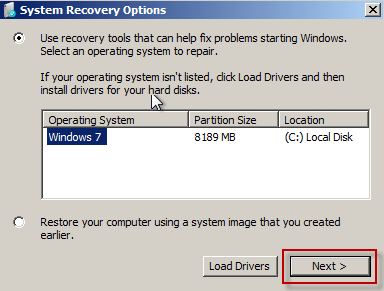
click "Use Recovery tools that can help fix problems starting windows" radio button and select the operating system and click Next > and then select command prompt from System Recovery options.
Method3
If you have installed two OS on same PC, then it is easy to access this folder by logging into the other operating system whether it is XP/Vista/7/RedHat linux/Ubuntu/Fedora.
Method3
Using other third-party bootable dvds like Ophcrack LiveCD, Ubuntu LiveCD, Hirens BootCD.
Method4
Connecting your internal hard disk to another PC or laptop via IDE/SATA to USB adapter. For more to know read my post on How to use internal Hard disk as an external USB device.
Using Command prompt
1. Type cd<space>C:WindowsSystem32Config and hit Enter key.
2. Now type dir and hit Enter key.
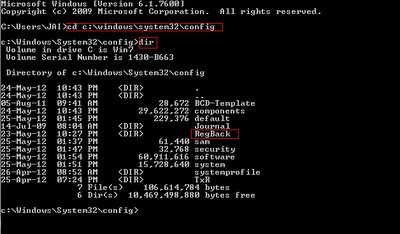
3. Type the following commands as follows and press Enter key after each.
- cd RegBack
- copy *.* c:WindowsSystem32config

4. If it ask for overwrite any existing files (y/n) > type Y and press Enter.
5. If all files were successfully copied message is displayed, type exit to leave the command prompt and restart Windows.
Finally, if you couldnt find RegBack folder; thinking that I was wasting your time.
GO AHEAD! - FORMAT YOUR PC! - INSTALL NEW OS!
But this is not the end for XP users. Read this Microsoft article on How to recover from a corrupted registry that prevents Windows XP from starting.
Overall, the above choice is my best advice rather than editing registry files directly.
Note: If you are still interested in editing those registry files, read my post on STOP: c0000135 error - Solved using Registry Editor.
Available link for download
Tuesday, February 14, 2017
How to fix Windows was unable to complete the format error
How to fix Windows was unable to complete the format error
Symptom
"Hey guys, I bought a brand new 64GB USB flash drive with the purpose of carrying documents and other files between home and company. It was formatted to NTFS to store data, which was proved too slow. Recently it reports errors when it is connected to computer and yesterday it asked me to format it. So I tried to reformat it to FAT32. The problem is that formatting cant be performed successfully and gives error message Windows was unable to complete the format.For the moment, the USB flash drive turns inaccessible and cant be formatted. I really need to be able to format it and make it normal to use, as it holds important documents. Any help will be greatly appreciated!"

This is one of those frequently asked questions on many forums and question sites and this post will give detailed and overall explanation about this issue. USB flash drives or memory cards are useful storage devices in modern society, as they are capable of storing a large amount of data but occupying small physical space. USB flash drive is easy to carry and transfer data, and memory cards, with smaller size, have become essential component in various digital products such as digital camera, cell phone, MP3 player, etc. USB drives are important to users and its necessary to learn skills and solve the problem.
Main causes that Windows cant format USB drive
Now and then, you need to format USB flash drive or SD card but get error messages saying Windows couldnt format the drive. This error may happen as a result of following reasons:

Virus infection
USB drives are very portable and they can be connected to computer easily via USB drive to backup or transfer data. Since they are often carried by users and might be used on various computers, USB drives are more likely to get damaged or infect virus. Every time you plug a USB drive into USB port of computer which is not protected by antivirus software such as public computers, USB drive will infect virus which often acts with a manner that fill USB drive with dangerous files and makes USB drive stop working.Storage devices have bad sectors
Storage devices have bad sectors. As we all know, storage devices consists of sectors which are the smallest unite for data storing. Files stored on hard drive or USB drive usually occupy discontinuous sectors. Bad sector means the sector is damaged and cant be read or written, thus bad sectors can disrupt the formatting operation as well as file recovery. There are quite a few causes of bad sector, like bad quality, excessive defragmentation, unplug USB drive directly while it is working, etc.

Storage device damage
Physical damage is another reason that makes storage device inaccessible. All components of USB drive or local disk cant escape physical damage. Computer wont be able to format the device if it cant use the device, such as chip or circuit board doesnt work. Professional repair center can replace damaged circuit and other damaged part to make it workable again. Whereas, the replacement process costs quite higher than the USB drive itself.Disk is write-protected
Besides, Windows cant format a drive which is write-protected. When USB drive gets well connected to computer, you start to copy some documents to it, then it reports messages "The disk is write protected. Remove the write protection or use another disk." As formatting is a kind of writing operation, so you need to remove the write-protection before formatting it.
How to fix Windows couldnt complete format on USB drive
If you are not capable of formatting your USB drive (USB flash drive, external hard drive, SD card, pen drive, etc.) in usual process then try to format that drive with following methods. Now connect USB drive to computer and follow step-by-step guide given below:
You should note that all these solutions wont be workable if the USB drive gets badly physical damage. Thus there is no guarantee that these methods work on all scenarios. Whats more, make sure that important data and files of the drive to be formatted have been backed up, as files will be erased once the drive is formatted. If USB drive became inaccessible before you had time to backup data, then you need to perform file recovery first prior to formatting. Steps of file recovery from damaged USB drive will be talked in next section of this post.
Solution 1: Format via Disk Management
Disk Management is provided by Windows and it helps to manage partitions and disks for computer. Disk Management is able to create new volume, extend or shrink partition, change drive letter, delete or format partition, etc. Damaged flash drives can be formatted within Disk Management. If USB drive uses unrecognized file system format or becomes unallocated or uninitialized, it will not show in My Computer or Windows Explorer. Thus its not available to format the drive through right-click menu "Format" option.Step 1
Open Disk Management. Right click on My Computer and select item "Manage", and then click Disk Management on the left side. In the center section you can see local hard drive and partitions and the USB drive which can be recognized by capacity.

Step 2
Right click the flash drive and select "Format" option and select file system format to perform quick format. However, this action is not workable in some cases, and you need to try step 3.
Step 3
Right click on the USB drive and select "New Simple Volume" item. Youll get the New Simple Volume Wizard which guides you recreate new partition for the flash drive. Operations are following the onscreen instructions, setting options and click "Next" button. When the process is done, youll find the USB drive has been formatted and is properly recognized by system.
Solution 2: Format with Command Prompt
Disk Management is not almighty and it is not helpful in many cases. Thus we need to switch to command line based formatting solution. It looks like this method is complicated to common users, but it is not. Follow steps below and see whether it can get everything done.Step 1
For Windows 7 users click Start button and type cmd in the search both and press Enter. If UAC is enabled, you need to find Command Prompt from start menu and run it as administrator.
Step 2
Type command diskpart on the black windows and press Enter key. Then you can see partition and disk list of current computer. All drives are listed with numbers and Disk 4 is the flash drive in question.

Step 3
Continue typing disk 4 which is the problem drive and clean and press Enter. The drive will be scanned and its damaged file structure will be erased during scanning. Once the process is done, it reports confirmation message telling that it has successfully cleaned the drive, and new partition need to be created.
Step 4
Type create primary partition and hit Enter; next type in Command prompt format /FS:FAT32J: (you can copy and paste it.) and press Enter. Here J is the drive letter of the USB drive, and you can change it in line with specific cases. The drive will be formatted to FAT file system and the formatting is very fast.
Solution 3: Use PartitionGuru
If the first two methods do not work as expected for you then try to fix the issue with third party tool PartitionGuru. Its effective disk tool and partition manager and file recovery tool, which can check and repair bad sectors for local and USB drive, format partition or HDD, recover formatted and deleted data, etc. As the Windows cant format USB drive issue might be caused by bad sectors, we can check and repair bad sector for flash drive with PartitionGuru ahead of trying formatting.Step 1
Run PartitionGuru and see its main interface listing detailed information of internal and external drives and their partitions.
Step 2
Click the problem USB drive and menu "Disk" to select "Verify or Repair Bad Sectors".

Step 3
It displays cylinder conditions with colored blocks, such as good, severe, damaged, etc. When bad sector checking completes, it reports how many bad sectors it finds out. Then click "Repair" button to repair bad sectors.
Step 4
Select the USB drive and click "Format" button to format the flash drive.
Note:
Repairing bad sectors damages files stored on and near bad sectors, thus if files on the drive are important to you, you need to backup or recover data first.

Free Download PartitionGuru
File recovery from USB drive that cant be formatted
Such kind of problem is very common to those who often works with USB drive, and it might end up with losing all files and folders. However, you are able to recover lost data provided that USB devices are not totally dead. One thing you should keep in mind is that you might not be able to recover data completely if the drive is formatted or repaired. Thus file recovery should be performed first if the problem drive contains valuable files which havent been backed up.Apart from checking and repairing bad sectors, PartitionGuru is able to recover lost files that are deleted, formatted, reformatted or corrupted from local or USB drives. File recovery process is read-only and doesnt do harm to original data and storage. Lets see how to recover files from USB drive.
Step 1
Connect the USB drive to computer and run PartitionGuru. Then you can see your USB flash drive or SD card is listed on the interface.
Step 2
Click on the drive and the button "File Recovery". Select "Complete Recovery" option and check the box "Search for Known File Types" on the Recover Files window, then you can start file scanning. This recovery tool allows users to preview files while file scanning is on-going as screenshot below:

Step 3
Select and save desired files to a secure location. When file recovery completes, you can try methods mentioned to format or repair it.
Conclusion
These are best methods to fix Windows was Unable to Complete the Format issue at present and most of times they work well. You can try these solutions above one after another and find the one works for you. If none of them works, then the USB drive might be damaged permanently and there is no way to fix it.Available link for download
Sunday, February 5, 2017
Bluetooth device was not discoverable or An error occured changes could not be saved and the bluetooth device may not be plugged in
Bluetooth device was not discoverable or An error occured changes could not be saved and the bluetooth device may not be plugged in
Solution:
1] Click Start > Run > type devmgmt.msc and hit enter.
2] Device Manager window will be opened and expand Bluetooth radios.
3] Right click on Wireless Bluetooth Module > Properties > Power Management tab.
4] By default windows turn off the bluetooth and wireless device.
5] Make sure that there is no tick mark in Allow computer to turn off this device to save power as shown in picture below.
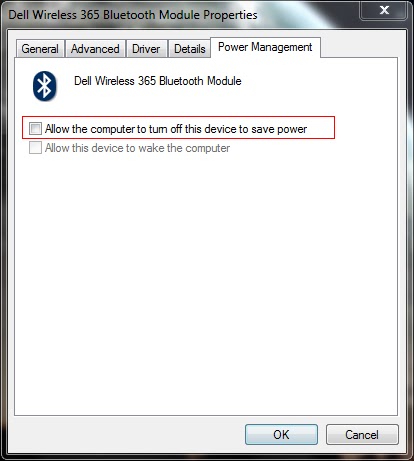
6] Click OK to close the properties box.
1] Click Start > Run > type devmgmt.msc and hit enter.
2] Device Manager window will be opened and expand Bluetooth radios.
3] Right click on Wireless Bluetooth Module > Properties > Power Management tab.
4] By default windows turn off the bluetooth and wireless device.
5] Make sure that there is no tick mark in Allow computer to turn off this device to save power as shown in picture below.
6] Click OK to close the properties box.
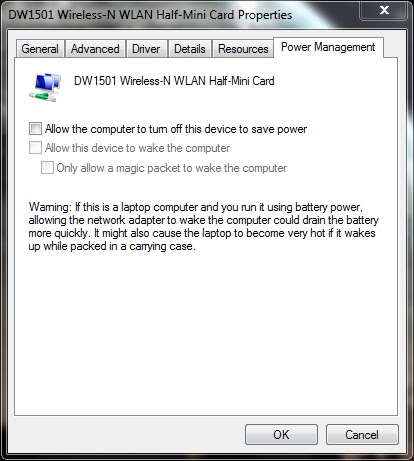
7] Also expand the Network Adapters in the device manager window.
8] Right click on Wireless-N WLAN Half-Mini Card > Properties > Power Management tab
9] Make sure that there is no tick mark in Allow computer to turn off this device to save power.
10] If there is tick mark then the error will be pop-up saying your bluetooth device was not plugged in.
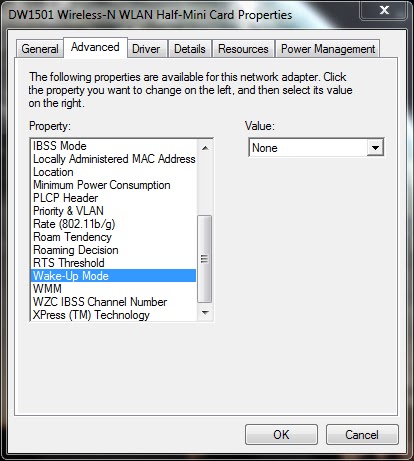
11] Now select Advanced tab > select Wake-up Mode > set Value as Disabled (or) None.
12] Click OK and close the Device Manager window.
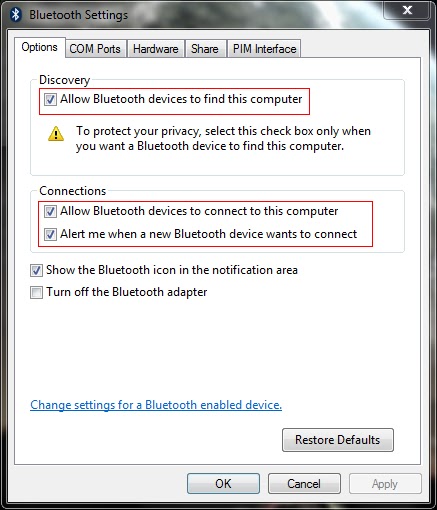
13] Now right click the Bluetooth radio button in the notification area of the taskbar and open settings.
14] Put the tick mark near the following options
- Allow bluetooth devices to find this computer
- Allow bluetooth devices to connect to this computer
- Alert me when a new bluetooth device wants to connect
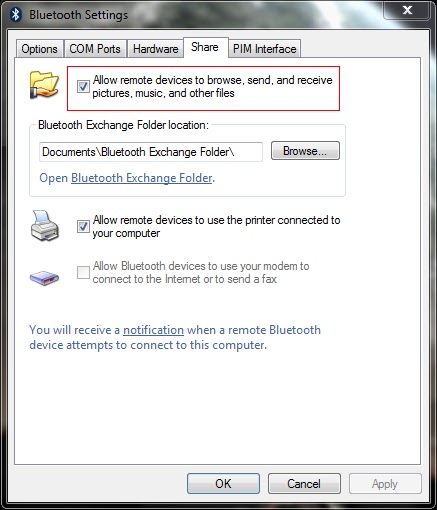
15] Now select the Share tab and put the tick mark near Allow remote devices to browse, send and receive pictures, music and other files.
16] Atlast click Apply and OK.
========================================================================
If the problem still exist then you have to check the bluetooth service.
1] Click Start > Run > type services.msc and hit enter.
2] Services window will be opened.
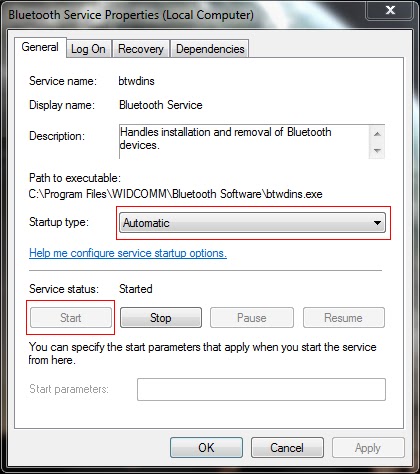
3] Locate the Bluetooth service and right click > properties.
4] Set the Startup type as Automatic and Start the service if it has Stopped.
5] Click Apply and OK.
6] Locate the Bluetooth Support service and right click > properties.
7] Set the Startup type as Automatic and Start the service if it has Stopped.
8] Click Apply and OK.
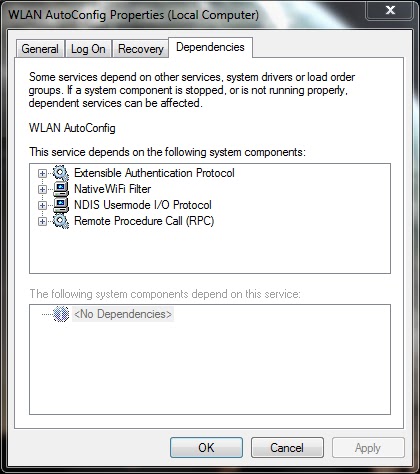
9] Similarly locate the WLAN AutoConfig service and repeat same procedure.
10] If you cant able to start the service, select the Dependencies tab and start all the services related to it by following the above steps.
Note: Also read my new post on "Bluetooth keyboard/mouse disconnects frequently in Windows 7 laptops"
Available link for download
Thursday, February 2, 2017
Error 2000 0146 Self test log contains previous error s Failed to transfer logged messages to the EventLog with status 50
Error 2000 0146 Self test log contains previous error s Failed to transfer logged messages to the EventLog with status 50


Reason:
This hard disk error commonly occurs in most probably the Dell desktops. When I search for the exact reason behind this error I found that it was not due to hard disk but with the device controller which is set default and hidden in BIOS. Most options in BIOS are fixed and cannot be changed due to some restrictions by Dell. Even the S.M.A.R.T capability function is hidden and enabled in BIOS settings. I dont know why they give this much restrictions to BIOS.
Firstly I warn every users that running a PC with fixed BIOS settings such as fixed device controllers for all hard disks, fixed CPU fan speed, fixed core clock frequency, fixed FSB speed may damage any peripheral devices that are connected to motherboard. This was the same happens to the Hard disk. Why Im saying this actually the error contained hard disk works very fine when I connect to Gigabyte motherboard through SATA port with device controller as IDE and with disabled S.M.A.R.T capability function.
Secondly, the S.M.A.R.T function is a self-monitoring tool which logs read/write errors in hard disk. Although this is useful but it decreases the overall performance of the hard disk since every time hard disk sends signal to this tool for logging an event while reading/writing a sector. If this function is enabled, there is a risk of data loss while power goes off. Still if you are more curious about monitoring your hard disk there are numerous real-time monitoring softwares available in net where you can freely download and install it in your OS.
Thirdly, the Operating systems like Vista, 7 are highly unstable in Dell Inspiron desktops because of incompatible device controllers and chipset drivers. Even though Windows Vista and 7 supports AHCI (Advanced Host Controller Interface) mode, it is not necessary for desktop purposes. They are very useful for servers where a continuous read/write access (heavy load) is involved in hard disks. By default it is likely enabled in Inspiron desktops and increases the wear and tear for hard disks.
Finally, Ive formulated a temporary and a permanent solution for saving the hard disk life. The entire solution may differ from hard disk to hard disk and PC to PC.
Solution:
This error clearly indicates partially bad sectors in the Hard Disk. So in order to verify and confirm the presence of bad sectors, chkdsk command line tool comes in handy using recovery console.
To access recovery console in Windows Vista/7:
Restart your PC > press F8 key before start-up > select Repair Your Computer > select your language for keyboard layout and click ok > type password for your account and click ok.

Then open Command Prompt window from Recovery Console.

To access recovery console in Windows XP:
Boot your PC with XP Installation disk > press R key to use recovery console from the installation screen when it prompts.

Now in the Command prompt window, type the command as follows and hit Enter key after each:
Then open Command Prompt window from Recovery Console.
To access recovery console in Windows XP:
Boot your PC with XP Installation disk > press R key to use recovery console from the installation screen when it prompts.
Now in the Command prompt window, type the command as follows and hit Enter key after each:
- CHKDSK C: /R
- Y (if it prompts to dismount the volume first)
- If the above command displays some KB in bad sectors and also displays "Failed to fix the errors/bad sectors on hard disk", then it is confirmed that the hard disk is really at a failing stage. It is necessary to replace the hard disk within the warranty period. If you would like to extend the life of the hard disk then read my post on How to fix bad sectors using Hirens boot CD.
- If the above command does not display any KB in bad sectors but still displays "Failed to transfer logged messages to event log with the status 50" again, then try to change the device/storage controller for the hard disk from ATA to IDE (or) AHCI to IDE (or) IDE to RAID in BIOS settings. Also try to disable S.M.A.R.T capability function and if the BIOS is restricted as in case of Dell Inspiron PCs then reinstalling a new OS by deleting the partition is the alternate solution.
- If Windows Vista/7 does not boot up after reinstalling it, then try to install XP at first in a new volume and then reinstall Windows Vista/7 in a different volume. This was the second alternate solution for the above.
Available link for download
Tuesday, January 10, 2017
Fixing Error Code 0x80073cf9 while Installing New Apps
Fixing Error Code 0x80073cf9 while Installing New Apps
Fixing Error Code 0x80073cf9 while Installing New Apps

Updates are always meant to fix issues that were left at the first place. However, the case titled above has quite a weird background. Amusingly, it never happened to appear before the release of updates. We cannot comment if it was occurred as a backlash or was implanted calculatedly. Anyhow, with a close observation we found this message to prompt the users with an error. “Something happened and this app couldn’t be installed. Please try again. Error code: 0x80073cf9”, with the options to Try again and Cancel install. The error message keeps displaying on trying again, until the install is canceled. As a rational fact, each system encountering this issue was recently mounted Windows 8 updates.
Fix 1:
1. go to c:/Windows
2.create new folder with name: AppReadiness
3. Delete the folder with name: AInstallAgent if this folder exist.
Then the apps are downloaded ok
this worked for me.
More Tricks
- The Fastest Way to Close All Running Programs in Windows
- 100+ Run Commands Lists
- Change Window 7 Password Without Knowing Current Password
- How to Lock a Folder in Windows 7/8/8.1
- The Fastest Way to Close All Running Programs in Windows
- 100+ Run Commands Lists
- Change Window 7 Password Without Knowing Current Password
- How to Lock a Folder in Windows 7/8/8.1
Available link for download
Friday, January 6, 2017
Complete Handset Validation Before this Step 169 SBI Mobile Registration Error
Complete Handset Validation Before this Step 169 SBI Mobile Registration Error
Your mobile must be validated before registering your mobile number with your SBI account. To do this follow the simple steps below.
1. Type the message MBSREG from your mobile and send to 9223440000.
2. You will shortly receive your User ID and Default MPIN.
3. Note down your user id and default mpin.
4. Now type SMPIN<space>UserID<space>Default MPIN<space>New MPIN and send to 9223440000 in order to change your default mpin. For example
- SMPIN<space>pjl123<space>123456<space>654321
- “Your MPIN is changed”
- “Validation from handset successful. Complete registration process at ATM/ branch, if not already done.
Available link for download
Friday, December 23, 2016
d3drm dll error
d3drm dll error
This error occurs during the installation/running of simulation/multimedia softwares which requires this (d3drm.dll) DirectX file especially for x64-bit operating systems.
Similar errors are
To avoid this error download the file d3drm.dll, and copy/paste to c:windowssystem32 folder. Also paste into c:windowssysWOW64 folder if you have x64-bit operating system.
Note: Installing/Updating to the latest version of Microsoft DirectX may (or) may not fix this issue.
Similar errors are
- The file d3drm.dll is missing
- D3drm.dll not found
- D3drm.dll not found, reinstalling might help this fix
To avoid this error download the file d3drm.dll, and copy/paste to c:windowssystem32 folder. Also paste into c:windowssysWOW64 folder if you have x64-bit operating system.
Note: Installing/Updating to the latest version of Microsoft DirectX may (or) may not fix this issue.
Available link for download
Tuesday, December 20, 2016
A disk read error occurred Fix for Windows XP Vista 7 8
A disk read error occurred Fix for Windows XP Vista 7 8
Why A disk read error occurred appears
The “A disk read error occurred error” appears on a black screen without an identifiable error code:
A disk read error occurred
Press Ctrl+Alt+Del to restart
Pressing the Ctrl, Alt and Del keys will only restart the computer and boot into the same error screen:

In most cases the error can appear for any of the following reasons:
- faulty hard drive
- IDE cables failing
- bad RAM memory
- issues with your computer’s BIOS version
Fix with Easy Recovery Essentials
Easy Recovery Essentials can fix many errors such as this automatically using its built-in Automated Repair option. EasyRE is currently available for Windows XP, Vista, 7 and 8 and can be downloaded and created on any PC.
- Download Easy Recovery Essentials. Make sure to note your Windows version (XP, Vista, 7 or 8) before you download EasyRE. This guide can help you identify what version of Windows you have installed.
- Burn the image. Follow these instructions on how to burn the bootable ISO image very carefully, as making a bootable CD can be tricky! Alternatively, these instructions explain how to create a bootable EasyRE recovery USB stick/drive.
- Boot up your PC from the Easy Recovery Essentials CD or USB you created.
- Once EasyRE is running, choose the “Automated Repair” option and click Continue.
 Choose “Automated Repair” in Easy Recovery Essentials
 - After EasyRE scans your computer’s drives, identify and select the drive letter for your Windows installation from the list, and then click on the Automated Repair button to begin.
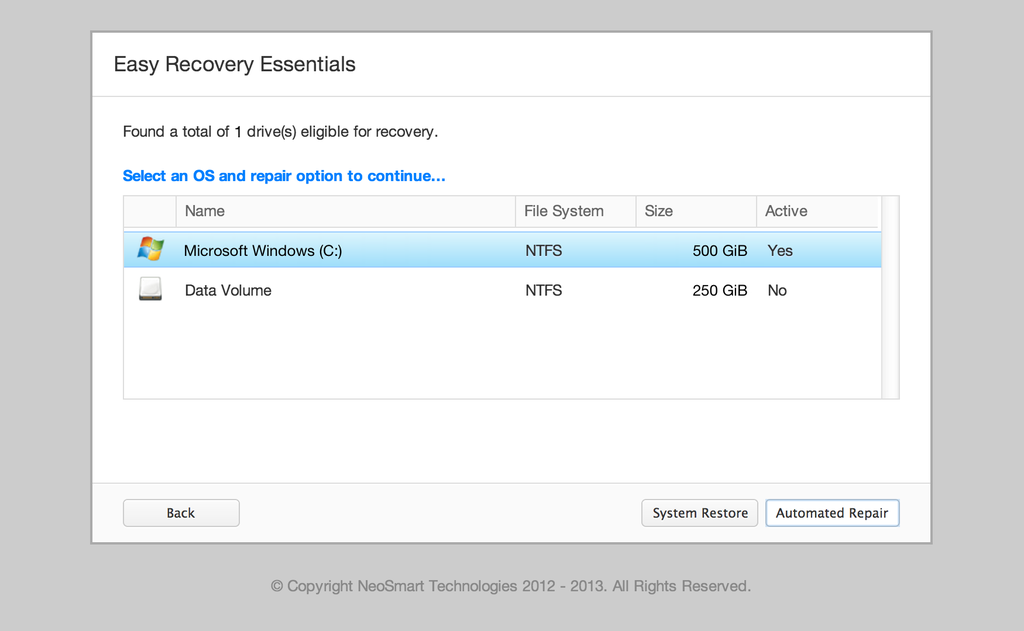 Choose the drive associated with the Windows installation you’re trying to repair.
 - Easy Recovery Essentials will start analyzing the selected drive for problems. EasyRE will test for and attempt to automatically correct errors with the disk, partition, bootsector, filesystem, bootloader, and registry. No intervention is required, as EasyRE’s repair is fully automated:
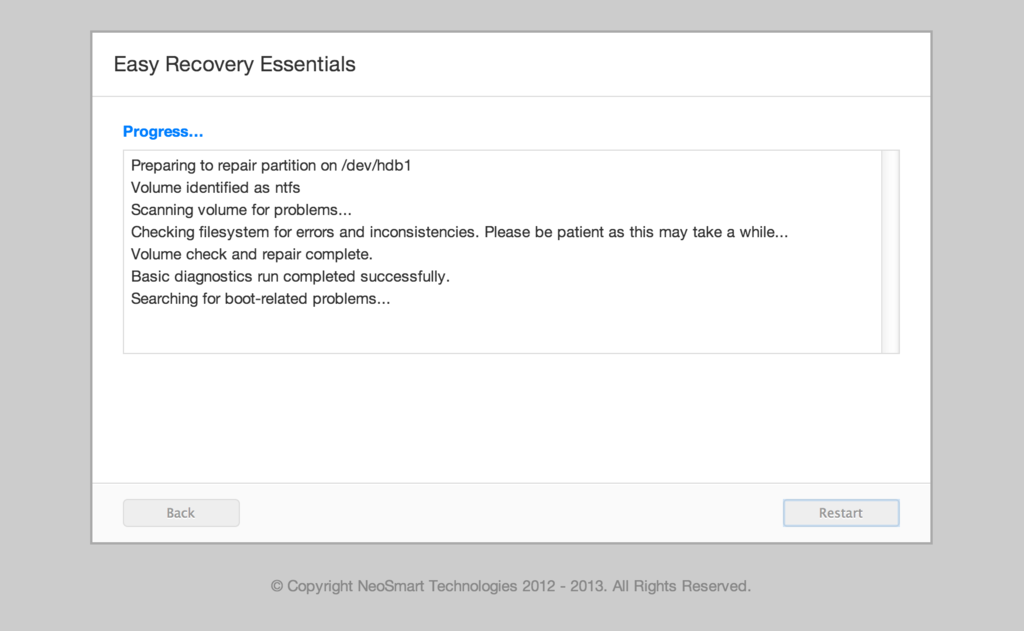 Easy Recovery Essentials searches for errors and makes corrections to the selected Windows installation.
 - Once the process is complete, EasyRE will report its findings. Click on the Restart button to reboot your PC and test the changes.
- The “A disk read error occurred” error should now be fixed as your PC begins to load:
 Windows, booting up successfully.
You can download Easy Recovery Essentials from here.
Other fixes for A disk read error occurred
You can try and fix the “A disk read error occurred” error by following any of these methods. These fixes can be applied to the followings Windows versions:
- Windows XP
- Windows Vista
- Windows 7
- Windows 8 and Windows 8.1
Windows Setup CD/DVD Required!
Some of the solutions below require the use of the Microsoft Windows setup CD or DVD. If your PC did not come with a Windows installation disc or if you no longer have your Windows setup media, you can use Easy Recovery Essentials for Windows instead. EasyRE will automatically find and fix many problems, and can also be used to solve this problem with the directions below.
Some of the solutions below require the use of the Microsoft Windows setup CD or DVD. If your PC did not come with a Windows installation disc or if you no longer have your Windows setup media, you can use Easy Recovery Essentials for Windows instead. EasyRE will automatically find and fix many problems, and can also be used to solve this problem with the directions below.
Fix #1: Check RAM memory
If you recently added new RAM memory to your computer, you can try to:
- Remove the new RAM modules you’ve recently added
- Leave only 1 single RAM module
- Restart the computer
You can also try to move the single RAM module on a different slot to troubleshoot if any of your RAM slots are damaged. To do that, simply follow these steps:
- Leave 1 RAM module on Slot #1
- Restart the computer
If “A disk read error occurred” still appears, move the RAM module on Slot #2 and start the computer again.
Fix #2: Check Hard Disk Cables
If the error is caused by damaged hard disk cables, try any of the following tips to fix the error:
- Try a different port for the SATA/IDE cables
- If you have more than 1 HDD, leave only the HDD with Windows installed and test multiple SATA/IDE ports and cables
The “A disk read error occurred” error can appear if:
- The SATA/IDE cables are damaged
- The SATA/IDE ports of your hard disks are damaged
If the HDD cables and ports are not damaged, the issue can also be from the hard disk itself.
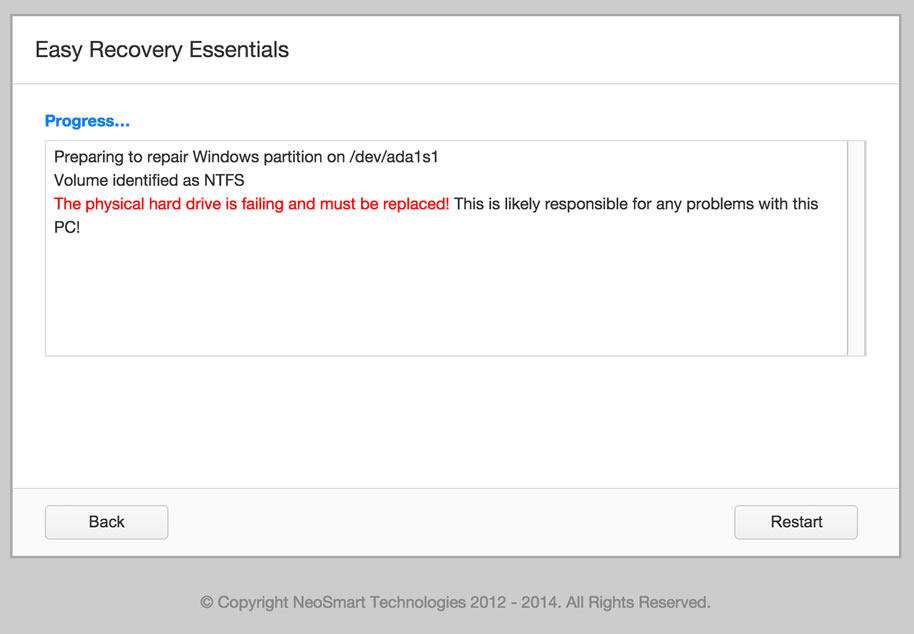
To test if your hard disk is failing or it’s already failed, use Easy Recovery Essentials’ Automated Repair. Automated Repair process will report any issues found with your hard disk or RAM memory:
- Download Easy Recovery Essentials
- Burn the ISO Image. Follow our instructions on how to burn a bootable ISO image. If you’d like to have a recovery USB instead, follow our instructions on how to make a recovery USB.
- Boot into Easy Recovery Essentials
- Select Automated Repair
- Click Continue and wait for the Automated Repair process to finish. Automated Repair process will report any issues found with your hard disk or RAM memory:
To download Easy Recovery Essentials, click here.
Fix #3: Reset or Upgrade BIOS
In some cases, “A disk read error occurred” can be fixed by either reverting your BIOS to its default settings or upgrading BIOS to the latest version available for your computer.
To revert your computer’s BIOS to its default settings or default configuration, follow these steps:
- Restart the computer
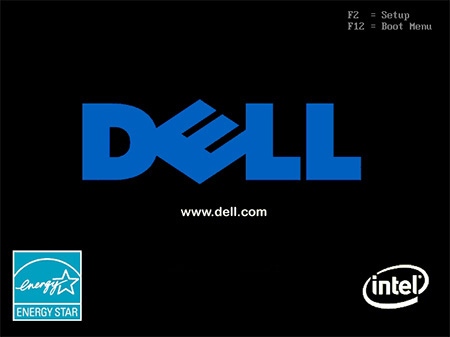
- Press the key to boot into BIOS. This is usually any of the following keys: F2, F8, F12, Esc or Del. The key you need to press will be listed at the first screen when you boot your computer:
- Once booted into BIOS, find a “Load Defaults” options. The option name to revert to default settings can be different, depending on your computer manufacturer and BIOS version:
- Load Fail-Safe Defaults
- Load BIOS Defaults
- Load Default Settings
- Load Setup Default
- Get Default Values
- Select to revert the settings and hit Enter to select the option
- Exit BIOS by saving the changes
If reverting to BIOS defaults doesn’t make “A disk read error occurred” disappear, you can also try to update the BIOS version to the latest available.
Fix #4: Run chkdsk
The chkdsk utility checks for hard drives integrity and can attempt to fix various file system errors.
To run chkdsk on a Windows XP system, follow these steps:
- Insert the Windows XP CD and boot from it
- Available link for download
Subscribe to:
Comments (Atom)