Showing posts with label device. Show all posts
Showing posts with label device. Show all posts
Saturday, March 11, 2017
Benefits Of Rooting Your Android Device
Benefits Of Rooting Your Android Device

For the uninitiated, rooting gives users root permission and access to their devices. Rooting also gives the users the ability to tweak the settings on their phones, flash custom ROMs on the phone for adding additional features, as well as modify the software on the device. However, rooting is not everyone’s cup of tea, but it can be done successfully provided the users follow the rooting instructions for their device carefully.
A thing to note is that with different kinds of Android phones available, the same rooting technique may not work for all. So before rooting, users need to ascertain whether or not a particular rooting method will actually work for their devices. Users should also know that doing so will void the manufacturer’s warranty on your device and there is a small chance that improper rooting can also damage the phone permanently. Nonetheless, there are still plenty of benefits to rooting your phone and it is a risk definitely worth taking.
Flash a custom ROM:
This is one of the best benefits of rooting an Android device. In simple terms, a custom ROM is a modified version of Android that users can install if they are not happy with the Android version that their device comes with. Adding a custom ROM adds more unique and convenient features to the phone that are not usually seen on their devices. Samsung devices are usually the most rooted of all, as users want to use stock Android ROMs that are much more agile than Samsung’s TouchWiz skin.
Flash a custom kernel:
A kernel allows apps on the phone to communicate directly with the hardware of the phone. A custom kernel helps improve the performance of the phone, enhance battery life, speed up battery charging, and also add advanced features such as Wi-Fi tethering on certain phones that do not come with this option.
Tweak under the hood settings: Users can tweak every little feature of their phone including customizing the keyboard layout, enhancing multitasking functionality, increasing the scrolling speed as well as adding interesting themes to the phone. Basically, rooting allows users to reach into the darkest corners of their phones and make the most of the changes that are possible.
Tweak under the hood settings: Users can tweak every little feature of their phone including customizing the keyboard layout, enhancing multitasking functionality, increasing the scrolling speed as well as adding interesting themes to the phone. Basically, rooting allows users to reach into the darkest corners of their phones and make the most of the changes that are possible.
Remove bloatware:
This is one of the best reasons for rooting. Often the phones are preloaded with software and apps that one does not use. These programs not only occupy the onboard memory, but can also drain the battery. Before uninstalling any apps, users should confirm that those apps are not vital to efficient functioning of their phones.
Backup:
Having a backup of crucial data and settings is highly recommended. Should a user want to migrate to a new Android handset or wishes to restore the deleted data to the current handset for any reason, then a backup must be readily available. This is also helpful even if the user is not rooting his/her device.
Apart from these benefits, rooting also helps to block annoying ads that appear in apps, boost the speed and battery life of the phone, automate everything as well as unlock certain hidden features in the device and install certain apps that are otherwise considered as incompatible.
Apart from these benefits, rooting also helps to block annoying ads that appear in apps, boost the speed and battery life of the phone, automate everything as well as unlock certain hidden features in the device and install certain apps that are otherwise considered as incompatible.
Author Bio:
Rohit Reddy is the editor of GadgetResearch. He is a gadget and technology enthusiast and loves blogging about them. In his free time he likes to follow the latest tech news and share it with his friends.Available link for download
Sunday, February 5, 2017
Bluetooth device was not discoverable or An error occured changes could not be saved and the bluetooth device may not be plugged in
Bluetooth device was not discoverable or An error occured changes could not be saved and the bluetooth device may not be plugged in
Solution:
1] Click Start > Run > type devmgmt.msc and hit enter.
2] Device Manager window will be opened and expand Bluetooth radios.
3] Right click on Wireless Bluetooth Module > Properties > Power Management tab.
4] By default windows turn off the bluetooth and wireless device.
5] Make sure that there is no tick mark in Allow computer to turn off this device to save power as shown in picture below.
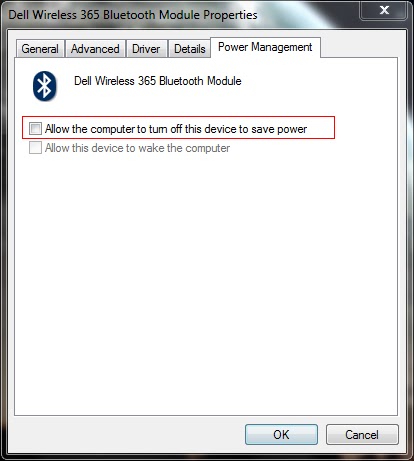
6] Click OK to close the properties box.
1] Click Start > Run > type devmgmt.msc and hit enter.
2] Device Manager window will be opened and expand Bluetooth radios.
3] Right click on Wireless Bluetooth Module > Properties > Power Management tab.
4] By default windows turn off the bluetooth and wireless device.
5] Make sure that there is no tick mark in Allow computer to turn off this device to save power as shown in picture below.
6] Click OK to close the properties box.
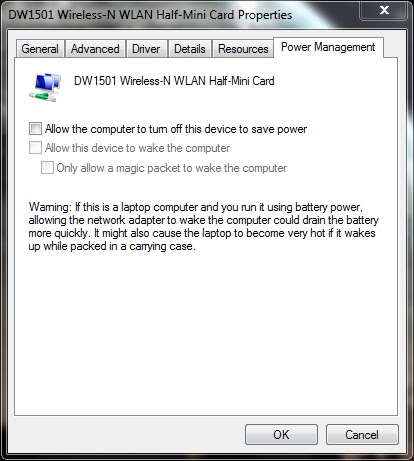
7] Also expand the Network Adapters in the device manager window.
8] Right click on Wireless-N WLAN Half-Mini Card > Properties > Power Management tab
9] Make sure that there is no tick mark in Allow computer to turn off this device to save power.
10] If there is tick mark then the error will be pop-up saying your bluetooth device was not plugged in.
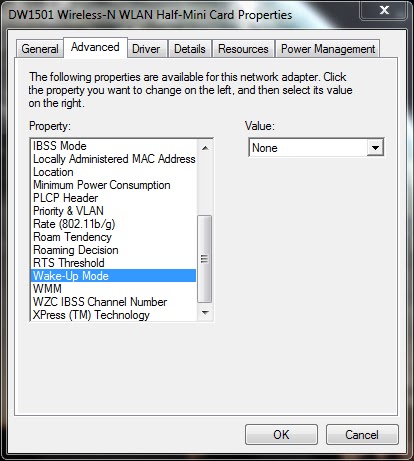
11] Now select Advanced tab > select Wake-up Mode > set Value as Disabled (or) None.
12] Click OK and close the Device Manager window.
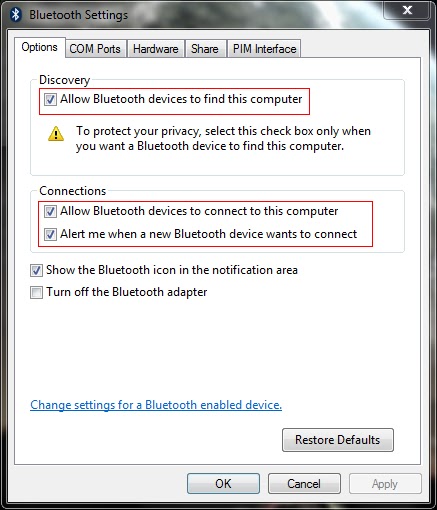
13] Now right click the Bluetooth radio button in the notification area of the taskbar and open settings.
14] Put the tick mark near the following options
- Allow bluetooth devices to find this computer
- Allow bluetooth devices to connect to this computer
- Alert me when a new bluetooth device wants to connect
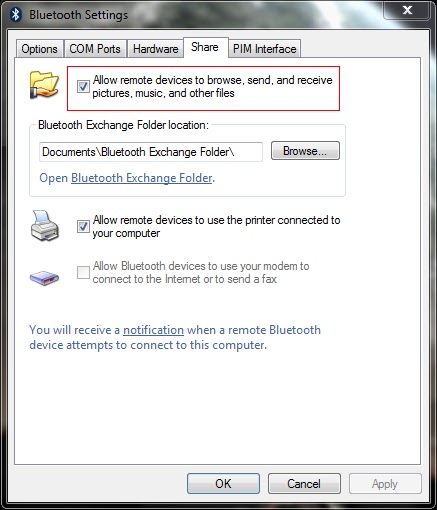
15] Now select the Share tab and put the tick mark near Allow remote devices to browse, send and receive pictures, music and other files.
16] Atlast click Apply and OK.
========================================================================
If the problem still exist then you have to check the bluetooth service.
1] Click Start > Run > type services.msc and hit enter.
2] Services window will be opened.
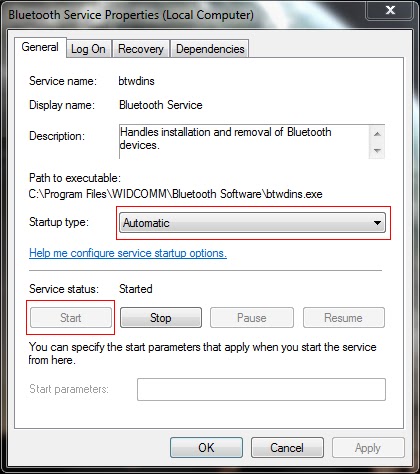
3] Locate the Bluetooth service and right click > properties.
4] Set the Startup type as Automatic and Start the service if it has Stopped.
5] Click Apply and OK.
6] Locate the Bluetooth Support service and right click > properties.
7] Set the Startup type as Automatic and Start the service if it has Stopped.
8] Click Apply and OK.
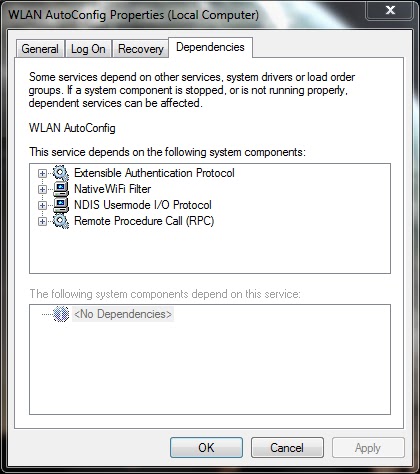
9] Similarly locate the WLAN AutoConfig service and repeat same procedure.
10] If you cant able to start the service, select the Dependencies tab and start all the services related to it by following the above steps.
Note: Also read my new post on "Bluetooth keyboard/mouse disconnects frequently in Windows 7 laptops"
Available link for download
Sunday, January 22, 2017
How to Find Stolen or Lost Android Mobile Using Android Device Manager
How to Find Stolen or Lost Android Mobile Using Android Device Manager
I am Sure this is Awesome post for Android lovers and will enjoy.Yes! This is something big.Now you can find your lost,Misplaced and stolen Android device easily without any third party apps.In our previous post we explained how to Trace your lost android mobile with some apps but Here in this post you dont need any app to find your device where it is. This is can done by simply using Android device manager.


Android Manger is one which it will get installed directly on your device when you use Google play for the first time.So you dont need to download any third party apps.
Nobody knows that they will lost their device if they know that they will keep them safe for sure so maximum of people dont install any tracking app to trace their lost device.For this people android device manger can work like miracle.
Some Advantages:
- You can find your misplaced mobile or tab.
- You can erase data in your device from any where
- Helps you to trace your lost device.
- Lock your device from anywhere.
How to use Android device manger to find lost device:
- First thing you need to do is using your device navigate to security in settings and then to device administrator.
- Now tap on it and activate if it is off.
Note: I suggest you to do this step right now because device administrator must be activate to take advantage of Android device manger.
- Now go to Google Play Store.
- You can find Gear icon at right side top. Just like in below screen capture.
- Now Click on Gear icon then you can find three options My Order,Settings and then last Android device manager.Just click on Android device manager.
- As soon as you click on android device manager it will find the device with which it is associated.
- As soon as Android device manger find your device it will show you on Google maps. It will also indicate how far is your distance from you.
You can find 3 Options:
- Ring: If you click on Ring then your device mobile or tab will ring though it is in silent mode.This feature fails when device is switched off.
- Lock: If you click on Lock then it will lock your device and you can get new password to access your device.
- Erase: If you click on Erase then total memory in that device will be erased automatically.Make sure once you click erase then all the data will be deleted including android device manager so it wont work again.
Available link for download
Monday, December 26, 2016
No driver found for you external USB device
No driver found for you external USB device
During the initial installation of a USB device (most often external drives, although not always), windows vista does not locate or install drivers for the device.
Windows vista might report that there is "no driver found for your device" or will not display the pre-installed Vista OEM driver, you will still get "no driver found .." error. This is most likely caused by a corrupted INFCACHE.1 file. This file stores the location of drivers and their INF files. This file is hidden, has restricted access, and can be found in "c:windowsinf".
By deleting the INFCACHE.1 file and it will force the windows to rebuild that file while next time windows searches for drivers. To delete this file, you have to set the security permissions of it to allow Full Control for the User Group Administrators or Full Control for your user account. Please follow the directions below:
1. Open My Computer and in the address bar, type C:windowsinf and press Enter.
2. Find and then right click on the file named INFCACHE.1.
3. Select Properties > Select Security tab > Click on Edit > Click on Add to add User Groups.
4. Type Administrators in the user groups field and click on OK.
5. Set Administrators to Full Control and click on OK.
6. Move or Delete the file INFCACHE.1.
7. Reinstall the device to force the windows to rebuild the INFCACHE.1 file.
Note: Do not reinstall the same external USB device that you were having issues detecting before. Connect another USB device other than the one that Vista had an issue detecting.
This detection issue can happen several times in a row, but repeat the steps 1-7 and try again until this works.
Available link for download
Sunday, December 4, 2016
My HP Laptop Boot device not found Hard disk 3F0
My HP Laptop Boot device not found Hard disk 3F0
 How to fix hp laptop Boot device not found Hard disk (3F0) Fix
maybe this mg from hp laptop
How to fix hard disk 3f0 problem
boot device not found
go to bios setting >press F10 and it came up something... find legacy options and
change legacy options if enable change it disable.
if disable change it enable.
and press f10 for saving setting.
auto system restart and you see problem solve all ready.
my hp laptop Boot device not found Hard disk (3F0)
my hp compaq Boot device not found Hard disk (3F0)
thank you .
Available link for download
Saturday, November 12, 2016
Bluetooth device driver was not successfully installed or No driver found for your bluetooth peripheral device
Bluetooth device driver was not successfully installed or No driver found for your bluetooth peripheral device
You may receive this error while you installing the driver for bluetooth in your laptop (or) connecting a bluetooth device to your laptop.

Solution:
NOTE : Also read my new post on Bluetooth device was not discoverable
Solution:
- While installing the bluetooth driver, please make sure that you must have a bluetooth enabled device like mobile phone, headset, mouse etc near your laptop as discoverable so that the laptop recognize the nearby bluetooth device and complete the installation of the bluetooth peripheral device driver in your laptop.
- While connecting a bluetooth device, please make sure that the bluetooth adapter is ON. If either your laptop discovers your mobile device (or) the mobile device discovers your laptop then the solution is easy. You can try sending some files from your laptop or mobile device which discovers first and vice versa so that the bluetooth peripheral device driver installs completly.
NOTE : Also read my new post on Bluetooth device was not discoverable
Available link for download
UVC device driver for Linux
UVC device driver for Linux
UVC(USB Video Class) is a device driver for video streaming on Universal Serial Bus. The goal of this project is to provide all necessary software components to fully support UVC compliant devices in Linux. UVC specification covers webcams, digital camcorders, analog video converters, analog and digital television tuners and still-image cameras that support video streaming for both video input and output. UVC projects is currently focusing on kernel support for UVC devices. The driver implements the Video4Linux 2 (V4L2) API. This include a V4L2 kernel device driver and patches for user-space tools. Please click here to read the article and supported devices.
Available link for download
Subscribe to:
Comments (Atom)