Showing posts with label how. Show all posts
Showing posts with label how. Show all posts
Wednesday, March 29, 2017
How To Speed Up Windows 8
How To Speed Up Windows 8

1. Remove programs from startup
When programs are installed, a shortcut is created in the startup. This enables services from the program to be launched once a computer is booted. With time, the computer has many services set to be running on startup. This consumes the primary memory of the computer and exhausts the processor as unused programs are also in operation. The following steps are used to remove unwanted programs from the startup and ensure the computer achieves required speeds in booting and its operations.- Open the task manager.
- Click on Startup tab. A list of the programs running at startup is displayed.
- Right click on a program and select disable. On the status column, it should now show disabled.
2. Manage computer space
Unwanted files accumulate over time and take up disk space in computers. Once the primary partition holding the operating system is congested, the computers speeds go down tremendously. Removing unwanted files from the recycle bin, caches and cookies formed by browsers and other temporary files can all be done an application incorporated in windows through following the following steps;- Open disk cleanup.
- Select drive to work on then select ok.
- Select file types to be deleted then ok.
- A message appears. Select delete files.
3. Hard disk defragmentation
Data saved in computers is stored in forms of files. These files are kept as data blocks in the computer’s hard disk. The continuous addition and deletion of files leaves huge gaps in between the data blocks created. The computer then gets hard time accessing data in the hard disk. Files that should be concurrent for easy access but are separate are said to be fragmented. To keep data in an organized format, the hard disks need to be regularly defragmented. The following steps are taken in implementing this.- Open Computer. The hard disks present are displayed.
- Right click on any drive and select properties.
- Click on Tools tab.
- Select Optimize. A list of all active drives is shown.
- Select required drive and click on optimize.
4. Computer graphics
Computers with low RAM require their graphics to be allocated minimum space so that other important features can be worked on. The following steps are used in effecting this.- Click on start and type performance information and tools. It will appear under settings.
- Click it and select adjust visual effects.
- You can then select what you require by clicking on the checkboxes. For critical situations, adjusting for best performance is recommended.
5. Uninstall unused programs
There are many programs that users install by visiting internet sites and making downloads. These programs are installed and consume space in the computer. Computer users are advised to keep only the programs they use and remove unused programs. In order to uninstall a program, a user has to;- Click on control panel.
- Ensure the view is set to category view and click on uninstall a program.
- Go through installed programs and click uninstall on those unused programs to remove them completely.
6. Cleaning up of the computer
Computers are easily affected by unwanted programs that include Viruses, Worms and Trojans. Getting the right antivirus solution is the best solution. Windows 8 however comes preinstalled with windows defender which can be updated regularly to prevent from attacks from malware programs.With the above solutions, a computers performance is bound to be at its best. Upgrading of computer components such as the RAM, processor and hard disk can also be considered.
Author Bio:
The Author is a professional writer with grown interests in computer interaction to help novices make the best of their computers. He writes for Essay Jedi.Available link for download
Monday, March 27, 2017
How Google Drive Works
How Google Drive Works

Google drive is a place where you can share your files and folders with yourself or public . It lets you to store your cool stuff online , and access that content from any part of the world. Now say bye to uploading email attachments and share all files at once with your friends by uploading it to Google drive. Generally , Google Drive offers up to 5 GB storage capacity and beyond that storage capacity they charge you a genuine price.
So simply share whatever you want , if you dont have a Google drive for your PC simply get it by Signing In to your Google account & visiting this link
https://drive.google.com
Google drive provides a powerful cloud storage online & has various advantages
- Free Cloud Storage Upto 5GB .
- Share files with your friends with a single click .
- Create spreadsheets, documents & share with people that you want.
- More Secure - Just hide your cool stuff from the unwanted people.
- Share the files right from your desktop.
Operating System Supported:
There are many operating system that works as a charm with google drive.
Windows : Windows 95/98/XP/NT/2000/7/8
Linux : Ubuntu , Fedora , Debian etc.
Macintosh : Mountain Loin , Snow Leopard etc.
How It Works ?
Now before starting , lets have a brief introduction to Google drive . Lets see the full exploration of Google drive.
Now before starting , lets have a brief introduction to Google drive . Lets see the full exploration of Google drive.
Simply , Google drive works on the concept of cloud computing which follows pay as you go procedure but it offers free storage up to 5 GB.
Now when you upload specific file on the Google drive right from your desktop with internet connection , it tries to maintain a synchronization with the drive by examining "Is any new files and folders are available on your google drive ".Once sync is maintained , the file will get uploaded to your account. Now Its depends upon you what you want.
a.) File or folder with yourself only.
b.) File or folder with friends.
c.) File or folder with everyone (Public).
If you are accessing google drive without internet connection , then that very particular file or folder get uploaded to your drive but visible on your desktop only , whenever a necessary internet connection is made available then your stuff ( Files or folders ) got uploaded to your online google drive account.
Google drive always keep in touch with your computer by ensuring that files and folders available on the drive is up to date.
If you have any further suggestions or queries , leave a comment below !
Available link for download
Saturday, March 25, 2017
How to install qbittorrent in Kali Linux
How to install qbittorrent in Kali Linux
About qbittorrent: qbittorrent is a torrent client, an alternative to utorrent. Its a GUI based cross platform free software based on Qt toolkit.
We know that Kali Linuxs base package is constructed in Debian, so we need to add http://http.packages.debian.org to sources.list file. To do this,
1. open any text editor and edit sources.list file, located in /etc/apt directory, with an entry deb http://http.packages.debian.org import deb packages.


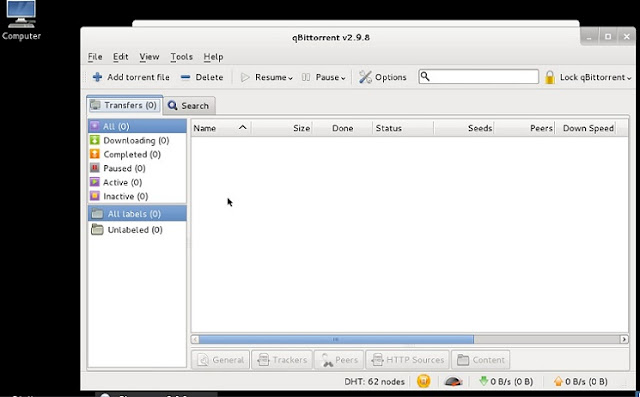
3. Once qbittorrent is installed, type qbittorrent on the root terminal window and press enter
We know that Kali Linuxs base package is constructed in Debian, so we need to add http://http.packages.debian.org to sources.list file. To do this,
1. open any text editor and edit sources.list file, located in /etc/apt directory, with an entry deb http://http.packages.debian.org import deb packages.
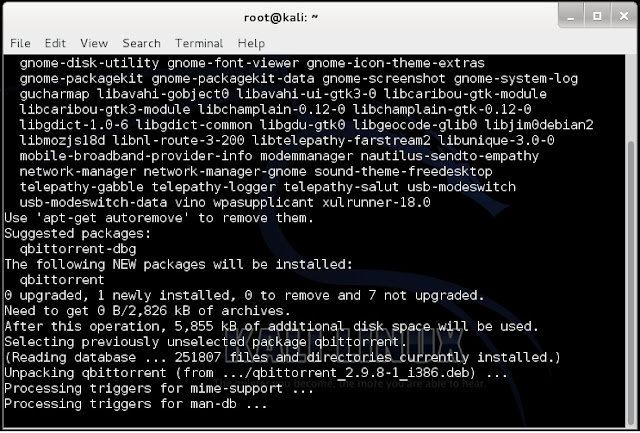
2. type apt-get install qbittorrent on the root terminal window and press enter
and, you are set to go.
Available link for download
Thursday, March 23, 2017
How to Use Miracast Screen Mirroring from Windows or Android To Television
How to Use Miracast Screen Mirroring from Windows or Android To Television

Miracast is a wireless display standard included in Windows 8.1 & Windows 10, Android 4.2, and newer versions of these operating systems.if older versions Miracast is not available but you can also download from Google playstore Screen mirroring App, With a Miracast receiver plugged into a TV or another display nearby, casting your screen should be easy.This feature is also available on devices running Amazon’s Fire OS and Microsoft’s Windows Phone 8.1 and newer. Bear in mind that Miracast is notoriously finicky and problematic.
Windows 8.1+
If your computer came with Windows 8.1 or Windows RT 8.1,Windows 10, it should support Miracast. If you’ve upgraded an old PC to Windows 8.1, it may or may not support Miracast.
You may have to get the latest drivers from Windows Update or your computer Manufacturer’s website before you’ll see the “Add a wireless display” option below.
The below option also refused to show up until we uninstalled VirtualBox on our Surface Pro 2. Miracast depends on having a “clean” networking stack, so programs that interfere with the networking stack VirtualBox, VMware, and
similar applications may need to be uninstalled
before this option will appear.
To access the Miracast options, swipe in from the right or press Windows Key + C and select the Devices charm. Click or tap the “Project” option.

To access the Miracast options, swipe in from the right or press Windows Key + C and select the Devices charm. Click or tap the “Project” option.
If you see an “Add a wireless display" option,your computer supports Miracast. To actually project to a Miracast device, tap or click the Add a wireless display option and select the device in the list. To disconnect from the wireless display, open the Devices charm, tap or click the Project option, and click the Disconnect button under the wireless display.
You may have to get the latest drivers from Windows Update or your computer Manufacturer’s website before you’ll see the “Add a wireless display” option below.
The below option also refused to show up until we uninstalled VirtualBox on our Surface Pro 2. Miracast depends on having a “clean” networking stack, so programs that interfere with the networking stack VirtualBox, VMware, and
similar applications may need to be uninstalled
before this option will appear.
To access the Miracast options, swipe in from the right or press Windows Key + C and select the Devices charm. Click or tap the “Project” option.
To access the Miracast options, swipe in from the right or press Windows Key + C and select the Devices charm. Click or tap the “Project” option.
If you see an “Add a wireless display" option,your computer supports Miracast. To actually project to a Miracast device, tap or click the Add a wireless display option and select the device in the list. To disconnect from the wireless display, open the Devices charm, tap or click the Project option, and click the Disconnect button under the wireless display.

These options are also available in PC Setting. Click or tap the Change PC settings link at the bottom of the Settings charm to access it. Navigate to PC and devices > Devices. To scan for nearby Miracast receivers, tap Add a device. Miracast receivers you’ve added appear under Projectors on this screen.

Android 4.2+
Miracast is available on Android devices with 4.2 Jelly Bean and newer versions of Android. Android devices do need the appropriate hardware, so your Android phone or tablet may not support Miracast especially if it’s an old device that’s been updated to the latest versions of Android.We performed this process with a Nexus4 running Android 4.4.4.First, open your device’s settings screen that’s the Settings app in your app drawer. Under the Device section, tap Display. Scroll down on the Display screen and tap Cast Screen. (You can alsocast to
Chromecast devices from here, although those
don’t use the Miracast protocol.)

Tap the Menu button at the top of your screen and select Enable wireless display. Your phone will scan for nearby Miracast devices and display them in a list under Cast Screen. If your Miracast receiver is powered on and nearby, it should appear in the list.

Tap the device to connect and begin casting your screen.A notification will appear, providing a visible indication that you’re casting your screen.Pull down the notification shade at the top of your screen and tap the Disconnect button to stop casting your screen

You can also cast from the Quick Settings screen if you’ve enabled the wireless display feature under Cast Screen. Pull down with two fingers from the top of your screen to open Quick Settings, tap the Cast Screen button, and you’ll see a list of nearby devices you can cast to. Tap one to start casting.

If your computer, smartphone, or tablet supports Miracast and you have a Miracast receiver nearby, it should be this easy. Miracast uses Wi-Fi Direct, so the devices don’t even have to be on the same network to communicate with each other.Issues with your home network or router shouldn’t even be a factor. This should simplify things, but Miracast-enabled devices often refuse to work together or have issues with playback glitches and dropped streams even after they connect.
Available link for download
How to Lock a Folder in Windows 7 8 8 1
How to Lock a Folder in Windows 7 8 8 1
How to Lock a Folder in Windows 7/8/8.1
Being a Blogger I have a lot of stuff in my laptop that I don’t want to share with any one else, rather I don’t even want that they should even see that stuff. So what I do is simply put up a lock on my folder and keep a secret key to open up the folder. Well don’t think that the trick is only for bloggers  , the trick can be easily implemented by any person who wants to hide his private stuff.
, the trick can be easily implemented by any person who wants to hide his private stuff.
You all might be thinking that, its not possible to put up a password for a particular folder so how did I manage to do it?
Well in this post I will be sharing a really cool trick, which will enable you to set up a password for a particular folder easily, you wont even have to use CMD for this trick.
Follow These Steps to Lock a Folder:-
1. Firstly right click, go to new and make a new Notepad.
2. Once you have made a new notepad, open it up and copy the below given code in the notepad as it is.
clsEnd
@ECHO OFF
title Folder Locker
if EXIST “Control Panel.{21EC2020-3AEA-1069-A2DD-08002B30309D}” goto UNLOCKif NOT EXIST Locker goto MDLOCKER
CONFIRM
echo Are you sure u want to Lock the folder(Y/N)
set/p “cho=>”
if %cho%==Y goto LOCKif %cho%==y goto LOCKif %cho%==n goto END
if %cho%==N goto END
echo Invalid choice.
goto CONFIRM
LOCK
ren Locker “Control Panel.{21EC2020-3AEA-1069-A2DD-08002B30309D}”
attrib +h +s “Control Panel.{21EC2020-3AEA-1069-A2DD-08002B30309D}”
echo Folder lockedgoto End
UNLOCK
echo EnterAvailable link for download
Wednesday, March 22, 2017
How to Download file Via Adf ly page
How to Download file Via Adf ly page
How To Download File Redirected To Adf.ly Page
 |
Adf.ly is a Service which Pays you If you use their Page directing Service..!!
You Can Sign up And Start Earning Online HERE
You Can Sign up And Start Earning Online HERE
Hey Guys, Today ill Share HOW TO DOWNLOAD FILE ,REDIRECTED TO adf.ly PAGE..!!
FOLLOW THE STEPS GIVEN BELOW:
- Whenever You Will Click On Any Downloading Link On iSoftware Store,A window will open like the image shown below..!!

- This window is a Redirecting page towards Downloading Link So PLEASE do not Close This Window.
- This Page will redirect you to Downloading page. So wait For 5-6 Secs.
- Please Do Not Press back/Home button During Waiting Time..!!
- You Can See the Waiting Time At the upper-Right Corner Of the Window..!!
- After 5 Sec, Button Saying "SKIP AD" Will Appears At the Upper-Right Corner OF the Window .

- Click On this Button And you will be redirected To the Downloading Page Straight away..!!

ADF.ly is Completly Safe And Secured..!!
You Can Sign up And Start Earning Online HERE
If you have any problem with this Article then feel free to ask in comment box below..!!
Available link for download
Sunday, March 12, 2017
How to Resolve Connectivity Issues in Windows 8
How to Resolve Connectivity Issues in Windows 8

There are three primary issues that could be causing your problems; your internet service provider, your connection hardware (hub, modem, router, Ethernet cable etc.) or your computer itself. Identifying where the problem is located is the first step, so try a little self-diagnosis first. This is particularly import with Windows 8, as many have experienced problems with the connectivity on this operating system and sometimes it is just a case of the software having a hiccup.
Step One
Start by clicking the wireless icon one desktop mode, this will bring up the side panel with all of your available internet connections. But the computer into airplane mode and leave for a few minutes, then turn off airplane mode and try connecting again. You may find that it takes a few minutes to establish the connection this time, but it might suddenly work.This can be a problem with your ISP as much as your computer and is worth mentioning to them. Some Virgin Media packages for example have connectivity issues dealing with Windows 8 and recent operating Apple operating systems (such as iOS7).
Step Two
If it still isnt working try connecting to your internet through an Ethernet cable rather than using wireless internet. If you are able to connect and use the internet when hardwired there may be a problem with your modem or with the wireless adaptor within your computer. Most internet service providers will be happy enough to come out and replace your wireless modem, after testing with a replacement you should know whether it is the fault of the modem or the computer. If it is your computer you may need to have the wireless adaptor replaced.Step Three
Try connecting to a different internet connection. Ask a neighbour if you can try connecting to their internet briefly to test your connection. If your problem connecting is on a laptop you can try connecting it at a friend’s house. This should give you a very clear indication as to whether your device is at fault or your internet connection. If your computer does connect to another wireless connection without a problem then it is most certainly your internet (which was mostly likely to be the case if Ethernet didnt work).Resolution for Internet Fault
It is possible that the connection between your internet modem and phone socket is the problem, perhaps a new filter is needed or there is damage. However this is unlikely to happen suddenly for no apparent reason. The only way you can be sure of resolving the problem is to call your internet service provider for technical support. Either there is a fault with their service, which they can sometimes resolve remotely (perhaps your internet service was accidentally cancelled or otherwise altered in a way that caused a problem) or they will send a technician out to identify the cause of this problem.Resolution for Computer / Laptop Problem
If the problem was with your wireless adaptor then you should be sure to have it replaced. However, if you were unable to connect to the internet using Ethernet both at home and at another location where the internet connection is known to be working then the fault could be something more serious with your device. Start by ensuring it is not in airplane mode, then run an anti-virus scan. Some viruses can have terrible impacts on your computer, including the disabling of your internet access; however this is nothing an up to date anti-virus cant deal with.If you cant find a software problem and running the trouble shooting window hasnt helped you identify a problem then it is possible that you have just been incredibly unlucky and managed to damage your Ethernet port and wireless adaptor at the same time (did you perhaps drop the device onto concrete recently? Either way it is best to take it to the manufacturer and explain the problem – they should be able to help.
Note for laptop users – Some laptops have a switch on the side or bottom somewhere that will turn off the internet access. Look for this and or check the manual to identify whether or not your laptop has one and check it is turned on before taking it back to the manufacturer to report it as faulty.
Other issues
Fortunately, although Windows 8 can be a little prone to a few connectivity issues, it is very easy to use and the problems are fairly simple to resolve. Though these fixes will probably only work if you were not experiencing connectivity issues prior to needing resolutions for them. In other words; if youre having connectivity issues from the off there is a good chance you actually just set your internet connection up incorrectly, check your usernames and passwords are all correct and go through the manual while setting everything up. They all come with step by step instructions so it shouldnt be too difficult to find what you did wrong and fix it.If your wireless internet is running slowly and/or dropping out frequently you may be too far from your wireless modem. Try moving the device and modem closer together or purchasing a wireless extender.
Image Credit: rajcreationzs
Author Bio:
Kate Critchlow is a writer passionate about technology, both new and old loving and writing about everything from web development to dial-up. Available link for download
Saturday, March 11, 2017
How to block a website from all your web browser
How to block a website from all your web browser
- Open command prompt by typing "cmd" without quotes in Run dialogue box (OR) Click start > All programs >Accessories > command prompt.
- Now type exactly the command below (or) copy-paste the command without quotes and hit Enter:
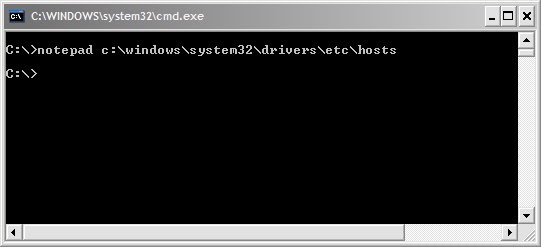
- A text file will be opened in notepad with name hosts.
- Locate the line " 127.0.0.1 Localhost " in the text file.
- To block a website for example http://www.websitename.com, type the following text below the above line without quotes:
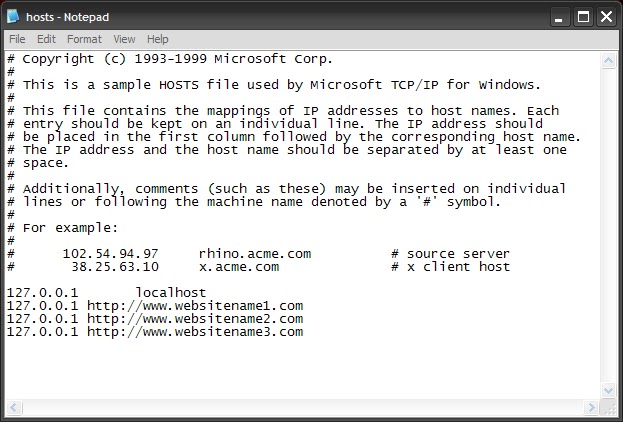
- You can add as many sites as u can, however u will need to prefix it with "127.0.0.1".
- Now save the file and close the command prompt.
- Now the above website will be blocked in all browsers in your computer.
- If u wish to unblock any sites just delete these newly typed lines and save the file.
Available link for download
Thursday, March 9, 2017
How to Bypass Windows XP Password to Download Things
How to Bypass Windows XP Password to Download Things
 To safeguard the computer, when you are trying to run some program it will ask for admin permission. How to solve that problem in Windows XP? Get the admin password or bypass windows XP password? Let’s see this question firstly:
“Tom:” I could not download anything on my sister’s Windows XP computer. When I need to download it ask for admin password and I want to know how I can bypass it to be able to download things again”
This is because you are not an administrator. Get the administrator password from your sister. If it failed, you still can resort to Windows password reset tool to bypass Windows XP password. These programs are designed to automatically recover or reset lost user credentials. This is how they work:
1. Download, Install and run a password recovery tool with an accessible PC which you can run as admin.
2. Burn a windows password reset disk.
You need to first place an empty CD /DVD or USB towards the working computer after which pick the password recovery mode: Totally reset windows local password or Totally reset windows domain administrator password. Next, choose “CD/DVD” or “USB” option. Ultimately, click “Burn” button to begin burning. Once the burning finishes, you simply remove the CD/DVD or USB.
3. Bypass unknown windows XP admin password.
Place the burned CD/DVD or USB towards the target/locked computer, and hang it boot from Compact disc/DVD or USB in BIOS. You can totally bypass password XP easily based on the simple wizard around the interface.
That is the simplest way to help you bypass Windows XP password. Since these applications are from various develop teams, their interfaces and usability differ from each other. Among them, Windows Password Recovery Tool from http://goo.gl/o9bjv is a highly-appraised one.
Check more introductions and videos for this tool and learn how to bypass your Windows XP admin password on its official site.
Video guide: http://www.youtube.com/watch?v=YCFjfSOqtsk
More detail guide on Windows password recovery on Squidoo.
Source: How to Bypass Windows XP Password?
Available link for download
Sunday, March 5, 2017
Thursday, March 2, 2017
How to Hack Facebook Gmail account using Backtrack
How to Hack Facebook Gmail account using Backtrack
Hacking Facebook ,Gmail account using Backtrack and SET

Hello, friends i am back with a latest post on hacking facebook,gmail accounts using backtrack and social engineering kit.Things you needed are following:---> 1. Backtrack 5 R2
2. Internet connection
3. A brain Now follow all my steps like i am showing in this post:----->

Available link for download
Wednesday, March 1, 2017
Monday, February 27, 2017
How to remove restore Recycle bin My Computer icon from the desktop
How to remove restore Recycle bin My Computer icon from the desktop
For Windows Vista / 7 Users:
For Windows XP Users:
Note: There are different methods in XP / Vista / 7 using registry editor but it is risky if you handle it wrong and I suggest the above method for safe.
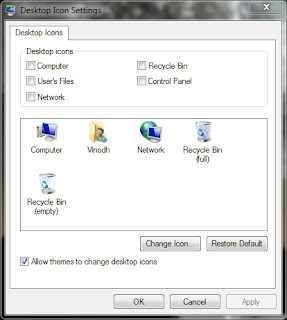
- Click Start > Control Panel > Appearance and Personalization > Personalization > Change desktop icons.
- Click to unselect the Recycle bin (or) My Computer check box to remove from the desktop. (OR) Click to select the Recycle bin (or) My Computer check box to restore.
- Click Apply and OK.
For Windows XP Users:
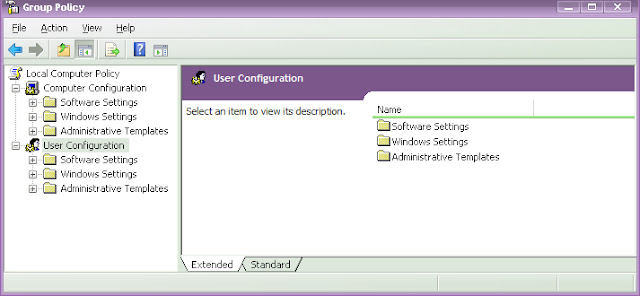
- Click Start > Run > type gpedit.msc and hit Enter.
- Now the Group Policy Editor window will be opened.
- In the left pane, click User Configuration > Administrative Templates > double click Desktop.
- Now in the right pane, double click Remove Recycle bin icon from desktop (or) Remove My Computer icon on the desktop.
- Click Setting tab > click Enable to hide (or) click Not Configured to restore > click OK.
Note: There are different methods in XP / Vista / 7 using registry editor but it is risky if you handle it wrong and I suggest the above method for safe.
Available link for download
Saturday, February 25, 2017
how to fix blue screen error
how to fix blue screen error
Samsung hard disk blue screen error problem solve for life time.
1) download this ISO file click here & download.
2) write it to USB or CD. how to write USB pen drive download this software click here.
screenshots

3)booting your PC or laptop from USB fast boot.
4)open hdd tools .
 5)open HDD Regenerator
6)enter choice 1 then enter just wait removing bad sectors.
I hope your blue screen error will be solved .
1) download this ISO file click here & download.
2) write it to USB or CD. how to write USB pen drive download this software click here.
screenshots
3)booting your PC or laptop from USB fast boot.
4)open hdd tools .
5)open HDD Regenerator6)enter choice 1 then enter just wait removing bad sectors.
I hope your blue screen error will be solved .
THANK FOR VISIT
Available link for download
Friday, February 24, 2017
How to enable multiple remote desktop user logins in Windows 7
How to enable multiple remote desktop user logins in Windows 7

Windows remote desktop connection application can be used in order to connect to another PC on the same network or the internet. Both computers should use Windows and have the “Remote desktop connection” application available. For example, you can use all of your work computer’s programs, files, and network resources from your home computer, and it’s just like you’re sitting in front of your computer at work. You can also use it to access an application that is only installed on a single computer, by multiple users at the same time.
Windows 7 do not allow the concurrent use of a single computer by multiple users. This means that a user needs to be signed out before a second user logs in. This is not the case for the server editions of Windows. Luckily there is a patch that allows you to override this setting and connect multiple users at the same time on a single computer. The will even be able to use the same applications at the same time.
CAUTION: The following steps are probably going against the windows EULA agreement and could cause harm to your computer. I have already tested both of the patched below on windows 7 professional edition installations and could not find any issues.
Patch 1 (Does not work on Win 7 SP1)
The first patch just enables multi-user support for the Windows remote desktop connection tool:
- You need to download the following zip file: Win7RDP.zip.
- Unzip the contents in a folder (let’s say you have used the following path: “C:Win7RDP”).
- Execute the file install.cmd by double clicking on it.
- You should see a screen similar to the one below, if everything works fine.
- After the end of the patching process the remote desktop connection of your pc provides multi-user support.

Patch 2
The following patch application lets you choose whether or not to enable multiuser support for the remote desktop connection process or/and to disable the no blank password policy that is enforced on users that need to connect remotely. Follow the steps below to access the application.
- Download the file Concurrent_RDP_Patcher_2-22-2011.zip
- Open the compressed file and execute the file “Concurrent RDP Patcher.exe”
- You should see the following screen
- Check the desired options and then click the patch button.

Available link for download
Subscribe to:
Posts (Atom)