Showing posts with label drive. Show all posts

Monday, March 27, 2017

How Google Drive Works


How Google Drive Works


How Google Drive Works - ITTWIST


Google drive is a place where you can share your files and folders with yourself or public . It lets you to store your cool stuff online , and access that content from any part of the world. Now say bye to uploading email attachments and share all files at once with your friends by uploading it to Google drive. Generally , Google Drive offers up to 5 GB storage capacity and beyond that storage capacity they charge you a genuine price.

So simply share whatever you want , if you dont have a Google drive for your PC simply get it by Signing In to your Google account & visiting this link

 https://drive.google.com

Google drive provides a powerful cloud storage online & has various advantages
  • Free Cloud Storage Upto 5GB .
  • Share files with your friends with a single click .
  • Create spreadsheets, documents & share with people that you want.
  • More Secure - Just hide your cool stuff from the unwanted people.
  • Share the files right from your desktop. 
Besides having a certain advantages let me tell you that on which basis Google drive works.

Operating System Supported:

There are many operating system that works as a charm with google drive.
Windows    : Windows 95/98/XP/NT/2000/7/8
Linux          : Ubuntu , Fedora , Debian etc.
Macintosh  : Mountain Loin , Snow Leopard etc.


How It Works ?


Now before starting , lets have a brief introduction to Google drive . Lets see the full exploration of Google drive. 


Simply , Google drive works on the concept of cloud computing which follows pay as you go procedure but it offers free storage up to 5 GB.

Now when you upload specific file on the Google drive right from your desktop with internet connection , it tries to maintain a synchronization with the drive by examining "Is any new files and folders are available on your google drive ".Once sync is maintained , the file will get uploaded to your account. Now Its depends upon you what you want.

a.) File or folder with yourself only.
b.) File or folder with friends.
c.) File or folder with everyone (Public).

If you are accessing google drive without internet connection , then that very particular file or folder get uploaded to your drive but visible on your desktop only , whenever a necessary internet connection is made available then your stuff ( Files or folders ) got uploaded to your online google drive account.

Google drive always keep in touch with your computer by ensuring that files and folders available on the drive is up to date.


If you have any further suggestions or queries , leave a comment below !


Available link for download


Read more »

Friday, March 3, 2017

1 abc net Hard Drive Washer 7 00 Full Version Free Download


1 abc net Hard Drive Washer 7 00 Full Version Free Download


1-abc.net Hard Drive Washer 7.00 Full Version Free Download

Delete unnecessary files from your computer! 
Windows and nearly all other software that is installed on it produce temporary data.
Read more »

Available link for download


Read more »

Thursday, February 23, 2017

Drive Not Opening issue Virus Remover Softwares


Drive Not Opening issue Virus Remover Softwares


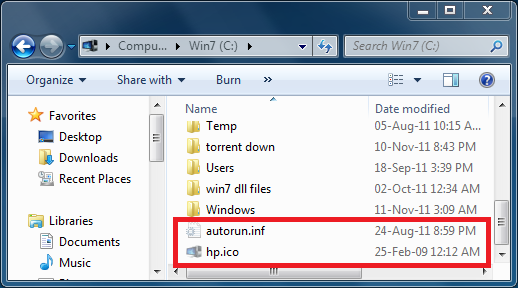
       With the popularity of USB removable media, more and more viruses started to appear that could take advantage of the ease at which these devices can be transferred from machine to machine using plug and play. It was quite easy to rewrite the Autorun.inf file to launch the malware on insertion of the drive because in general it is not write protected. It’s not just on removable drives that the autorun file can be created on though, it can be burned to a CD/DVD and also created on local hard drives including the system drives.

     An autorun.inf file at the root of your local drives can be problematic because when you open My Computer and try to access a drive, it could run a virus to infect your computer. Quite often antivirus software doesn’t touch autorun.inf because it’s only an instruction file that tells Windows what to automatically run when you access the drive from My Computer, not the malicious file itself. So even after the virus has been cleaned, you might find that you’re unable to access your C drive because autorun is pointing to the removed virus. A search window could appear, a script/file might try to to run or when double clicking your drive, it gives you an option to choose a program to open instead.

1. Disk Heal

Disk Heal is a useful tool that restores the condition of your storage device after being infected by a virus. Although it’s not in development any more, Disk Heal is a useful tool that performs many functions, most of which are quite useful. While there are loads of tweaks you can apply to different areas of your system such as Control Panel, Internet Explorer, Appearance and Security, the Fix section is what makes the program more valuable to the user.


After installing and running Disk Heal, click on the Fix tab. In addition to being able to sort out the drive problem, it can also fix Folder options, Task Manager and Regedit being inaccessible after a virus infection. The option to fix the drive is at the top, and you simply enter the letter of the drive which has the problem into the small box and press the Fix button. If any other drives have a similar issue, repeat the process. Disk Heal doesn’t actually delete the Autorun.inf file itself but blanks its contents rendering the autorun function ineffective. A reboot or logoff will be required to complete the process.

There’s also another useful cleanup function at the bottom to restore hidden files and folders that have been hidden by a virus and they can’t be seen. Disk Heal is a standalone executable so can be copied from the Program Files folder to make it portable.

Download Disk Heal

2. FixDrive

If Disk Heal has functions you have no interest in and simply want to sort the problem of your drive not opening in My Computer, then FixDrive is what you want. The program is small (60KB) and portable so requires no installation. It is described by the developer as a tool to fix the issue of Network drives not opening when you double click on them, but the same principle applies to other drives such as C.


FixDrive couldn’t be much easier to use, extract from the zip file and then run it, select the drive you want to repair from the selection box and click Fix. If there is an Autorun.inf present on the drive in question, it will be deleted completely. After a logoff or reboot, you should be able to open the drive on double click again.

Download FixDrive

3. Flash Disinfector

This tool is developed by sUBs who also created the ComboFix malware removal program. It’s slightly different to the other tools above because it also has a limited ability to remove some autorun viruses while they are still attached to the inf file. In addition to USB flash drives, Flash Disinfector can remove the autorun file leftover from viruses on local system drives that are causing the folder to not open in My Computer.

It’s very easy to use, just run Flash_Disinfector.exe and it will tell you to plug in your flash drive that is infected by malware. If you want to repair a fixed drive, just press the button to start. The screen will then go blank for a few seconds, then you’ll see a popup window saying “Done!!”. Once completed, all autorun files will be gone from your drives and replaced with a protected folder called Autorun.inf, this is quite normal and a preventative measure to stop future autorun virus issues.


If you actually don’t want the autorun folder on your drive, it can’t be deleted normally and use of the command prompt to remove is a quick way to do it. Open up a Command Prompt window (type cmd in the run box) and enter the following:


Attrib -R -S -H /S /D C:Autorun.inf

RD /S C:Autorun.inf

Press Y to confirm delete and the folder along with the dummy file will be removed. Obviously substitute C: for any drive letter you wish. The two commands above can also be used to delete the original autorun.inf manually if you have any problems with the listed tools for any reason.

Download Flash Disinfector
If Your Problem is not Autorun Related

Even though this problem is mostly related to the leftover Autorun.inf file, there is another way your drives in My Computer can be stopped from opening. A few incorrect settings in the Windows registry can also open other windows such as search or programs on double click similar to the Autorun issue. Windows Vista, 7 and 8 can all be affected as well as XP because similar registry keys are present in all versions of Windows.

This has a simple solution which research seems to suggest fixes the problem the majority of times with a single command typed into the Run dialog. Open Run (win key+R) and type:


regsvr32 /i shell32.dll

Re Registering the shell32.dll file resets a number of Windows shell functions that can possibly become corrupted causing various issues, including opening drives in My Computer.

Available link for download


Read more »

Thursday, February 16, 2017

How to Safeguard Your USB Drive 10 Easy Steps!


How to Safeguard Your USB Drive 10 Easy Steps!


How to Safeguard Your USB Drive - 10 Easy Steps!
USB drives are a fantastic way to share information from computer-to-computer. While many people use email to send documents, USB drives can take just about anything that your computer has and move it to another system with minimal effort. Plus, USB drives can be used to share information without actually putting it in someone’s possession. Doing so can keep sensitive data from falling into the wrong hands. If you have a USB drive, though, there are still extra measures you should take to secure its contents. Continue reading for 10 easy steps that you can take to safeguard your USB drive.

Proper Password Management Protects Your USB Drive

First, let’s make sure that if anyone gets a hold of your USB drive, they won’t be able to use it.


  • Insert your USB drive into your computer.
  • Find the USB drive in your computer’s “Devices with Removable Storage” section or similar area.
  • Right click on it and choose, “Turn on Bitlocker.”
  • Once you choose this, Wizard will open up, and you’ll see the option to “use a password to unlock the drive.”
  • Type in the password that you would like to use for your USB drive and click next.
  • You’ll be asked how you’d like to “back up Recovery Keys.” Simply choose from the menu.
  • Next, you’ll be asked to confirm whether or not your USB drive is already being used or if it’s brand new.

Encrypt Your USB Drive

Now you’ll want to encrypt the information that is found on your USB drive. This is a further measure that will make sure that your drive is protected from prying eyes, no matter how badly they want your information. After the above 7 steps, Wizard will ask you how much of your drive you’d like to encrypt.

  • You’ll be given the option to encrypt the entire drive, which is best for those that are already in use, or just the used disc space, which is preferable for a new drive. The former option will take longer.
  • After you make your choice, the encryption process will start.
  • When the encryption process is complete, you can remove your USB drive, confident that its contents are now safe.
Going forward, whenever anyone wants to use the USB drive, they’ll be prompted to enter your password first. You can follow the same steps to change the password, as well, if you should so choose.

Keep in mind it’s also important to store your USB drive in a safe place at all times. Even if someone doesn’t have your password, possessing your USB drive can still be damaging, as you no longer have access to the data, either. If the USB drive contains information related to your company, check with human resources or your management. There are often official guidelines specific to securing USB drives that carry company data.

While USB drives are extremely convenient, they can easily expose you to information leaks if not controlled properly. Maintain your USB drive in a secure place at all times, and use the above 10 steps to encrypt the information and protect it with a password.

Source:
http://geekofreak.com/2013/03/encrypt-and-password-protect-your-usb.html


Available link for download


Read more »

Make Flash USB drive Bootable for Windows XP Vista 7 8 or Linux


Make Flash USB drive Bootable for Windows XP Vista 7 8 or Linux


Making your USB Drive Bootable for Windows XP, 7 and 8 and Linux and/or based Systems.. (Links Updated)

Dear Readers, Today i will tell you about Bootable USB Stick and how to create a Bootable USB Drive, you dont need to search the internet over and over again to find the right tool for creating a bootable usb device for your needs...
Bootable USB Drive is just like a normal usb drive but it lets you boot  your PC directly from USB Stick eliminating the need of a CD/DVD drive... thatll allow you to perform actions such as Installing an Operating System and / or Running Bootable Iso Files such as Antivirus Rescue Disks or Other Softwares that Run in offline mode and needed to be burned on CD/DVDs in the form of .ISO file to become operatable... There are many tools available

  1. Windows 7 USB/DVD Download Tool (For Windows 7 and 8): This tool is provided by Microsoft itself. There is no need to find or search the internet for any other software/tool thatll make your USB bootable. This could be used for Making Bootable Windows 7 and Windows 8 Platform USB device... It wont work for Windows XP as it lacks the Install.wim file...
    NOTE: DotNET Framework 2 or higher (.Net FX) is required for this tool to work/Works best with Dot Net Framework 3.5... You can easily obtain Dot Net Framework 3.5 for Windows 7 on Microsofts official Downloads Page while you need to follow this guide to install dotnetfx3.5 for Windows 8 --> "How to Install Dot Net Framework 3.5 on Windows 8 All Editions"
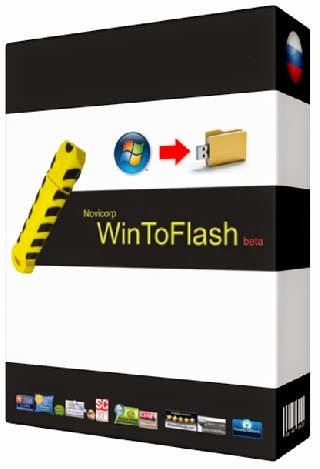
  2. Novicorp WinToFlash: Novicorp WinToFlash has always been my first choice to create bootable usb drives when it comes to Windows XP. It is very simple to use, you only need to enter the path, where you had extracted your Windows .ISO file (or mount the .ISO file and then browse to path). It is very handy tool for Windows XP, Vista, 7 and now it also supports Windows 8...
  3. UNetbootin: When it comes to install rescue disks on bootable usb pen drives, UNetbootin has always been my first choice because not only UNetbootin allows you to create bootable Linux based .ISO image files  but it also allows you to create bootable USB Pen drives for Linux Operating Systems and its variants such as Ubuntu etc. as well... and also allows you to download .ISO Image files and Create Bootable USB device directly from within..
So, whenever you need to make a bootable USB drive, no matter which family it belongs to, all you need is above listed three free tools... Nothing else.. Enjoy and Click on Name of tool to Download requisite tool...

Tags: bootable usb ; create bootable usb disk ; bootable rescue disk ; install iso image on usb ; install windows xp/vista/7/8 from bootable usb pen drive ; install ubuntu / linux from usb ; install windows from usb

Available link for download


Read more »

Tuesday, February 7, 2017

How to Remove Write Protection from a USB Drive


How to Remove Write Protection from a USB Drive


How to Remove Write Protection from a USB Drive

Write protection, when applied to a USB drive, prevents unauthorized users from adding to, changing or deleting anything contained on the drive. Using write protection, you can circulate the drive among several users with the assurance that each user will see the same message. You can also prevent inadvertent deletion of the drive’s data. To permanently remove write protection from your USB drive, you need to format the drive. Before doing so, copy any files you want to save to another storage unit.

More Tricks

  • Windows 10 Announced by Microsoft in San Francisco
  • Trial 2 Second Edition PC Game
  • How to format a write protected USB Flash Disk / Card [Solved]
  • Street Cricket 2010 Pc Game

Permanently Remove Write Protection

Step 1

Insert the USB flash drive into a USB 2.0 port and turn on your computer. Click the "Start" button and then select "Computer." Note the drive letter of the USB drive, which is labeled as "Removable Disk."

Step 2

Click “Start | All Programs | Accessories | Command Prompt” to open a Command Prompt window.

Step 3

Type the drive letter assigned to the USB drive followed by a colon; for example, type "E:" (without quotation marks). Press “Enter.”

Step 4

Type “format” and the drive letter followed by a colon; for example, type "format E:" (without quotation marks). Press "Enter."

Step 5

It will say to select Y/N you would write Y(Without Quote Marks) and Press "Enter".

Step 6

Close the Command Prompt window when the operation is complete. Write protection has been removed from the USB drive.


Available link for download


Read more »

Monday, February 6, 2017

How to Install Windows 8 1 from a USB Flash Drive


How to Install Windows 8 1 from a USB Flash Drive


The Windows 8.1 update was made available on Thursday this week, and for most Windows 8 users, the easiest way to install it is via the Windows Store. But if you have more than one system to update, it’s easier to create physical media to install it. This helps because you don’t have to worry about downloading a 3.5 GB file each time you update a different machine.

Install Windows 8.1 from Flash Drive

First head over to this Microsoft page and click the Install Windows 8.1.
Windows 8.1 Download Page
That downloads a small installer file that you run on your PC. After it downloads, simply run WindowsSetupBox.exe. Keep in mind that you’ll need Windows 8 running on the computer you’re installing the update on.
sshot-1
The Winodws 8.1 Setup wizard will launch, and the first thing you need to do is type in your Product Key.
Enter Product Key
Now wait while Windows 8.1 is downloaded. You can continue to use your system while it’s downloading in the background.
Downloading
The next step will prompt you to decide if you want to install now, create media, or install later from your desktop. Select “Install by Creating Media” and hit Next.
install by creating media
Now select the Media to use, in this example I am going with USB flash drive. Make sure you have a flash drive of 4 GB or more.
flash or iSO
Select the USB flash drive you want to use and click Next.
Select USB
Next you’ll get a message to confirm that all files on the flash drive will be deleted. Click Yes.
files deleted warning
Now wait while the flash drive installer is created.
Creating USB
Success! The USB flash drive installer for Windows 8.1 has been created. Click Finish to close out of the wizard. You can use this to update other Windows 8 systems to 8.1, or install it on another partition if you plan to dual boot.
flash drive ready
Insert the USB flash drive you just created on a Windows 8 system and launch setup.exe.
Setup executable flash drive
When the setup wizard starts you’ll have the option to get important updates during the install – I recommend using that option so the installation goes smoother.
Get Updates
Next you’ll need to agree to the EULA or License Terms.
EULA
Then follow the onscreen instructions to complete the installation of Windows 8.1. If you want this to be a seamless update, tick the option to keep your settings, personal files, and apps.
Choose What to Keep

Conclusion

When going from Windows 8 to 8.1, you can keep all of your settings and apps. Remember, if you want to upgrade from the 8.1 Preview to the final version, you’ll lose all of your apps and desktop programs — for what reason, only Microsoft knows. When installing from the Preview though, all of your modern app tiles will display, with a download arrow. So, you just need to go though and click each tile of the modern app you want to get back.
If you don’t want to create a flash drive from this wizard, at the beginning select to download the ISO file. Then you can burn it to DVD or make a USB flash drive later byfollowing this article.
The update process got off to a rough start yesterday, so you might want to hold off updating a few days. Just like when Apple gets a new iOS update, downloading it to your device is a long arduous process because everyone is nailing the servers at once.
There’s several other upgrade paths you can take to Windows 8.1 from XP SP3, Vista, and Windows 7. I will be running tests for each of these scenarios, so make sure to check back here often.

Available link for download


Read more »

Monday, January 16, 2017

Test Drive Windows 8 1 Preview ISO Download


Test Drive Windows 8 1 Preview ISO Download


Windows 8.1 Preview is out for testing

Windows 8.1 (previously known as Windows Blue) is next big update to Microsofts most recent Operating System i.e. Windows 8. The release of Final update is set to be rolled on to existing customers for Free as an important Windows Update on October 18th, while other users can try this Pre-released Preview of Windows 8.1 on their PCs and can thereby test drive its Features...
Windows 8.1 Lock Screen


Windows 8.1 Store
Windows 8.1 Personalize View

Windows 8.1 is bound to produce many new features as well as polished features from the previous version of Windows 8..

Download Windows 8.1 Preview ISO from Official Page

Serial Key : NTTX3-RV7VB-T7X7F-WQYYY-9Y92F


Available link for download


Read more »

Thursday, December 29, 2016

Make or Recover Bootable ISO from Bootable USB drive


Make or Recover Bootable ISO from Bootable USB drive


Create .ISO Image File from Bootable USB

Dear Readers, ever encountered with a situation where you created a Bootable USB disk from an .ISO Image file but got that file deleted accidentally ? Then, No need to worry about that any more. You can recover the lost .ISO Image file if you have it backed once either you have it burned onto a CD/DVD or have created a Bootable USB disk, Use the Novicorp Bootable USB Replicator tool to recover Bootable .ISO Image file back from your Bootable USB Disk... For Recovering Bootable .ISO Image file from Bootable CD/DVD disk, use PowerISO, UltraISO, Daemon Tools, MagicISO tools etc..

Click here to Download <---- Link Updated
OR you can try this direct link
Direct Download

Tags: create bootable image from bootable usb ; extract iso from usb ; create iso from bootable usb ; make iso from usb ; rip iso from prepared usb

Available link for download


Read more »

Sunday, December 4, 2016

Changing Windows Drive Icon


Changing Windows Drive Icon


Customizing windows drive icons gives a new stylish look from the default look. Follow these simple steps to change the icons for your drives like C:/D:/E: etc.

1] Have your favorite icon file with the format .ico or download icons from any website which offers icon images.
Vista Icons 
Dock Icons - Devine
MAC Icons - Slick Drive
MAC Icons - SHINE 

2] Now copy your .ico file and paste in your destination drive.

3] Now open notepad and type the following text with your icon name.

[autorun]
ICON=filename.ico


4] Now save the file as autorun.inf and file type as All Files in your destination drive.


5] Make sure that you have both the .ico and .inf files in the open space of your drive.


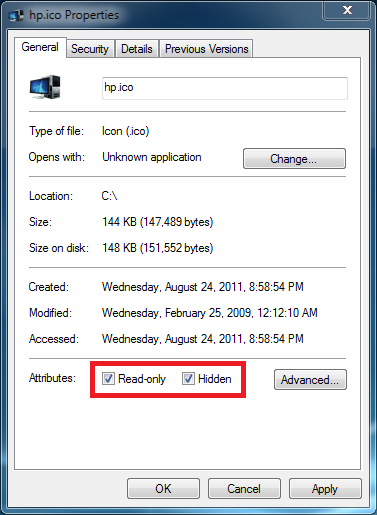
6] For safety purpose, hide these two files with read only mode properties. So that it avoids from normal deletion.


7] Restart your PC.

8] Finally a new stylish look has come at-last.

9] Similarly you can change icons for the other drives in the same manner.

EXAMPLE:


Note1: This method does not work if you have .ico/.inf file(s) in a separate folder.

Note2: This method does not work for other file types like .png, .icn except .ico.

Note3: Delete these files in order to have windows default drive icon images.

Available link for download


Read more »

Tuesday, November 29, 2016

How to format USB flash drive from microsoft windows xp vista 7


How to format USB flash drive from microsoft windows xp vista 7


How to fix Computer Software and Hardware: How to format USB flash drive from windows xp, vis...: Just you need a USB format tools for your  OS supportable Just a easy way to fix pen drive format from windows xp.  Formatti...

Available link for download


Read more »

Wednesday, November 23, 2016

How to access a drive or a folder in a network through Kali Linux


How to access a drive or a folder in a network through Kali Linux


In this scenario, I have Windows 7 and Kali Linux operating systems. Kali Linux is installed in a virtual server, i.e. vmware player

(A) Now to create a shared drive or folder in Windows 7

  • Click on Start  and then on Computer
  • Select the drive or the folder you want to share. Right click on it, then click on Share with and then on Advanced sharing...
  • Goto Sharing tab and click on Advanced Sharing...

  • Check on Share this folder, then click on Add button to give Share name and Description of the drive or folder and select the number of users that you allow to share the drive or folder. Then click on permissions and add number of users to whom you grant permission to share your drive or folder in a network. Click on OK to all pop windows that has opened so far. This will take affect and you will see shared drive or folder in the network.

(B) Open vmware player and allow Kali Linux to boot.
  • Login with username and password
  • Press Alt. + F2 key to bring run dialog box. 
  • type smb://username/shared, where username is the host name and shared is the drive or folder name that has to accessed (smb is a program of samba distribution that allows to maintain interoperability between linux/unix server and windows client), then click on Run.
  • type username and password of windows 7 user to access the drive or folder (username and password is the account of the user where the drive or folder has been shared) and click on Connect.
This will mount the shared drive or folder and it will appear on the desktop of Kali Linux.


Available link for download


Read more »

Sunday, October 16, 2016

Make Bootable USB Pen Drive For Windows XP Windows 7 And Windows 8 Free Download


Make Bootable USB Pen Drive For Windows XP Windows 7 And Windows 8 Free Download


In This post I will show you how to load the Windows installation in your USB flash drive and how to make it bootable just like the DVD from your .iso image. This Post Very Help Full Guyss Because Install Window With USB Is Many Time Faster Than DVD.

Installing Windows from a flash drive! An application that permits you to entirely transfer the setup Windows XP, Windows 2003, Windows Vista, Windows 2008, Windows 7, Windows eight on the USB drive in a couple of mouse clicks. This means that you can set up Windows from a flash card, HDD or other storage device to your personal computer or netbook. And its not all she can do. WinToFlash can transfer your CD / DVD into the USB drive, for example, BartPE. Right after all the technological manipulation, you can fully clear the flash card and format it in Windows for everyday use.

List of Features:

  • Transfer Setup Windows XP/2003/Vista/2008/7/8 on a USB drive.
  • Full support for editions of Windows 32 bit and 64 bit.
  • Transfer the recovery disc or mini-OS (BartPE for Windows XP/2003, WinPE on Vista/2008/7/8) on a USB drive.
  • Cleaning the USB nakopiteya (removal of all the information on it).
  • Create a USB nakopiteya with emergency boot Windows 2000/XP/2003.
  • Transfer of MS-DOS on a USB drive.
  • Create a USB to kopitelya Windows XP/2003 Recovery Console.
  • Formatting a USB nakopiteya to FAT16 or FAT32.
  • Detailed configuration of any FAT option for better compatibility.
  • A detailed set any options the partition table.
  • Choice of boot USB flash drive, such as GRUB or Standard.
  • Choosing a topic – CHS or LBA for better compatibility with some motherboards.
  • Creating an answer file for Windows Setup. Add a serial number, user name, etc.
  • Detailed configuration of the transfer of Windows Setup.
  • Check nakopiteya USB for file system errors after migrating Windows Setup.
  • Fix some problems of Windows Setup, such as 0x6B BSOD.
  • WinToFlash – portable application, you can take it with you on a removable disk and run on any computer.
  • Supports transfer profiles – to save and load settings for the transfer at any time.
  • Support for encryption key in the Windows profile.
  • A detailed log file.
  • Reminder about updates.
  • A simple, classic interface, the utility ntbackup.
  • Master with only two options for converting Windows Setup.
  • Support for multiple languages.
  • Now includes WinToFlash Suggestor.

Technique Sspecifications:

  • Pentium 233-megahertz (MHz) processor or quicker
  • At least 64 megabytes (MB) of RAM
  • At least 20 megabytes (MB) of available space on the hard disk
  • Keyboard and a Microsoft Mouse or some other compatible pointing device
  • Video adapter and monitor with Super VGA (800 x 600) or larger resolution
  • OS : Windows XP/2003/Vista/2008/7/8
  • Language : Multilanguage [ML]

Installation Guide

  1. Unpack the rar file.
  2. Open/run the file named” WinToFlash.exe”.
  3. Then click next to install.
  4. After installation Go to ‘Advance’ tab and select “Transfer WinPE Vista/2008/7/8 to USB drive” from the drop down box.
  5. Now select the source file drive and the USB path drive, Then select create.
  6. All you done after the complete  the process you can use your pendrive as bootable device.
 Download Novicorp WinToFlash For Windows XP/Vista/7/8
File Size: ( 24 MB )
Server  Name
Download  link
http://usersfiles.com/vv9m7uhj7mxc
http://www.mediafire.com/download/6aiw1srlzd2y4z3/Novicorp_WinToFlash_0.7.0057-by-www.freehitfiles.com.rar
http://up.ht/VCoOzx
http://www21.zippyshare.com/v/97469707/file.html
http://ge.tt/5NYUPdr1


Available link for download


Read more »