Showing posts with label access. Show all posts
Showing posts with label access. Show all posts
Monday, March 6, 2017
Access Kali Linux through Remote System
Access Kali Linux through Remote System
There are several open source and enterprise software program through which we can access remote system. These software becomes a necessity when you setup a remote server and do not allow direct access to the server, as because of some security measures. PuTTy is one of the major terminal emulator through which we can access a remote server. PuTTy is a free and open-source terminal emulator, serial console and network file transfer application. It supports several network protocols, including SCP, SSH, Telnet and rlogin. Here, I am going to show you how to access Kali Linux through PuTTy. My base computer is running Windows 7 and Kali Linux is installed in a VMWare Player. So we can assume that Kali Linux is installed in a remote machine, as Windows 7 and of Kali Linux is on different network now.
Before we access Kali Linux through remote system, we need to make sure that ssh service is already running in Kali Linux.
To check the status of ssh service. Open root terminal and type service --status-all

In case it shows [-], then it means ssh service is not running and you have to enable ssh service first. To do this type apt-get install openssh-server from terminal window. Once, it shows [+] sign it means service is enable. Now, we type service ssh start to run ssh service.

Once we are sure that ssh service is running in remote Kali Linux, we have to perform one more step. Run ssh-keygen -t rsa to setup rsa key for ssh authentication and enter filename and passphrase to save the key. Once this is done we are good to go.

Now open PuTTy application and type the ip address of Kali Linux (if you are not sure then type ifconfig command on Kali Linux root terminal window). Let the port no. be default, select ssh and click on open. If everything is fine then it will ask you to enter login name and password. Once you enter the correct login and password, you will get privilege to access Kali Linux from console mode.

Available link for download

Wednesday, February 8, 2017
cannot access files
cannot access files
1) You should change cable
2) reinstall windows
3)try to save mode
2) reinstall windows
3)try to save mode
Available link for download
Wednesday, November 23, 2016
How to access a drive or a folder in a network through Kali Linux
How to access a drive or a folder in a network through Kali Linux
In this scenario, I have Windows 7 and Kali Linux operating systems. Kali Linux is installed in a virtual server, i.e. vmware player.
(A) Now to create a shared drive or folder in Windows 7
- Click on Start
 and then on Computer.
 - Select the drive or the folder you want to share. Right click on it, then click on Share with and then on Advanced sharing...

- Goto Sharing tab and click on Advanced Sharing...

- Check on Share this folder, then click on Add button to give Share name and Description of the drive or folder and select the number of users that you allow to share the drive or folder. Then click on permissions and add number of users to whom you grant permission to share your drive or folder in a network. Click on OK to all pop windows that has opened so far. This will take affect and you will see shared drive or folder in the network.

(B) Open vmware player and allow Kali Linux to boot.
- Login with username and password
- Press Alt. + F2 key to bring run dialog box.
- type smb://username/shared, where username is the host name and shared is the drive or folder name that has to accessed (smb is a program of samba distribution that allows to maintain interoperability between linux/unix server and windows client), then click on Run.

- type username and password of windows 7 user to access the drive or folder (username and password is the account of the user where the drive or folder has been shared) and click on Connect.

This will mount the shared drive or folder and it will appear on the desktop of Kali Linux.

Available link for download
Monday, October 17, 2016
How to Access Shared Folders in Windows 7 without Username and Password
How to Access Shared Folders in Windows 7 without Username and Password
My favorite method of accessing a shared folder in the network is by pressingWIN+R, and type double backslash followed by the computer name. An example is rajandmk which will open an explorer window showing all shared folders on rajandmk’s computer.
Windows XP by default allows anyone in the same local area network to access its shared folder without the need to provide user name and password. This is because the XP’s Simple File Sharing mode is enabled by default and you can disable it from Control Panel > Folder Options.
Windows XP by default allows anyone in the same local area network to access its shared folder without the need to provide user name and password. This is because the XP’s Simple File Sharing mode is enabled by default and you can disable it from Control Panel > Folder Options.
When it came to Windows 7, the default security has been strengthen and you cannot access anyone’s shared folder on the same network without providing the correct login information. This is a good change because anyone could access your unprotected shared folder in windows xp.
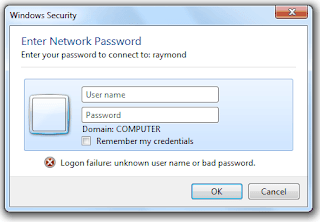
Now, to access shared folders without Username and Password follow the following steps:
Go to Control Panel and if it shows icon view, select Network and Sharing Center. If it is on a category view, Network and Internet, then Network and Sharing Center.Next, on the left pane, click on the “Change advanced sharing settings” link. Scroll down until you see Password protected sharing. By default the Turn on password protected sharing in Windows 7 is enabled. All you need to do is select the “Turn off password protected sharing” and click the Save Changes button.
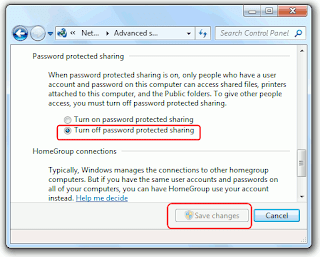
Now anyone on the same local area network would be able to access the shared folders on that computer which you’ve just turned off the password protected sharing without having a user account and password. The only troublesome part is when my laptop connects to an outside network or wifi, I will make sure that option is re-enabled, or just unshare the important folders.
Available link for download
Subscribe to:
Posts (Atom)