Showing posts with label on. Show all posts
Showing posts with label on. Show all posts
Friday, March 24, 2017
Tuesday, March 14, 2017
Removing Windows OS Passwords with CHNTPW on Kali Linux
Removing Windows OS Passwords with CHNTPW on Kali Linux

So First of all lets see which tool we are going to use
[UPDATE] If you are having any kinda problem with this method on windows 8/8.1 then try this method
Changing Windows 8/8.1 Password with CHNTPW
If you want to recover Windows 8/8.1 passwords instead of removing them see this tutorialCracking Windows 8/8.1 passwords with Mimikatz
Tool Name:- chntpwTool Description: Obviously its going to be what the man page of tool says: "chntpw is a utility to view some information and change user passwords in a Windows NT/2000 SAM userdatabase file, usually located at WINDOWSsystem32configSAM on the Windows file system. It is not necessary to know the old passwords to reset them. In addition it contains a simple registry editor (same size data writes) and hex-editor with which the information contained in a registry file can be browsed and modified."
Attack Requirements:
1. Physical Access to victims Computer.
2. A live bootable pendrive of Kali Linux.
(Download Kali Linux)
So Lets get started:
Step 1: Mounting the drive containing Windows OS-> This one is easy aint it? Well so that you might not have forgotten how to do it, Ill type the syntax:
ntfs-3g /dev/sda1 /media/win
Note that sda1 in above command is the partition on which Windows OS is installed yours can be different. To check yours simply type fdisk -l which will list your all partitions and then check by yourself on which partition your Windows OS is installed. If you cant get it this way then dont worry Im still here well then you can try doing it in GUI way. Click on Applications > Accessories > Disk Utility then select victims hard disk and see on which partition Windows OS is installed. If Windows Partition is installed on any other partition then replace sda1 in the above command with that which you found e,g sda2. Also note that if there is no such directory as win (mentioned in above command) in your /media folder then you must create one which is simple just type mkdir /media/win this command will make win folder in media folder on which youll mount victims Windows OS (It is not necessary that its name be win you can use any name).
Step 2: OK after successfully mounting Victims Windows OS now you need to move there but wait not only there instead very much deep in there. You need to move to config folder which is located in System32 folder (Note that it is Capital S in windows 7 & 8). You can move there using this command:-
cd /media/win/Windows/System32/config/ (On Windows 7 & 8)
or
cd /media/win/WINDOWS/system32/config/ (On Windows XP and those before it)
Step 3: Now is the most tough part of game (only if tough means easy :) ). Now as when you are inside the config directory type the following command to see the list of users available on Victims Machine:
chntpw -l SAM (remember it is ell not 1)

note the name of user whose password you want to clear.
Step 4: Oh man our happy journey is coming to an end now. Follow the upcoming steps to blast Victims Windows OS password:
type the command:
chntpw -u <username> SAM

Note: <username> here is the name of user you noted in the above step.
it will display different options before you.
type 1 and hit enter
type y and hit enter

Voola you busted Victims password now turn off Kali and Open Victims Windows OS without knowing His/Her Password. Bad Bad Bad...
For More Info on chntpw type this in your terminal:
man chntpw
This will display Manual Page of chntpw...
Happy Cracking... :)
Dont forget to read the Disclaimer
Available link for download
Thursday, March 9, 2017
Change Default Install Storage to External SD Card on Android No Rooting Required
Change Default Install Storage to External SD Card on Android No Rooting Required
Change Default Storage for Android Device. Install apps directly on SD Card instead of Internal Storage without Rooting.
Things you need to perform this ...
- Java Development Kit (Java SE DK) <-- Click to download
- Android Software Development Kit (Android SDK) <-- Click to download
- Android Device
- Connecting Cable
Lets get started...
- Install Java Development Kit. If already installed, skip to step 2.
- Install Android SDK. If already installed, skip to step 3.
- Navigate to folder, where you installed Android SDK i.e. adt-bundle-windows-x86-20130717
- Into the folder SDK>Platform tools>adb.exe
- Turn USB Debugging ON from developer options of Settings menu... (Note: Android 4.2.1 and Up users will have to enable developer options to be able to use Debugging Options, for this go to settings > about phone > Tap on build number 7 times to see message " you are now a developer".)
- Now open CMD (Command Prompt) and point to install location of development tools or right click while holding down shift button and selecting open command prompt here...
- Now type " adb devices " (without quotes) - This will list all the devices attached to the PC with serial no. (eg. 0123456789ABCDEF - device)
- Now type adb shell pm setinstalllocation 2 (default is 0, where 0 is auto, 1 is internal & 2 is SD card). Itll take a few seconds a minute at the most to show the status...
- Now every app youll install will directly go to SD card...(Keep in mind that apps that are designed to be installed on internal memory cannot be installed on to external storage)
Tags: increase internal storage, how to install apps directly on sd card, set sd card as default storage for installation of apps.
Available link for download
Monday, March 6, 2017
A Guide on Getting Approved Easy for Google Adsense !!
A Guide on Getting Approved Easy for Google Adsense !!
Google Adsense - Why, Requirements and How to get approved!!!
Hello dear readers, this is a very little guide to show newbies/beginners about Google Adsense and How to get approved for it and how it works...
What is Google Adsense? Google Adsense is a flexible, hassle-free way to show relevant and engaging ads alongside your online content and make money, Google Adsense makes perfect sense. You can easily show Adsense ads on your website, mobile sites, and site search results.
OR
In Simple Words, Google Adsense helps you Monetize your Website or Blog, that you own and can edit by displaying relevant ads, which help you generate revenue...
Why Google Adsense?- Google Adsense displays relevant ads on your website/blog or your online content (that have direct relation or derived from typed search or published content) instead of irrelevant ads or ad specific / focused ads as displayed by many other Monetizing Services.
- It displays High Quality Ads - It means that before ads appear on your site, theyre reviewed by real people and clever machines. The review process takes into account a variety of factors, including the quality of the ad and target audiences...
- Live Statistics - Provides users with extensive data that helps users understand that how well their ads are performing...
- Mobile Interface - provides you with a dedicated interface thats optimized for mobile devices - giving you quick access to your account. You can easily check your earnings, get important alerts, and view reports without the need for Flash on your phone
- Flexible Ad Control - You can block those you don’t want to appear, and manage how your ads are shown by choosing which ad formats youd like to accept. You can also customize the look and feel of your ads to match your site.
- Highest Payout rates - Google Adsense offers highest payout rates per click that helps you generate relatively much more revenue than that of other Monetizing Services...
How to Get Your Application Approved for Adsense?In order to get your application approved for Adsense:- First of all, you need to have desire to Earn Revenue from your online content...
- Youll need to have a Website or A Blog or Alternatively you can Sign Up for Google Adsense through YouTube --> Under Account Settings --> Channels Settings --> Enable Monetize option.
- Select a High Value Niche.. This means that the niche you select for your website or blog should be of high commercial value, this will aid in getting approved easily as well as number of ads displayed on your website or blog will increase dramatically...
- Make Sure your Site is well Structured and indexed and is not hidden from Search Engines / Robots or Web Crawlers... For this, use SEO Tools such as Google Webmaster Tools, Yandex Webmaster Tools and/or Bing/Yahoo Webmaster Tools etc.
- Publish High Quality Content on your Website or Blog that youre writing to... Make Sure your Published Posts Comply with Google Adsense Terms & Conditions...
- Make Sure that your Website or Blog receive decent and organic Traffic i.e. it should be generated mostly from Search engine search results and should be non-repetitive, this means that traffic should be generated from IP Addresses different from your own IP from which your Website or Blog is maintained... Your Blog/Website should be performing well enough to grab 1000 Page Views or Visits per day...
- Make Sure Your Website or Blog Should possess a good number of Posts, but this doesnt mean that publishing useless content or Content without any quality or low quality... It simply wont work because Adsense is very Strict in matter of Quality... So, keep focus on Quality rather than number of posts because 10 Good Posts will have good impact on your application than 100 Posts without quality...
- Finally apply for Google Adsense when you satisfy all of above elements... Thats all youll need to get your application approved from Google Adsense... If rejected even after all, then go ahead and try again... There is no limitation for you to resubmit your application for review...
Alternate Approval for Adsense:If for some reasons, Google is not approving your application, then you can try Alternate way for Google Adsense i.e. YouTube. - In order to apply for Adsense from YouTube Account, You need to have signed into your Google account or sign up for a new account if you dont already have...
- After Signing in, go to YouTube Settings --> Channels Settings --> Monetize option --> Enable
- After you have applied for Monetize option, focus on Uploading Videos on YouTube, Make Sure the Videos you upload comply with Google Adsense and YouTubes Terms and Conditions...
- Try Uploading Videos with Higher Resolutions i.e. 720p or 1080p...
- Upload a minimum of 3-5 Videos in order to get your application approved easily... although 2 Videos will do the trick but better be on safe side than safety...
- Make Sure Videos uploaded are more than 30 Sec in length... i.e. Videos less than 30 Sec will not be taken into account and will not qualify you for Adsense approval... Focus on Uploading Videos more than 1 min and Should Complying with Terms & Conditions...
- Thats all you need to qualify for Google Adsense...
Have fun and enjoy your earnings with Adsense all Bloggers, Readers and Publishers...
Tags: how to get approved with google adsense ; why google adsense reject application ; google reject adsense application ; how to easily get approved with google adsense ; trick for google adsense
Available link for download
Saturday, March 4, 2017
Activating IIS on Windows 8
Activating IIS on Windows 8
In this Article Im going to Show u how to activate IIS on Windows 8-->
Step 1--> Open Run Box.
Press Window Key + R.

Step 2--> Type Control Panel and Hit Enter.
 Step 3--> Click Uninstall a Program.

Step 4--> Click on "Turn Windows Features on or off".

Step 5--> Select "Web Managemet Tools" and "World wide Web Services" under Internet Information Services" and then Click OK.
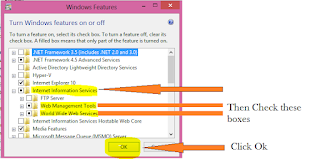
Step 6--> Wait untill Changes are applied.
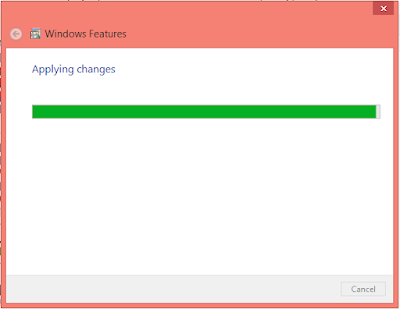
Step 7--> Click Close After changes are Applied.

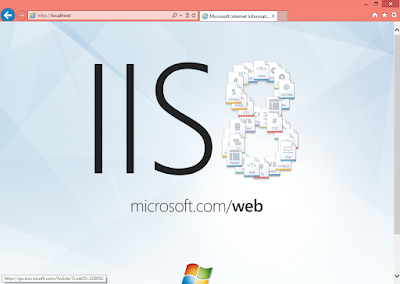
Step 8--> Open your browser and type localhost in adress bar and hit enter to confirm working of IIS.
Hope this post help many people....
You Can Read this Article on 7pm Tech here--> Activating IIS on Windows 8 Read Comments for more Info...
Step 1--> Open Run Box.
Press Window Key + R.
Step 2--> Type Control Panel and Hit Enter.
Step 4--> Click on "Turn Windows Features on or off".
Step 5--> Select "Web Managemet Tools" and "World wide Web Services" under Internet Information Services" and then Click OK.
Step 6--> Wait untill Changes are applied.
Step 7--> Click Close After changes are Applied.
Step 8--> Open your browser and type localhost in adress bar and hit enter to confirm working of IIS.
Hope this post help many people....
You Can Read this Article on 7pm Tech here--> Activating IIS on Windows 8 Read Comments for more Info...
Available link for download
Tuesday, February 21, 2017
Infographic on Disaster Recovery
Infographic on Disaster Recovery
Having a disaster recovery plan (DRP) in place is essential to the survival of all businesses. Without a DRP, businesses are subject to the loss of data, revenue, and customer base during a disaster or downtime, which can be catastrophic. Many different DRP options exist, such as adjusting your in-house infrastructure, backing up data through a secure cloud hosting service, and adding redundancies to your servers so that there is little to no downtime in the event of an unforeseen circumstance. By having a proper DRP, you can ensure that your data is safe and your business will continue to operate even amidst a disaster.

Available link for download
Tuesday, February 14, 2017
Activating NET on Windows 8
Activating NET on Windows 8
Today Im Going to show u how to activate .NET Framework on your Windows 8 Machine without downloading it from Internet...
Step 1:- First of all mount your Windows 8 Boatable onto your PC and remember the drive letter...
 Step 2:- Open Command Prompt with administrative privilege short cut is shown in the picture...
 Step 3:- Type or Copy paste this command into cmd prompt.
dism.exe /online /enable-feature /featurename:NetFX3/Source:H:sourcessxs /LimitAccess
 Note:- Replace the colored letter "H" in the cmd with your drive letter...
Step 4:- Wait a While...

Step 5:--> Type Y
Note:--> Your PC will restart immediately as you type Y so before typing Y save your other works.
 Step 6--> During Restart your PC will configure New feature. Dont turn off your PC during this process. And after Restart your PC will be Having .Net Framework installed...
 Enjoy...
You Can See This Post of Mine in 7pm Tech forum also here--> Activating .NET on windows 8 There are some good comments on it which can solve your Problem if any...
Step 1:- First of all mount your Windows 8 Boatable onto your PC and remember the drive letter...
dism.exe /online /enable-feature /featurename:NetFX3/Source:H:sourcessxs /LimitAccess
Step 4:- Wait a While...
Step 5:--> Type Y
Note:--> Your PC will restart immediately as you type Y so before typing Y save your other works.
You Can See This Post of Mine in 7pm Tech forum also here--> Activating .NET on windows 8 There are some good comments on it which can solve your Problem if any...
Available link for download
Thursday, February 9, 2017
How to Install Dot Net Framework 3 5 on Windows 8 All Editions
How to Install Dot Net Framework 3 5 on Windows 8 All Editions
Installing .Net Framework 3.5 on Windows 8
Dear Readers, You may have sometimes noticed while using windows 8 that some apps wont Run properly and some even doesnt open up... Its because of a reason that the application are designed in .Net Framework Environment these days that requires .Net Framework 2.0,3.0,3.5,4.0,4.5 etc. (Different application need different versions of .Net Framework and may not work with most out dated or most recent version of .Net Framework). Now you need to just install .Net Framework 3.5.. Just follow these 2 simple steps...
Method 1 (Offline Installation using cmd):
- Enter your Windows 8 Installation Disk into DVD Drive... or Mount the .iso file...
- Now run Command Prompt as an Administrator... Hit Start --> type in "CMD" or "Command" without quotes, when you see command prompt listed on top of apps list, Right Click on Command Prompt and Select option "Run as Administrator" from the bottom area near taskbar.
- Now type in " DISM /Online /Enable-Feature /FeatureName:NetFx3 /All /LimitAccess /Source:G:sourcessxs " without quotes.. (where G: will be your drive letter of DVD Drive or Mounted Image Virtual Drive.. Replace G: with your actual drive letter if its other than G:)
- The .Net Installation will begin and the Feature will be installed with in a few minutes...
Method 2 (Online Method using Windows Update):
If for some reasons the Method 1 doesnt work for you, either your installation media doesnt have that installation file for .Net Framework or You have no Windows Installation disk at the moment, then you can try this second sure fire method thatll work for everyone.. Because in this method, the feature will be installed straight from Windows Update but it is much lengthy process especially if you are on a slow connection..
For this, Go to Control Panel --> Programs and Features --> Turn Windows Features on or off --> Select the option .NET Framework 3.5 (includes .NET 2.0 and 3.0) --> Hit OK. A Pop-up windows will appear asking that Windows needs to download additional files from Windows Update... Select Install this feature.. Wait until its done..
Thats all folks.. Youll have .Net Framework 3.5 Installed in your Windows 8...
Tags: how to install dotnet framework 3.5 on windows 8 ; install .net 3.5 on windows 8 ; adding dot net 3.5 to win 8 ; win 8 .net framework install add feature
Tags: how to install dotnet framework 3.5 on windows 8 ; install .net 3.5 on windows 8 ; adding dot net 3.5 to win 8 ; win 8 .net framework install add feature
Available link for download
Friday, February 3, 2017
Install Kali Linux ARM on Raspberry Pi
Install Kali Linux ARM on Raspberry Pi
Before we begin, let me give you a brief introduction on Raspberry Pi. Well, a Raspberry Pi is a low budget, small credit-card sized ARM board, that acts as a computer. This board is developed by Raspberry Pi Foundation, UK with the intention of promoting the teaching of basic computer science in schools. The processor at the heart of the Raspberry Pi system is a Broadcom BCM2835 system-on-chip (SoC) multimedia processor. This means that the vast majority of the system’s components, including its central and graphics processing units along with the audio and communications hardware, are built onto that single component hidden beneath the 256 MB memory chip at the centre of the board. It’s not just this SoC design that makes the BCM2835 different to the processor found in your desktop or laptop, however. It also uses a different instruction set architecture (ISA), known as ARM. The ARM-based BCM2835 is the secret of how the Raspberry Pi is able to operate on just the 5V 1A power supply provided by the onboard micro-USB port. It’s also the reason why you won’t find any heat-sinks on the device: the chip’s low power draw directly translates into very little waste heat, even during complicated processing tasks.

Figure(1). Sketch of a Raspberry Pi Board

Figure(2). Actual view of a Raspberry Pi Board

Figure(3). Raspberry Pi Board in a box

Figure(4). Raspberry Pi Board to work as a computer
Components needed to make Raspberry Pi to a Computer are:
• Raspberry Pi board
• Micro USB lead (for power)
• USB power adapter (also for power)
• HDMI lead: Type A to Type A (to connect to your monitor or TV)
• HDMI display
• SD card: 2 GB to 64 GB (for storage); 8 GB minimum recommended
• SD card reader
• USB keyboard and mouse
Now, lets get started installing Kali Linux for Raspberry Pi.
1. Download Kali Linux for Raspberry Pi image.
2. Use dd utility to image this file to your SD card. Assumed that the storage device is located at /dev/sdb. Please note that this process will wipe out your SD card. If you choose the wrong storage device, you may wipe out your computers hard disk.
root@kali:~ dd if=kali-pi.img of=/dev/sdb bs=512k
This process can take a while depending on your USB storage device speed and image size. Once the dd operation is complete, boot up your Rasberry Pi with the SD card plugged in. You will be able to log in to Kali (root / toor) and startx.
Available link for download
Tuesday, January 31, 2017
Want to install Windows 10 on your own PC How to Install Windows 10 on Your PC
Want to install Windows 10 on your own PC How to Install Windows 10 on Your PC
If you haven’t installed Windows 10 on your PC before, you’ll have to perform an upgrade first before you can clean install. If this doesn’t make any sense, that’s because Microsoft never makes licensing easy, even when there’s a free version. Once you’ve performed the upgrade and activated your Windows 10 upgrade on a PC, Microsoft will associate your unique hardware ID with an activated Windows 10 license, and you can reinstall as you see fit. But not until you’ve upgraded Windows 7 or 8 to Windows 10 and then activated.
Just keep in mind that Windows 10 is only provided for free as an upgrade. You can’t clean install it, there are no keys at this point. Unless you use our clean install workaround.
- Step 1: Download the Windows 10 ISO image from Microsoft’s web site. Alternatively you can download the web installer from the same page and just choose to upgrade your PC, which is the easiest option.
- Step 2: If you are installing on a regular PC with Windows already on it, you’ll be prompted immediately to start the upgrade process. Alternatively, you can burn it to an optical disk orcreate a bootable USB flash drive. Otherwise, just attach the ISO image using the virtual machine software of your choice (assuming your virtual machine already has Windows 7 or 8 installed).
- Step 3: Install it mostly by clicking the Next button, making sure to choose Upgrade when prompted. If you want to clean install, follow our clean install instructions instead.
- Note: Now that Windows 10 is released, you’re going to need a valid Windows license key for 7, 8, or 8.1 in order to perform the upgrade.
For posterity, here are all of the installation steps if you’re booting from a flash drive, although you could just remember the word “Next” and get through it fine. Just remember to choose Upgrade when prompted unless you’ve previously upgraded and activated Windows 10 on this computer.
When you first boot the computer you’ll see a screen like this one:
Click Next and you’ll be taken to the Install now button screen. Which obviously you should click.

At this point you can choose whether you want to upgrade Windows or install a new custom install. Since we’re recommending that everybody install into a virtual machine or on a test PC, you should select Custom here.
Update: You should probably choose to Upgrade the first time, because the license key might not work otherwise.
At this point you’ll need to pick where to install Windows 10. You might need to delete or create a partition, but if you are using a virtual machine, you can just click Next.

And now it will install.

Once the PC reboots again, you’ll be able to select the settings like whether Windows Updates are enabled (they aren’t allowed to be disabled in the preview). We’d recommend just using the express settings if you are using a test machine — use Custom if you’re really going to use the computer.

And now you can sign into your Microsoft account. We’d recommend using a Microsoft account because otherwise you won’t be able to use half of the new features and you may as well use Linux or stick with Windows 7.
If you’ve setup your account properly you’ll probably be asked to verify it in the middle. We excluded those steps from this article, but they are pretty simple.
Now you’ll be asked how to setup the PC. Since we wanted to test everything as a new computer, we chose to set it up as a new PC instead, but you could copy all your settings from another computer if you wanted to.
Want to use OneDrive? It’s nicely integrated into Windows, so we just left it alone.
And now a colorful screen that tells us things are happening.
And finally, we are at the desktop! Note that the desktop on the full release of Windows 10 looks different, and this screenshot came from a pre-release version.
Now click that Start button. Click it. You know you want to.
Available link for download
Saturday, January 28, 2017
Setup Videocon Internet on PC with Mobile without PC Suite
Setup Videocon Internet on PC with Mobile without PC Suite
Setup Videocon Mobile Internet on PC without PC Suite through Manual Settings
Dear Readers, to do this, You need USB drivers of your mobile phone be installed on your PC, which you are gonna use for Internet access. In order to access Internet on Your PC, you need to follow these two steps:
Set up a Dial-Up Connection:
- Click on Start Button and go to Control Panel
- Open Network Connections.
- From the Left Windows Task Pane, Select "Create a New Connection"
- A Connection Wizard will open, Select Next and then Select Connect to Internet from the list provided.
- Choose to "Setup my Connection Manually" and hit Next.
- Choose " Connect using a dial-up modem" and hit Next.
- Enter ISP Name as " Videocon " without Quotes Next --> " *99# " as Phone Number and hit Next, Leave the Username and Password fields blank and hit Next. Finally click on "Finish".Now youre Dial-up Connection is Set..
Set Up Your Modem:
- Again Go to Control Panel ---> " Phone and Modem Options ".
- Enter " 01 " as your Area Code and Hit Next.
- Make sure you Modem is Listed under Modems Tab and is in Working Condition, if your modem isnt listed then make sure you have installed usb drivers for your phone and your phone is connected to your PC in either " PC Suite " Mode or " Connect to PC " Mode. Youll have your Modem listed as soon as your USB drivers have finished installing.
- Select your Modem and hit on Properties.
- Now Go to Advanced Tab and enter extra initialization commands exactly as +CGDCONT=001,"IP","vinternet.com"
- Apply the settings and click OK.
Youre now Setup manually with Videocon Mobile Internet on PC with Manual Settings.. Enjoy !!!
Available link for download
Wednesday, January 25, 2017
Prevent or disable Remote Shutdown From Command Prompt on Windows 7
Prevent or disable Remote Shutdown From Command Prompt on Windows 7
How To Stop Remotely Shutting Down Computers

Windows 7 Shutdown Command - The Basics

Sooner or later everyone makes the mistake of accidentally shutting down the local machine instead of the target computer that they really wished to reboot. To recover from this mistake pay close attention to the syntax of the abort command Shutdown /a.

As can be seen in the example above, youll have different options to choose from in the Remote Shutdown Dialog. First specify the name or IP address of the computer you want to shutdown by clicking the Add button. Next, select Shutdown and keep the Warn users of the action checked if you want to warn the user of the shutdown before it occurs. Next, in the Shutdown Event Tracker, choose the Option you want the Event Log to show and enter a comment.
If you are running a training session and the delegate from hell keeps shutting down other students machines by abusing shutdown -s or -r, then configure a policy to prevent Force Shutdown From A Remote Machine.
Launch GPMC or SECPOL.MSC
Navigate to Local Policies, User Rights Assignment.
Experiment by assigning just your account, rather than all administrators.
Launch GPMC or SECPOL.MSC
Navigate to Local Policies, User Rights Assignment.
Experiment by assigning just your account, rather than all administrators.
Then click Apply and ok.
How can I remotely shutdown another Windows computer?
To start the GUI version of this command click Start, Run, and in the Run line type: shutdown -i and press enter. After running this command you should see a dialog window shown in the example below.
The shutdown executable is available at the command line in Windows 7, Vista, XP and also the Windows Server family. Once you launch the DOS box by typing cmd, your first decision is do you want to shutdown (/s), or reboot (/r) the computer?
CMD-->shutdown -i window appear
Sooner or later everyone makes the mistake of accidentally shutting down the local machine instead of the target computer that they really wished to reboot. To recover from this mistake pay close attention to the syntax of the abort command Shutdown /a.
As can be seen in the example above, youll have different options to choose from in the Remote Shutdown Dialog. First specify the name or IP address of the computer you want to shutdown by clicking the Add button. Next, select Shutdown and keep the Warn users of the action checked if you want to warn the user of the shutdown before it occurs. Next, in the Shutdown Event Tracker, choose the Option you want the Event Log to show and enter a comment.
Available link for download
Monday, January 23, 2017
Install Latest and Bigger Games including Data Files on Internal Storage without Partition Android Hack Application
Install Latest and Bigger Games including Data Files on Internal Storage without Partition Android Hack Application
FolderMount [ROOT REQUIRED]
Dear Users, You may have already seen or tried the Link2SD Android Application, that allows you to create links to external storage but with limitations such as Need to create a Secondary Partition that usually results in Partition getting dirty sooner and Unable to Move the Android OBB data files to external storage as a result of which you can save merely 100-200 MB of Internal Storage by Creating Links to SD Card with Link2SD but this isnt enough right...
Now, here im presenting you guys a new android application known as Folder Mount.. Available as Free App in Google Play Store.. This Application Moves data to Internal Storage and then Mounts Files and OBB data on Internal Storage as if the data has been stored in internal storage instead of external storage. Such as GTA Vice City, NOVA 3, Need for Speed: Most Wanted, Modern Combat 4, Virtual Tennis Challenge etc.
Installation:
- Download the .apk application and Install on your android device.
- Open the Application and Allow SuperUser Access.
- Click on Top Left menu and Select Apps Analyzer Option.
- Select the App you want to Mount to External Storage.
- Click to Create Pair for both Data and OBB Files.
- Select "Yes" to automatically allow the Application to Move Data to External Storage.
- You are DONE.. ENJOY !!!
Limitations:
The only limitation of this application is Free Version supports only 3 Pairs of Applications. For Linking More than that or all of your applications, Get the Pro Version to unlock all the functionality.
Get PRO Version for FREE.. !!
- Install the Application Freedom and allow Root Access.
- After this has been done, Select "START" option by Clicking Soft Menu button on your Device and then Selecting FolderMount..
- Now open FolderMounts Settings Menu and Click on "Purchase Pro Version" & Make sure you are connected to the Internet..
- Select to Pay From Google Play Store (Recommended).
- Now youll be presented with a Free Card something like XXXX-XXXX-XXXX-5689 or Something.
- Finally Click on Pay Now button and wait for confirmation message.
- Done.. Now Restart the Application to use Pro Version Mode.. ENJOY.. !!!
Folder Mount - Tusfiles OR Mediafire
Freedom - Tusfiles OR Mediafire
tags: install large applications on low specs phone, increase storage, hack android, script storage, mount external storage, increase free internal storage, how to install large game files and obb files in internal storage,
Available link for download
Sunday, January 22, 2017
How To Find Android Phone Even On Silent Mode
How To Find Android Phone Even On Silent Mode
There are many times when you just forget your Android phone somewhere and icing on the cake, your phone is kept on silent mode then you just can’t find it, no matter how hard you try, which is very annoying and frustrating.

Well, if you are also going through the same problem that I have mentioned above then now don’t worry because today I have created this tutorial in which I will teach you that how you can easily find Android phone even when it is on Silent mode. Well, there is an amazing app for fixing this annoying problem, which is known as Ring My Droid. It is one of the best app for your Android phone that you can use to find your Android phone even on Silent mode. The Ring My Droid app has a SMS triggered alarm function, so when you send a SMS to your Android phone then the alarm will ring on full volume so that you can easily find your Android phone, no matter how far it is. So, without wasting much of your valuable time, let’s get started with our tutorial.Learn-How To Find Android Phone
So, if you want to find your Android phone easily then follow the below given steps to get started.- First of all, open up your Android device and then go to Google Play Store.
- Now, in Google Play Store, type Ring My Droid in the search box and then tap on search icon button.
- Then, tap on the Ring My Droid app in the search results.
- Now, download and install the app on your Android phone.
- After the app is successfully installed on your phone then open it.
- Now, when you open the app then it will ask you to enter a Key Phrase. Well, the Key Phrase is just a secret phrase or word which is used to trigger the phone alarm unless you find it.
- After entering your desired Key Phrase then tap on Set button.
- Now, if you want to check that if it is working or not then just send a SMS from another phone with theKey Phrase that you have entered previously.
- Then, as your Android phone receives the SMS with the Key Phrase in it then it will trigger the alarm on full volume even when your phone is on Silent mode.
- That’s it! You are done!
Conclusion
So, this was all about how to find Android phone even when it is on Silent mode. I hope that now you will be able to find your Android phone easily and quickly. If you have any type of queries regarding this tutorial then do let us know, we will try our best to resolve them. And in the meantime, if you’d like this tutorial then don’t forget to share this with your friends and social circles too.
Available link for download
Friday, January 20, 2017
CutyCapt on Kali Linux
CutyCapt on Kali Linux
Today im going to make you know about an intresting tool in Kali-Linux that is CutyCapt.
CutyCapt was written by Björn Höhrmann <bjoern@hoehrmann.de>
CutyCapt is used to capture Webkits rendering of a web page into many different Vector and Bitmap formats like JPEG, PNG, PDF and many more.
So lets Capture something::
Sample 1:

Here --url=www.moinkhan.blogspot.com specifies the target website which we want to capture and --out=/root/Desktop/output.png specifies the location of output (here it is /root/Desktop) and the name of output file (here it is output) and the format of output file (here it is .png).
Formats can also include [pdf, bmp, jpeg and many more...]
Sample 1:

here we captured the target address in PDF format using .pdf extension and also specified minimum width and height using the --min-width and --min-height options.
CutyCapt has many other options to try out like max-wait and delay time and many other things. Now as you know how to specify these options you can try them out one by one.
For more help on CutyCapt check out the help page and the manual page of CutyCapty using following commands:
man cutycapt --> to check the manual page.
cutycapt --help --> for summary of options.
Hope you Enjoyed this one... :)
CutyCapt was written by Björn Höhrmann <bjoern@hoehrmann.de>
CutyCapt is used to capture Webkits rendering of a web page into many different Vector and Bitmap formats like JPEG, PNG, PDF and many more.
Requirements:
1. Kali Linux or Any Linux with cutycapt installed.
(Download Kali Linux)
So lets Capture something::
Sample 1:
command--> cutycapt --url=www.moinkhans.blogspot.com --out=/root/Desktop/output.pngHere --url=www.moinkhan.blogspot.com specifies the target website which we want to capture and --out=/root/Desktop/output.png specifies the location of output (here it is /root/Desktop) and the name of output file (here it is output) and the format of output file (here it is .png).
Formats can also include [pdf, bmp, jpeg and many more...]
Sample 1:
command--> cutycapt --url=www.facebook.com --out=/root/Desktop/output2.pdf --min-width=400 --min-height=300here we captured the target address in PDF format using .pdf extension and also specified minimum width and height using the --min-width and --min-height options.
CutyCapt has many other options to try out like max-wait and delay time and many other things. Now as you know how to specify these options you can try them out one by one.
For more help on CutyCapt check out the help page and the manual page of CutyCapty using following commands:
man cutycapt --> to check the manual page.
cutycapt --help --> for summary of options.
Hope you Enjoyed this one... :)
Available link for download
Wednesday, January 18, 2017
How to Backup app data on Android without Rooting
How to Backup app data on Android without Rooting
Backup your Android Devices Application Data along with Applications
You can safely backup your application data from your Android device itself. Helium (formerly known as Carbon) is your solution. How to use Helium (Carbon) to backup your app data...
- Download and Install Helium (Free or Premium) from Google Play Store.
- Install desktop version of Helium <--- Click here to download
- Enable USB Debugging on your device. (For android 4.2 and up users, go to Settings>About> Tap 7 to 8 times on Build Number until to you see a message " You are now a developer ")
- Install USB drivers of your device if you are running on Windows Platform. Please note that USB drivers that you install must support ADB. (You can also try installing drivers from Windows Update if you are unable to get manufacturers drivers)
- Connect your device to PC via USB Cable in PTP Mode (Portable Camera) making sure you have USB Debugging ON.
- After you have done with this, Open Helium app on your device and Helium desktop on your PC, this will activate Helium to work on your device unless you perform a restart
You can now backup your app data along with apps either to your SD Card or Your PC... ENJOY!!!
NOTE: This will not work with Motorola Devices due to bug from Motorolas Side...
| Click here to Download |
Available link for download
Subscribe to:
Posts (Atom)