Showing posts with label os. Show all posts
Showing posts with label os. Show all posts
Tuesday, March 14, 2017
Removing Windows OS Passwords with CHNTPW on Kali Linux
Removing Windows OS Passwords with CHNTPW on Kali Linux

So First of all lets see which tool we are going to use
[UPDATE] If you are having any kinda problem with this method on windows 8/8.1 then try this method
Changing Windows 8/8.1 Password with CHNTPW
If you want to recover Windows 8/8.1 passwords instead of removing them see this tutorialCracking Windows 8/8.1 passwords with Mimikatz
Tool Name:- chntpwTool Description: Obviously its going to be what the man page of tool says: "chntpw is a utility to view some information and change user passwords in a Windows NT/2000 SAM userdatabase file, usually located at WINDOWSsystem32configSAM on the Windows file system. It is not necessary to know the old passwords to reset them. In addition it contains a simple registry editor (same size data writes) and hex-editor with which the information contained in a registry file can be browsed and modified."
Attack Requirements:
1. Physical Access to victims Computer.
2. A live bootable pendrive of Kali Linux.
(Download Kali Linux)
So Lets get started:
Step 1: Mounting the drive containing Windows OS-> This one is easy aint it? Well so that you might not have forgotten how to do it, Ill type the syntax:
ntfs-3g /dev/sda1 /media/win
Note that sda1 in above command is the partition on which Windows OS is installed yours can be different. To check yours simply type fdisk -l which will list your all partitions and then check by yourself on which partition your Windows OS is installed. If you cant get it this way then dont worry Im still here well then you can try doing it in GUI way. Click on Applications > Accessories > Disk Utility then select victims hard disk and see on which partition Windows OS is installed. If Windows Partition is installed on any other partition then replace sda1 in the above command with that which you found e,g sda2. Also note that if there is no such directory as win (mentioned in above command) in your /media folder then you must create one which is simple just type mkdir /media/win this command will make win folder in media folder on which youll mount victims Windows OS (It is not necessary that its name be win you can use any name).
Step 2: OK after successfully mounting Victims Windows OS now you need to move there but wait not only there instead very much deep in there. You need to move to config folder which is located in System32 folder (Note that it is Capital S in windows 7 & 8). You can move there using this command:-
cd /media/win/Windows/System32/config/ (On Windows 7 & 8)
or
cd /media/win/WINDOWS/system32/config/ (On Windows XP and those before it)
Step 3: Now is the most tough part of game (only if tough means easy :) ). Now as when you are inside the config directory type the following command to see the list of users available on Victims Machine:
chntpw -l SAM (remember it is ell not 1)

note the name of user whose password you want to clear.
Step 4: Oh man our happy journey is coming to an end now. Follow the upcoming steps to blast Victims Windows OS password:
type the command:
chntpw -u <username> SAM

Note: <username> here is the name of user you noted in the above step.
it will display different options before you.
type 1 and hit enter
type y and hit enter

Voola you busted Victims password now turn off Kali and Open Victims Windows OS without knowing His/Her Password. Bad Bad Bad...
For More Info on chntpw type this in your terminal:
man chntpw
This will display Manual Page of chntpw...
Happy Cracking... :)
Dont forget to read the Disclaimer
Available link for download
Monday, March 6, 2017
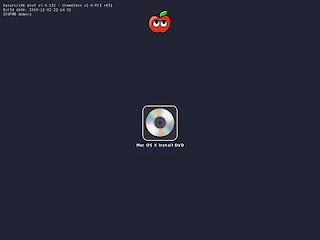
Mac OS X Mountain Lion Free Download
Mac OS X Mountain Lion Free Download

Mac OS X Mountain Lion Free Download DMG 10.8 App Store Release. It is final bootable OS X Mountain Lion 10.8 InstallESD.DMG File for Clean OS X Install.
Mac OS X Mountain Lion Overview
OS X Mountain Lion is the ninth arrival of the Mac OS X. This working framework was made accessible for the overall population on 25th July 2012. This form of Mac OS X includes 200 new peculiarities which has upgraded the client experience. Macintosh OS X Mountain Lion has drawn quite a bit of its persuasion from iOS which is the working framework for iPhone and iPad. The antecedent of Mac OS X Mountain Lion was Mac OS X Lion and the Mountain Lion is proposing the refinement in the status of this working framework. With Mountain Lion the client can undoubtedly deal with the substance. in the event that you are occupied with Latest Features then Download Mac OS X Yosemite.Macintosh OS X Mountain Lion has some new gimmicks and some of them are as per the following Mac OS X Mountain Lion has another and overhauled Safari program with variant 6. Notes and Reminders have been presented as individual application and are no more incorporated with Mail and Calendar. The iChat application from past OS X forms have been supplanted with Messages from iPhone. Another malware blocking framework known as Gatekeeper has been presented in Mac OS X Mountain Lion. Notice Center is the checked gimmick included Mac OS X Mountain Lion and it will inform you about the applications that has been right now opened and about their overhauls. You can likewise Download Mac OS X Mavericks which was discharged after Mountain Lion.
All things considered Mac OS X Mountain Lion is an extremely convenient working framework which has some new and some upgraded gimmicks bringing about improved client experience.


Features of Mac OS X Mountain Lion:
Below are some noticeable features which you’ll experience after Mac OS X Mountain Lion free download.- Adds 200 new features.
- Enhanced user experience.
- Inspired from iOS.
- User can easily manage the content.
- New and updated Safari browser included.
- Notes and Reminders have been included as individual applications.
- iChat application is replaced by Messages from iPhone.
- New malware blocking system Gatekeeper introduced.
- Notification Center included.

Mac OS X Mountain Lion Technical Setup Details
- Software Full Name: Mac OS X Mountain Lion 10.8 Official App Store Release
- Setup File Name: Mountain_Lion_10.8_InstallESD.dmg
- Full Setup Size: 4.05 GB
- Setup Type: Offline Installer / Full Standalone Setup:
- Compatibility Architecture: 32 Bit (x86) / 64 Bit (x64)
- Latest Version Release Added On: 12th Jan 2015
- License: Official App Store Release (To be Installed on Mac)
- Developers: Apple Mac OS

System Requirements For Mac OS X Mountain Lion
Before you start Mac OS X Mountain Lion free download, make sure your PC meets minimum system requirements.- Memory (RAM): 2GB of RAM required.
- Hard Disk Space: 8GB of free space required.
- Processor: Intel Pentium 4 or later required.
Mac OS X Mountain Lion Free Download
Click on download catch to begin Mac OS X Mountain Lion Free Download. This is finished disconnected from the net installer and standalone setup for Mac OS X Mountain Lion. This eventual good with both 32 bit and 64 bit windows.Download Here
Available link for download
Friday, February 24, 2017
OS X Yosemite 10 10 2 14C109 Intel Flash card for installation 5 2 GB
OS X Yosemite 10 10 2 14C109 Intel Flash card for installation 5 2 GB

OS X Yosemite 10.10.2 (14C109) [Intel] (Flash card for installation) | 5.2 GB
Upgrade your Mac to OS X Yosemite and you’ll get an elegant design that’s both fresh and familiar. The apps you use every day will have powerful new features. And your Mac, iPhone, and iPad will work together in amazing new ways. You’ll also get the latest technology and the strongest security. It’s like getting a whole new Mac
Here’s what you’ll love about OS X Yosemite:
A fresh look for your Mac
• The Dock has a sleek new design with instantly recognizable icons.
• A beautiful new system font is crisp and easy to read.
• Translucency gives you a sense of what’s in, or behind, your window.
• Streamlined toolbars free up space for your content.
Handoff. Pick up where you left off.
• Start an activity on your Mac and finish it on your iPhone or iPad — or vice versa.
• Use Handoff with Mail, Safari, Pages, Numbers, Keynote, Maps, Messages, Reminders, Calendar, Contacts, and other apps.
iPhone calls. Now on your Mac.
• Make and receive calls on your Mac even when your iPhone is in the next room.
• Just click a phone number you see in Contacts, Calendar, Messages, Spotlight, or Safari to make a call.
SMS. Those green text messages on your iPhone? They’re now on your Mac, too.
• All of your messages now appear on all of your devices.
• Send and receive SMS text messages right from your Mac.
Instant Hotspot gives you the Internet anywhere.
• Easily activate the personal hotspot on your iPhone right from your Mac.
• Connect to your personal hotspot without taking your iPhone out of your pocket or bag.
AirDrop. Now between Mac and iOS devices, too.
• Share files to another Mac or to an iOS device, even when you don’t have an internet connection.
New Today view in Notification Center.
• Handy widgets give you quick access to up-to-the-minute calendar, weather, and stock information.
• Add widgets from the Mac App Store.
Creating the stick. All actions are performed in a favorite Windows:
Mount the image 10102usb.iso
Install R-Drive (in the hand).
Expand the image 10102usb.arc to stick (at least 8GB. Please format the USB flash drive to)
Specified during installation to become the partition active.
Reboot, load with flash. We make installation Mac OS X.
Upon completion reboot again with the stick, but choose a boot menu section with a freshly installed Mac.
After a successful download - install the boot loader and the necessary kekstov.
Shkarko ketu - Download here
http://rapidgator.net/....part1.rar.html
http://rapidgator.net/....part2.rar.html
http://rapidgator.net/....part3.rar.html
http://rapidgator.net/....part4.rar.html
http://rapidgator.net/....part5.rar.html
http://rapidgator.net/....part6.rar.html
http://ul.to/dzwp6uie
http://ul.to/a4thslg7
http://ul.to/awgk0hx2
http://ul.to/s425miea
http://ul.to/xylq1msq
http://ul.to/dbeio3ca
http://www.nitroflare.com/...D587ED42C936509
http://www.nitroflare.com/...98C900181905C0E
http://www.nitroflare.com/...F5E3AF9830866D6
http://www.nitroflare.com/...3FA766F101F77A3
http://www.nitroflare.com/...4ADB1EBCE3F8A3C
http://www.nitroflare.com/...D314A64C925712C
Torrenthttp://www.torrentdownloads.me/torrent/1658515194/Install+OS+X+10+10+Developer+Preview+2+dmg
Torrenthttp://www.torrentdownloads.me/torrent/1658515194/Install+OS+X+10+10+Developer+Preview+2+dmg
Available link for download
Saturday, December 17, 2016
Mac OS X Common problems Solved
Mac OS X Common problems Solved
Common Mac OS X problems solved
1. Persistent Beachball -Mac Pointer Hang

Quite often, Mac pointer turns into a spinning beach ball while your Mac keep on doing the thinking. Occasionally it stays that way. Mostly with Browsers like Chrome
First, try pressing Cmd + . to cancel whatever process is running. If that has no effect, switch to Finder or another app (using Option+Tab) or from Dock, and carry on working. In case you choose to wait, the app will finish what its doing and give you its full attention.
First, try pressing Cmd + . to cancel whatever process is running. If that has no effect, switch to Finder or another app (using Option+Tab) or from Dock, and carry on working. In case you choose to wait, the app will finish what its doing and give you its full attention.
If youre convinced the application isnt going to recover, force it to quit by holding Option or by pressing Cmd+Option+Esc. Rarely, it refuses to die, or its windows may disappear while its Dock icon retains its open indicator.
Restarting your Mac will get rid of it, but could give a message saying the app failed to quit. Hold down the power button to force shutdown like you do for Windows :(
Restarting your Mac will get rid of it, but could give a message saying the app failed to quit. Hold down the power button to force shutdown like you do for Windows :(
You can also use a Unix command for this: run Terminal – found in Utilities within the Applications folder – and type sudo shutdown –h. Close other apps first to avoid losing data.
2. Deleting of File by Mistake
When you think youve mislaid an important file is to ask Spotlight. Press Cmd+[Space] to open the search bar, and type as much of the filename as you remember; pause after each letter to see what comes up.
If youve overwritten your work with a new file of the same name, or emptied the Trash, youve have a problem. if you have backed up Time Machine users you may be in luck, as Spotlight will find files that dont currently exist but have been backed up. The software is built into OS X 10.5 and later, and you only need is a USB or FireWire hard disk.
If you havent set it up yet, you may need a disk-recovery utility such as Data Rescue 2. This detects and restores deleted files as well as tackling more general disk problems.
Its wise to stop using the disk as soon as you realise youre missing something; the likelihood of rescuing a deleted file depends on whether new data has been saved over it.
3. Documents open in the wrong app
Although hardly a catastrophe, this can be an ongoing source of frustration. Yet its easy to fix once you know how. For example, when you download a JPEG file, double-clicking it will normally open Preview. But if you habitually use Photoshop to work with photos, Preview may be irrelevant.
To change this, select any JPEG and press Cmd+I (Get Info). Under Open with, select your preferred app, such as Photoshop, and click Change All. Confirm this and all JPEGs will always open in Photoshop.
This works for any combination of file type and compatible application. The files themselves arent changed; youre just altering the Mac OSs list of file associations.
4. Mac wont start
A total lack of response to the power button could mean a blown fuse in the plug, so check first. If its not completely dead, the Mac will do a power-on self-test (POST) as it boots up, and beep if it finds a fault. The power LED may flash too.One, two or three beeps points the finger at RAM modules (see here for more info). Try easing them into place, in case theyve become unseated. Your manual will tell you how to get at the RAM, or go to www.apple.com/support and search for install memory and your Macs model name.
Four and five beeps indicate problems with the system ROM or processor, while the Air also has an SOS code consisting of three short, three long and then three short beeps. If you hear these, seek professional Mac help.
5. Mac Kernel panic

When the OS crashes it can only bow out with the message You need to restart your computer. This is a kernel panic. Its rare and, thankfully, often fixed by restarting.
If not, try unplugging all add-ons from your Mac and restarting. Internal upgrades – including dodgy RAM – can provoke kernel panics, as can devices such as USB hubs. Another possibility is that a system file has become corrupted.
Restart while holding x; if this works, go to System Preferences, click Startup Disk and ensure the correct disk is selected. Or, restart holding down Option, releasing it when icons appear; youll be asked which disk to start up from. Or zap the PRAM (see the tip above).
If none of those work, perhaps youve moved, renamed or deleted a system file. Reversing this may sort it out – or not.
The last resort is to reinstall Mac OS X. Start up from your Macs OS X DVD, run the installer and choose Archive and Install. Youll need to reinstall your apps, though.
Available link for download
Tuesday, November 22, 2016
How to Get the Mac OS X 10 11 El Capitan Public Beta Preview
How to Get the Mac OS X 10 11 El Capitan Public Beta Preview
Lately Apple announced the release of their newest Mac OS X version at this years WDC- Worldwide Developers Conference, and its called "El Capitan."
Like the majestic rock formation its named after (located within Yosemite National Park), El Capitan promises to emphasize and expand on some of the great features we used on 10.10 Yosemite.
If you cant wait for few months to try out some of the new features coming this fall, like more intuitive Spotlight searches and improved window management, then do sign up for the Public Beta preview, which isnt exclusive to just developers.

How to Sign Up for the El Capitan Beta Preview
To sign up for the Public Beta preview right now, visit the Apple Beta Software Program page.
Start by hitting "Sign Up," then enter in your Apple ID credentials and accept the agreement to join the OS X Beta Program. This will sign you for both the iOS 9 and OS X 10.11 Public Betas. If youre already a member, just sign in.
Then move to the Enroll Your Devices page for Mac OS X and hit the "Download" the OS X El Capitan Public Beta" button.
This will open up the Mac App Store, automatically redeem your redemption code, and start downloading the El Capitan Public Beta.
Once youve downloaded it, I suggest you create a boot-able install disk before you install it. That way you can install it on your other Macs too without having to re-download the file. Also, its better to create a separate partition for El Capitan, so your Yosemite one is unharmed.
Available link for download
Thursday, October 13, 2016
Dual Boot Windows 7 and OS X Snow Leopard Using Chameleon
Dual Boot Windows 7 and OS X Snow Leopard Using Chameleon
Posted by tonymacx86 on Thursday, November 26, 2009
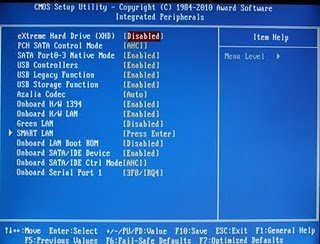
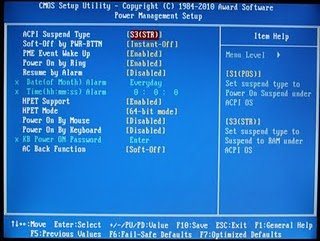
You will need to set your BIOS to ACHI mode and your Boot Priority to boot from CD-ROM first. This is the most important step, and one many people overlook. Make sure your bios settings match these. Its not difficult- the only thing I did on my Gigabyte board besides setting Boot Priority to CD/DVD first was set Optimized Defaults, change SATA to AHCI mode, and set HPET to 64-bit mode.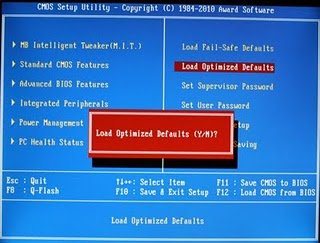
STEP 2: PARTITIONING HARD DRIVE


STEP 3: INSTALL SNOW LEOPARD
The next step is to install Snow Leopard to Partition 2.


(Modified by MACWIN to make it more simpler and comfortable on Nov 01,2011)
Using Chameleon as your bootloader, you can boot an infinite amount of operating systems on your PC. Its simple to use a separate hard drive for each operating system.
The following guide will show you how to put OS X Snow Leopard and Windows 7 on the same hard drive. You can then use Chameleon to select either Snow Leopard or Windows 7 at boot time. Its a bit trickier, as the Windows installer will set itself as the active partition automatically The latest MultiBeast will take care of choosing boot0hfs instead of boot0 to automatically boot from hfs partition, even if its inactive.
YOU WILL NEED
- A computer running an Intel Processor.
- A blank CD
- A Mac OS X Snow Leopard Retail DVD
- A Windows 7 Installation DVD (Retail/OEM)
- Its easy to get frustrated, but dont give up! There are a community of users with similar hardware in the tonymacx86 Forum to provide support if you get stuck.
BEFORE YOU BEGIN
- If you have greater than 4gb of RAM, remove the extra RAM for a maximum of 4gb. You can put back any extra RAM in after the installation process.
- Use only 1 graphics card in the 1st PCIe slot with 1 monitor plugged in.
- Remove any hard drives besides the blank drive being used for OS X.
- Remove any USB peripherals besides keyboard and mouse.
- Remove any PCI cards besides graphics- they may not be Mac compatible.
- If using a Gigabyte 1156 board, use the blue Intel SATA ports- not the white Gigabyte SATA ports.
- Its best to use an empty hard drive- you will have to partition and format the drive.
- Always back up any of your important data.
STEP 1: BIOS SETTINGS
You will need to set your BIOS to ACHI mode and your Boot Priority to boot from CD-ROM first. This is the most important step, and one many people overlook. Make sure your bios settings match these. Its not difficult- the only thing I did on my Gigabyte board besides setting Boot Priority to CD/DVD first was set Optimized Defaults, change SATA to AHCI mode, and set HPET to 64-bit mode.
STEP 2: PARTITIONING HARD DRIVE
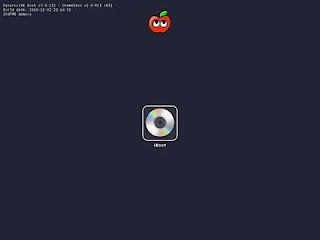
In order to boot the Mac OS X Retail DVD, youll need to download and burn iBoot. For desktops and laptops using unsupported Intel CPUs and graphics, a legacy version of iBoot can be downloaded here. (HP Users Use Legacy iBoot or Boot with CPUS=1) Download iBoot
- Burn the image to CD
- Place iBoot in CD/DVD drive
- Restart computer
- Boot to iBoot CD and then eject iBoot
- Insert your Mac OS X Snow Leopard Retail DVD and press F5
- When you see the screen below, press enter to begin the boot process
- When you get to the installation screen, open Utilities/Disk Utility. NOTE: If you cannot get to the installation screen, retry from Step 4, type PCIRootUID=1 before hitting enter. If that doesnt work then try PCIRootUID=1 -x or just -x which will enter Mac OS X Safe Mode and will allow you to proceed.
8. If you have unsupported Graphics Card boot with –X . { E.g. At Bootloader screen select OSX install Disk and hit Spacebar and type cpus=1 –x –v and hit enter. )
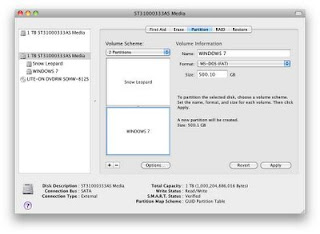
9. First thing to do is format and partition the hard drive. When you choose 2 partitions with a GUID Partition Table, OS X will format the drive with 3 partitions. Partition 1 is EFI, Partition 2 will be Snow Leopard and Partition 3 will be Windows 7. The EFI partition is a very small (200mb) hidden partition that holds the OS X bootloader and BIOS information on a real Mac.
10. Open Applications/Utilities/Disk Utility
1. Select your hard drive in the left column. Click the Partition tab
2. Under Volume Scheme: separate your hard drive into 2 Partitions. You can make them any size you want.
3. Click Options... choose GUID Partition Table, then click OK.
4. Click Untitled 1. Under Name:type Snow Leopard. Under Format: choose Mac OS Extended (Journaled).
5.
6. Click Untitled 2. Under Name: type Windows 7. Under Format: choose MSDOS (FAT).
7.
8. Click Apply and close Disk Utility.
9. Insert Windows 7 DVD in tray.
10. Unplug all hard drives except this one and reboot.
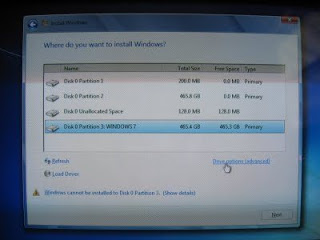
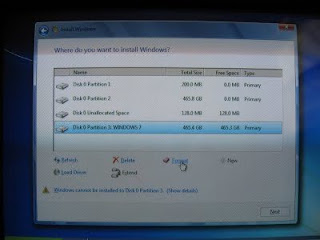
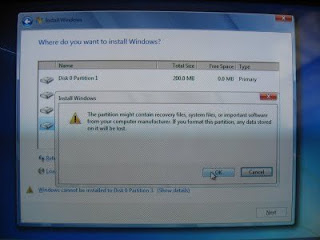
STEP 2: INSTALL WINDOWS 7
Now you will install Windows 7 to Partition 3. Youll have to reformat it to NTFS in the Windows 7 installer before Windows will let you install. We labeled it Windows 7 in the previous step.
Now you will install Windows 7 to Partition 3. Youll have to reformat it to NTFS in the Windows 7 installer before Windows will let you install. We labeled it Windows 7 in the previous step.
- Wait for Windows to begin installation process.
- Accept license agreement.
- At Which type of installation do you want, choose Custom (Advanced)
- At Where do you want to install Windows, choose Partition 3: Windows 7.
- Click Drive options (advanced).
- Click format.
- Click OK.
- Click Next.
At this point, Windows 7 will install to Partition 3. The installer will reboot the computer a few times- just leave it until you complete the installation process and see the Windows desktop.
STEP 3: INSTALL SNOW LEOPARD
The next step is to install Snow Leopard to Partition 2.
iBoot + MultiBeast- Install OS X on any Intel-based PC
1.Available link for download
Read more »
Tuesday, October 4, 2016
Disable Windows 10 Tracking for x32 x64 bit OS Apps Download Free
Disable Windows 10 Tracking for x32 x64 bit OS Apps Download Free
Disable Windows 10 Tracking is similar to Destroy Windows 10 Spying tool. Functionality wise, it is the smallest tool but size wise it is the largest. It displays privacy options, all of which focuses on deactivating tracking.

Whats New:
1. Option to disable Windows Defender
2. Optimizations
3. Fixed "Allow Telemetry"
4. Finally changed the exe manifest to automatically request Administrator privileges.
5. Logging! If an error occurs, DisableWinTracking.log will contain detailed information about the error so we (the developers) can help you fix it.
?S: Windows 10
Instructions:
• Right click and press "Run as Administrator"
• Choose any/all of the options youd like
• Press "Get privacy!" or "Revert" to revert options
• You can read the output in the console dialog to see if it worked.
• Thats it!
Download Disable Windows 10 Tracking for x32/x64 bit OS Apps
File Size: ( 7 MB ) | |
Server Name | Download link |
| Mirror Links | |
Available link for download
How to setup boot options for new os setup
How to setup boot options for new os setup
 Changing the boot order of the "bookable" devices on your computer like your hard drive,optical drive, USB flash drive,etc is very easy.
The BIOS setup utility is where you change boot order settings.
Turn on or restart your computer and watch for a message during the POST about a particular key, usually Del, F2,F10,F12,Esc,etc.
, that youll need to press to ...enter SETUP. Press this key as soon as you see the message.
Available link for download
Subscribe to:
Posts (Atom)