Showing posts with label create. Show all posts

Tuesday, February 14, 2017

How to Create Animated GIF using Camtasia Studio from Video and Images


How to Create Animated GIF using Camtasia Studio from Video and Images


Camtasia is a powerful desktop screen video recorder which is used by many people all over the world in all most all the fields. And yes here at TechTricks also we use camtasia to record the video tutorials. (You can check our the videos created with camtasia here on our YouTube channel). Camtasia is so powerful with so many advance features with simple user interference.

Camtasia can not only allow you to record your desktop video, It also allows you to save the video in the GIF image format! with simple one click.

camtasia

How to Create GIF from your Own Video:

In this post we are going to show you How to create GIF images with camtasia. If you are not interested in creating the GIF images on your computer then check this post to create the GIF images online.

Note: Before getting started you need to get the camtasia from here [official link] free version is available for 30 days.
  • If you want to create a GIF from already created video then you can directly import the video by hitting on import media.
import+media
  • If you want to create a GIF from the video which is to be recorded by using camtasia then you can Hit On "Record the Screen" and start recording your activity on your desktop.
record
  • After completion of the recording your video edit the video as per your need. And then Hit on Produce and Share.
porduce+and+share
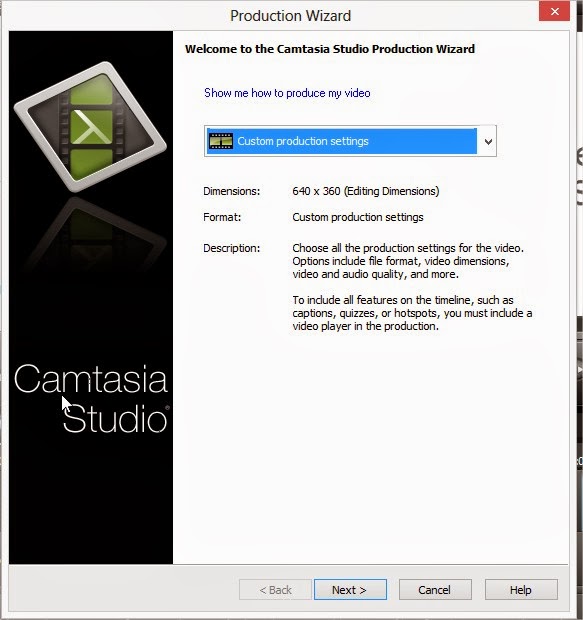
  • When you click on Produce and Share you will get the a popup windowwith title "Production Wizard".Just like in below screen capture.
+Production+Wizard
Select the custom production settings and click on next to continue.
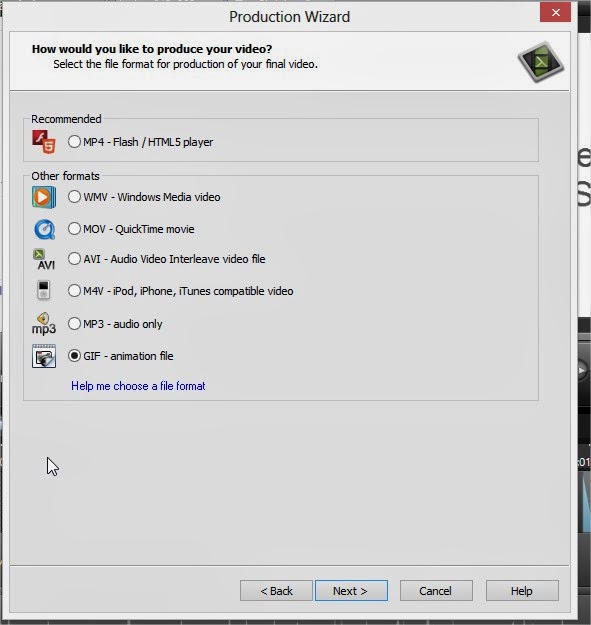
  • In the next window you can select the format of the output video.As our Aim is to create the GIF image we will select the GIF and click on next.
Production+Wizard2
And the remaining steps are so simple you can continue by hitting next button and create the GIF image.

Conclusion:

Camtasia is a huge software.To create the simple GIF images from the videos need to try these Online tools which are really too small in size when compared to Camtasia.

Available link for download


Read more »

Friday, February 10, 2017

APP INVENTER Create your Own Android App with less then your Coffee time


APP INVENTER Create your Own Android App with less then your Coffee time


                     MIT App Inventor is a blocks-based programming tool that allows everyone, even novices, to start programming and build fully functional apps for Android devices. Newcomers to App Inventor can have their first app up and running in an hour or less, and can program more complex apps in significantly less time than with more traditional, text-based languages. Googles Mark Friedman and MIT Professor Hal Abelson co-led the development of App Inventor while Hal was on sabbatical at Google. Other early Google engineer contributors were Sharon Perl, Liz Looney, and Ellen Spertus. App Inventor runs as a Web service administered by staff at MIT’s Center for Mobile Learning - a collaboration of MIT’s Computer Science and Artificial Intelligence Laboratory (CSAIL) and the MIT Media Lab. MIT App Inventor supports a worldwide community of nearly 3 million users representing 195 countries worldwide. The tool’s more than 100 thousand active weekly users have built more than 7 million android apps. An open-source tool that seeks to make both programming and app creation accessible to a wide range of audiences, MIT App Inventor has grabbed the attention of:
  • Formal and informal educators who have used MIT App Inventor to introduce programming to their Computer Science students, science club members, after-school programs attendees, and summer campers. Many educators have also started to use MIT App Inventor to develop apps in support of their own instructional objectives.
  • Government and civic employees and volunteers who have harnessed the power of MIT App Inventor to develop custom, often hyper-local apps in response to natural disasters and community-based needs Designers and product managers who have seen the potential that MIT App Inventor has to support the iterative design process via rapid prototyping, testing and iteration.
  • Researchers who use MIT App Inventor to create custom app in support to meet their data collection and analysis requirements in support of their research in a wide variety of fields from medical to social.
  • Hobbyists and Entrepreneurs who have an idea they want to quickly turn into an app without the cost or learning curve that more traditional app creation entails.


Available link for download


Read more »

Sunday, February 5, 2017

Android Apps To Create Music


Android Apps To Create Music


"Music is the language of the spirit. It opens the secret of life bringing peace, abolishing strife." Kahlil Gibran.

Everybody loves music. In one form or another we are all addicted to our favourite songs. Pop music, Hip-Hop, Jazz music or RocknRoll – they are all great.

In recent years modern technology becomes more and more innovative. Especially when it comes to mobile devices such as tablets, smartphones etc..


Android Apps To Create Music

Android, iOS biggest competitor, is undoubtedly the most popular platform for mobile devices. Every month they release thousands of new applications and always find a way to surprise us. Travel applications, which help you explore the most interesting and captivating places on Earth; business apps, which are must-haves if you are running your own business; educational apps; fitness apps; games... the list is so large that we can hardly find such a big variety of categories to classify all the different opportunities that Android offers us. Today we have decided to select for you the best music making apps. No matter if you are at home or on the road – these applications are amazing and you can be sure that you will spend hours enjoying your favorite hobby with them. Here is our short list:


1) PocketBand Pro

Here is our first suggestion! PocketBand Pro is an amazing application that allows you to “Build high quality tracks as a sequence of loops, mixing synths,drums, audio recordings, analog modulators and arpeggiators. Apply FX to channels and export to mp3 or ringtones. Also play and collaborate in our community.” (quote directly form Play Store). Unfortunately, it is not free – it costs $9.99, but it is really worth the money. It works on Android 1.6 and above and it is among the most popular making music apps.

2) Image-Line FL Studio Mobile

As almost every other Android application, this one has an iOS twin too – FL Studio Mobile. However, the interface is a bit different. It has a wonderful selection of built-in sounds and gives you the opportunity to create your own tracks. All you need to do is let your imagination fly and put all of your creative ideas in practise. The application costs only $19.99 and runs on Android 2.3.3 and above.

3) Solo

Apps To Create MusicHere is another fantastic program. If you love playing the guitar, then this is the best choice for you. Solo gives you the opportunity to carry your own guitar everywhere you go. Classical guitar, electric guitar, acoustic guitar – they all sound realistic. You will spend hours creating your own projects. Also, the app will show you the exact place to put your fingers. After the latest updates, Solo has added toddler settings and variable auto strum speed. It is the cheapest application in our list – only $3.99 and works on Android 1.6 or later.

4) Caustic 2

We left this one for a dessert since it is our favourite. Inspired by synthesizers, this great application has a wonderful design. And although the overall interface looks a bit complicated, once you download it you will see that in fact it is very easy to use. The program is absolutely free and runs on Android 2.1 or later.


Author Bio:

Rose Finchley loves to write about technology. She works in the support team of http://www.perfectcleaning.org.uk/end-of-tenancy-cleaning-hornsey-n8 and she loves her job.

Available link for download


Read more »

Monday, January 16, 2017

Create Bootable USB in Kali Linux


Create Bootable USB in Kali Linux


Hi Everyone. Today I am going to show you how to create bootable usb in Kali Linux using line utility. There are several 3rd party utilities available in the market, some of them are UNetbootin, Universal USB Installer, YUMI and RMPrepUSB. These all are GUI-based utilities. But, today I am going to create a linux bootable usb using dd (device driver). dd is a simple command line program that is pre-installed in almost linux based operating systems. It is a simple, yet versatile and powerful tool. It can be used to copy from source to destination, block-by-block, regardless of their filesystem types or operating systems. Below screen-shot shows you how to create bootable usb using dd command.

Tested on: Kali Linux 1.1.0a (64-bit)
I logged in as a superuser. For normal user, please run sudo or su command to complete the task.

STEP:
  • Before we begin, please check the partition of your hard drive. Open terminal and run fdisk -l
  • Now, plug in formatted (in fat32) usb drive and re-run fdisk -l to identity your usb drive name in partition table. Mine detected as sdb (Disk /dev/sda).
  • Now, goto the location where you have placed your iso file. I chose Debian 8.1 (64-bit) Disc 1 to create bootable iso.
 
  • Type dd command to create bootable usb. syntax: dd if=filename.iso of=/dev/sdx bb=y, where filename is the image of the file (in iso format), x represents external drive and y represent block size of the external drive (in kb as K or in mb as M). Please check screen-shot.
    • Once program begin, you will find blinking cursor on the next line. Be patient for a while until it finishes creating bootable usb. Once finished, you will get the status of the operation.
    • If operation is successful, run sync and then eject /dev/sdx. Plug in your usb drive. If operation is successful, you will see bootable usb icon on your desktop.

    Available link for download


    Read more »

    Thursday, January 5, 2017

    Dell 7537 Windows 10 Upgrade issue reboot loop and how to rebuild without Recovery disk create Dell recovery disk yourselves


    Dell 7537 Windows 10 Upgrade issue reboot loop and how to rebuild without Recovery disk create Dell recovery disk yourselves


    Reboot loop after upgrading to Windows 10 & Rebuild Dell machine from scratch without recovery disk.


    Even though Im writing this blog little bit late but I think it might be useful to others. With Windows 10 release I started upgrading my Dell 7537 laptop to Windows 10 on first day itself, I did created Dell recovery disk as I was was confident that upgrade will go smooth, but it didnt happen :(.

    After upgrading to Windows 10 my laptop was on continuous reboot loop and I tried various options from Boot such as changing to GPT, UEFI and it didnt help at all. Now Im stuck as there was no option to go back to Windows 8.1 and I dont have recovery disc, I tried searching media all over WEB but I couldnt find source anywhere. Then I contacted Dell UK Support and they informed me that Dell Recovery Disks costs around £29/- which I was not ready to pay. Moreover they can only provide disks but the model doesnt have CD/DVD Drive, hence recovery disks from DELL is not solution at all, when I asked support engineer how to recover with disks he dont have answer, what he mentioned was I need to use another computer to convert disks into bootable USB Disk. After getting escalated to his line manager he offered to provide disks for free but he mentioned it takes 5 business days to receive (I actually received after 10 days). Also I cant install OS without Product Key, at least in my model I dont have Product Key sticker its embedded in hardware.

    As my machine was no use and didnt have recovery disks yet from Dell, I have started searching various other options by going through various blogs. I came across this wonderful & very helpful sites for Dell - http://dellwindowsreinstallationguide.com/ by Philip Yip.

    What I understand is that we cannot directly build Windows 10 even if you have Product Key, the option is to upgrade Activated version of Windows 7 or 8 to Windows 10.

    Note by performing below steps you will lose the data as we are formatting so I suggest you to take backup on another disk. 

    Requirements
    • A working machine with internet connectivity
    • USB Disk with at least 8GB
    Since my machine is not bootable I followed the below steps
    1. Downloaded Windows 8.1 media creation tool
    2. Downloaded Windows 8.1 x64 ISO
    3. Using Rufus-2.2 created bootable version of 8.1
    4. Make sure Dell Laptop is configured with UEFI Partition & GPT disks (this is default settings for Dell laptop)
    5. Boot from USB Stick it will automatically build the machine with Windows 8.1
    6. After installation, Windows 8 is activated
    7. I didnt install NVIDIA GEFORCE drivers as many said the reboot loop might be because of nvidia display
    8. Download Windows 10 using media creation tool
    9. copied the ISO to bootable USB media using Rufus
    10. From windows 8 itself launched setup.exe and it upgraded windows 10 without any issue.

    Creating Windows 10 Recovery Disk from Philip Yip - 
    YouTube - https://www.youtube.com/watch?v=4BUNvnIFT3g&feature=youtu.be
    Step by step - http://dellwindowsreinstallationguide.com/a-clean-install-of-windows-10/creating-a-recovery-drive-and-using-it-in-windows-10/#Creating

    Download link for Windows 10 media creation tool 
    http://windows.microsoft.com/en-in/windows-10/media-creation-tool-install

    Download link for Windows 8.1 media creation tool 
    http://windows.microsoft.com/en-IN/windows-8/create-reset-refresh-media

    Creating bootable USB disk for DELL with UEFI Partition 
    http://dellwindowsreinstallationguide.com/a-clean-install-of-windows/converting-your-dell-windows-reinstallation-dvd-into-a-reinstallation-usb/#BootableUSB

    You can check your OS Product key embedded in hardware using RWEverything and following steps mentioned here
    http://dellwindowsreinstallationguide.com/a-clean-install-of-windows/a-clean-install-of-windows-8-1/installation-of-windows-8-1-with-a-windows-8-0-retail-product-key-notes/#OEMKey

    Philip Yip website was very useful & helpful as I could recover my machine without recovery disk from Dell.


    Available link for download


    Read more »

    Tuesday, December 13, 2016

    How to Create a Clean BCD file to fix Windows 7 8 8 1 Boot problem


    How to Create a Clean BCD file to fix Windows 7 8 8 1 Boot problem


    Note: Not for UEFI systems

    So your Windows 7 PC System no longer boots and you are getting the "...An error occurred while attempting to read the boot configuration data." system error. You have reached the point that all suggestions on startup repair have failed and you may now have to re-create a clean boot configuration data (BCD) file. The following information on creating a clean, fresh BCD file maybe helpful to you.

    We are going to use a system command called BCDedit to re-create the BCD file.

    Introduction
    BCDedit is a really powerful tool that Windows 7 and Windows Vista uses to manage the boot loader entries.

    BCDEDIT needs a boot loader file to boot your system.

    A boot loader is a file that contains necessary information that instruct the system how to boot/start an operating system.
    • Windows 7 and Vista bootloader file is ootmgr
    • Windows XP bootloader file is tldr

    Bcdedit edits a file called BCD, which is located in Windows 7s hidden partition under C: ootBCD.

    NOTE: Before performing any changes to your system, please make sure you have a backup of system and personal data files. A backup is essential if things go wrong, when you are making changes to your system.

    How to Create a Clean BCD file:
    Put your Windows 7 DVD in the drive and restart your PC. Assuming youve properly configured your BIOS to boot from CDs/DVDs before hard drives, you should get a prompt asking you to "Press any key to boot from the CD/DVD..."
    Go ahead and press any key.
    In the next window, select "Repair your computer" to continue.
    On the next window, choose the Windows 7 installation that youd like to perform the repair on.
    Click the Next button.
    Proceed with the process by choosing "Command Prompt" from this list [Image below]. We could select the "Startup Repair" to fix the boot problem, but we are assuming that you already tried this option and it did not work.
    In the Command Prompt window we shall perform a number of commands to create the new BCD file.


    Note: Were assuming that the boot drive is drive C: below. If your computer is configured differently, be sure to use the appropriate drive letter here instead. Each command shown below is separated by a newline for display purposes only. So, command and its switches must be on the same line.

    Enter the following commands:

    bootrec.exe /fixmbr
    X: oot ootsect.exe /nt60 all /force


    Replace X in the command line above with the device letter to the CD/DVD drive that is running your Windows 7 Recovery Disk.

    Now remove the old BCD registry, and create a new one instead.

    del C: oot cd

    bcdedit /createstore c: oot cd.tmp

    bcdedit.exe /store c: oot cd.tmp /create {bootmgr} /d "Windows Boot Manager"

    bcdedit.exe /import c: oot cd.tmp

    bcdedit.exe /set {bootmgr} device partition=C:

    bcdedit.exe /timeout 12

    del c: oot cd.tmp


    Now we have a clean, working Win 7 bootloader. But we need to add a Win 7 entry to it:

    bcdedit.exe /create /d "Windows 7" /application osloader

    bcdedit.exe should return a message with a GUID for the newly-created entry. It will look something like this:

    The entry {fc8bcc18-8a93-11df-baf9-806e6f6e6963} was successfully created.

    Youll need to use the value that bcdedit.exe returned for you below, along with the drive letter for the drive that Windows 7 is installed to:

    bcdedit.exe /set {fc8bcc18-8a93-11df-baf9-806e6f6e6963} device partition=C:

    bcdedit.exe /set {fc8bcc18-8a93-11df-baf9-806e6f6e6963} osdevice partition=C:

    bcdedit.exe /set {fc8bcc18-8a93-11df-baf9-806e6f6e6963} path Windowssystem32winload.exe

    bcdedit.exe /set {fc8bcc18-8a93-11df-baf9-806e6f6e6963} systemroot Windows


    And, last of all, tell the Windows 7 bootloader to boot the new entry by default:

    bcdedit.exe /displayorder {fc8bcc18-8a93-11df-baf9-806e6f6e6963}

    bcdedit.exe /default {fc8bcc18-8a93-11df-baf9-806e6f6e6963}


    Now the Windows 7 bootloader has been removed and rebuilt from scratch.

    At this point, you have a clean and hopefully a fully-working bootloader with one entry for Windows 7.

    Reboot your PC system to get back into Windows 7.

    Enjoy!!!

    © pcsoftwarehowto.blogspot.com


    Available link for download


    Read more »

    Wednesday, November 30, 2016

    Create password protected folder without any software


    Create password protected folder without any software


    Steps to create a password protected folder in windows without any requirement of any folder locking software!!! The code for this is:
    cls
    @echo off
    title Folder Locker
    IF EXIST "Control Panel.{21EC2020-3AEA-1069-A2DD-08002B303­09D}" GOTO UNLOCK
    IF NOT EXIST Locker GOTO MDLOCKER
    echo Folder Created.
    :CONFIRM
    echo Are you sure you want to lock the folder? (Y/N)
    set/p "cho="
    IF %cho%==Y GOTO LOCK
    IF %cho%==y GOTO LOCK
    IF %cho%==N GOTO END
    IF %cho%==n GOTO END
    echo Invalid Choice.
    GOTO CONFIRM
    :LOCK
    ren Locker "Control Panel.{21EC2020-3AEA-1069-A2DD-08002B303­09D}"
    attrib +h +s "Control Panel.{21EC2020-3AEA-1069-A2DD-08002B303­09D}"
    echo Folder Locked.
    GOTO END

    :UNLOCK
    echo Enter password to unlock the Folder :
    set/p "pass="
    IF NOT %pass% == YourPassword GOTO FAIL
    attrib -h -s "Control Panel.{21EC2020-3AEA-1069-A2DD-08002B303­09D}"
    ren "Control Panel.{21EC2020-3AEA-1069-A2DD-08002B303­09D}" LOCK
    echo Folder Unlocked Successfully.
    GOTO END
    :FAIL
    echo Invalid Password!
    GOTO END

    :MDLOCKER
    md Locker
    echo Folder created.

    GOTO END
    :END
    PAUSE

    And save it in .bat format (example:- hackingtricks.bat)


    [change the word- YourPassword in the above code with your own password]

    Available link for download


    Read more »

    Tuesday, November 22, 2016

    How To Create A Folder Without Any Name Blank Space In Windows 7 8 and XP


    How To Create A Folder Without Any Name Blank Space In Windows 7 8 and XP


    People are fond of playing pranks on their friends, doing something which can irritate their friends and make them feel surprised. Pranks can be in the form of jokes or tricks and these pranks can at times create big laughs but may also lead to huge fights.

    A way of playing pranks on your friends is by creating nameless folders in your windows. It is a trick which can make the other person feel irritated and I am sure you would love this feeling. This task can be accomplished very easily one has to just follow the below mentioned steps and within no time the task is done. So, don’t kill the time and prank your friends.


    Step By Step Procedure To Create A folder With Blank Space

    1. Select any file or folder whose name you want to remove or change its name as a blank space.
    2. Right click on it and choose rename or simply press F2 from keyboard to rename that file or folder
    3. Press and hold the Alt key. While holding the Alt key, type numbers 0160(0r 999999999 or 255) from the numpad.
    Note: Type the numbers 0160 from the numpad, that is, the numbers present on the right side of the keyboard. Don’t type the numbers which are present on top of the character keys.
    4. Press Enter and the nameless file or folder will be created.
    Note: The file or folder that seems nameless is actually named with a single blank space.

    How to create another folder without name on the same location

    Two Folders Without Any Name On The Same LocationFor this you will have to rename the file with 2 spaces. Just follow these steps below:
    1. Select file, press F2.
    2. Hold alt key and type 0160 from the numpad.
    3. Release the alt key. Now without doing anything else, again hold Alt key and press 0160.
    4. Press enter and you will have second nameless file in the same directory.
    5. Repeat step 3 to create as many nameless files or folders in the same directory.


    Available link for download


    Read more »

    Thursday, October 20, 2016

    How To Create a Virtual Hard Disk VHD in Windows 8


    How To Create a Virtual Hard Disk VHD in Windows 8


    Today Ill show you how to Create a Virtual Hard Disk in Windows 8...

    Follow Steps given below to Create a Virtual Hard Disk (VHD):

    Step 1--> Right Click on the Computer Icon and Click on Manage from the Drop Down List.
    NOTE:- You Must Have Administrative Privilages to Select Manage Option.
     Step 2--> Click on "Disk Management" and then select a drive and then Click on "More Actions" and then Select "Create VHD" from the dropdown list.
     Step 3--> Now Select "Location" for your VHD and its "Size" and "Type".
    After Selecting these things Click "OK".
     Example-->
     Step 4--> Right Click on "Disk 1" and then Click on "Initialize Disk" from the Dropdown list.
     Step 5--> Select the Partition Style Type and then Click "OK".
     Step 6--> Now Right Click on Unallocated Space and then click on "New Simple Volume" as shown in the Image. 
     Step 7--> Follow the On Screen Instructions given in the wizard for creating "New Simple Volume"
     After Successfully following the On Screen Instructions given in the Wizard you will be able to see your New Simple Volume in your Computer Folder as Shown in the Picture.

    Enjoy...

    Available link for download


    Read more »

    How to create MBR partition table on USB Flash drives like mp3 player


    How to create MBR partition table on USB Flash drives like mp3 player


    Creating MBR Partition table on USB flash drives like mp3 player, video player makes your audio and video files playable with your player. If your USB flash drives partition table is corrupted or partitioned with GPT/MSDOS/PC98 partition table, sometimes it makes all your files unplayable with your player and the player reports with File system Error or No valid file format. Using Disk Part Utility in MS Windows we can easily create the MBR Partition table.

    Solution: 
    [Last updated on July 8, 2012] 

    Requirements:
    * USB Flash Drive (mp3/video player).
    * Windows 7/Vista Setup DVD.

    Method:
    1. Backup all your data from USB Flash drive to your Hard disk.
    2. Open Command Prompt with administrator rights.
    • Type cmd in Start menu search box and hit Ctrl+ Shift+ Enter. (Or)
    • Go to Start menu > All programs > Accessories, right click on Command Prompt and select Run as administrator. 
    3. Type and execute the following commands in the command prompt to use Disk Part tool:
        
        DISKPART
        LIST DISK
        SELECT DISK 1               (here my flash drive disk no. is Disk 1)
        CLEAN
        CREATE PARTITION PRIMARY
        SELECT PARTITION 1
        ACTIVE
        FORMAT FS=NTFS         (Format process may take few minutes)
        ASSIGN
        EXIT
      
    4. Now you are leaving the Disk Part tool but Don’t close the command prompt as we need to execute two more commands at the next step. Just minimize it.

    5. Next insert your Windows7/Vista DVD into the optical drive and check the drive letter of the DVD drive. Here my DVD drive letter is “G:” and USB drive letter is “H:”

    6. Now type each cmd in command prompt and hit Enter key.
       G: CD BOOT
       BOOTSECT.EXE /NT60 H: 

    7. Now "All the file(s) were written successfully on the targeted volume" message will be displayed.

    8. Finally your USB Flash drive was successfully partitioned with MBR partition table with NTFS file system. You can format to FAT32 filesystem if NTFS does not works.

    9. Now you can check this by opening Disk Management > Select View menu > Top > Disk List.


    Note: Make sure that your USB Flash drive is not set to Read only mode. It may create an error while formatting the disk.


    Available link for download


    Read more »

    Friday, October 14, 2016

    How to create more than four partitions in a Hard Disk


    How to create more than four partitions in a Hard Disk


    In general a Basic disk with MBR partition table can support
    • 4 MBR Primary partitions. Here u can install upto 4 operating systems in each partition like Windows XP in partition0, Vista in partition1, Se7en in partition2 and Ei8ht in partition3 where the Earlier versions must be installed first. 
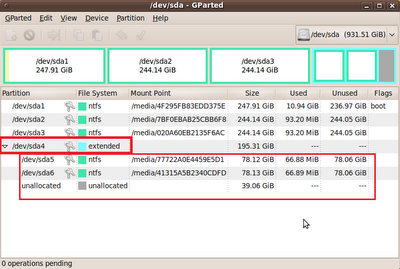
    • 3 MBR Primary partition and 1 Extended partition with 128 Logical volumes in the extended partition. Here it is safe to install more than 4 operating systems including Linux based operating systems like Ubuntu, Fedora, RedHat etc.
    If your hard disk is already partitioned into 4 MBR primary partition, it is necessary to delete one partition so that it can be extended upto 128 logical volumes. Backup your data to other volume before deleting a partition.

    Solution:
    1] Download Ubuntu LiveCD and burn the image file to a CD to make it a bootable one.

    2] Boot the PC with this CD by setting priority in your BIOS menu or Boot options @ startup.

    3] Choose the option "Try Ubuntu without making changes to your Hard Disk".

    4] Go to Administration > Preferences > GParted.

    5] It will display all empty free space as Unallocated in grey color. If you have already installed 4 primary partitions, you must delete one partition in order to have unallocated space for creating an extended partition.


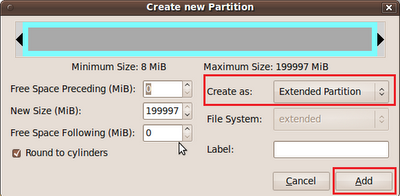
    6] Right click on Unallocated partition > Create New Partition > Create as Extended Partition > Click Add button.


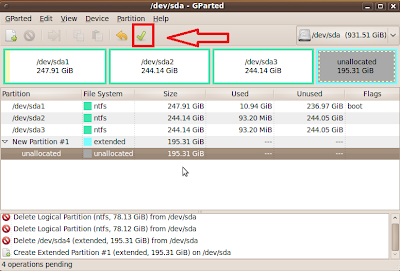
    7] Now Click Apply all operations button to complete the process. This also can be done after completing all the steps.


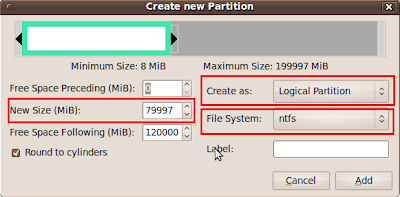
    8] Now Right click on Unallocated under Extended File system > Create New Partition > set Create as Logical Partition  and set the File System as ntfs and allocate your New Size in MB by reducing it > Click Add button.


    9] Like this your remaining Unallocated space under Extended File system can be divided upto 128 Logical Volumes including the above.


    10] After all Click Apply all operations button to complete the process.


    11] Once completed Restart your PC and take the Ubuntu LiveCD out.

    12] After rebooting into Windows you can check using Disk Management utility.

    Example1:  Here the Hard Disk is partitioned into
    • 1 MBR Primary Partition
    • 1 Extended Partition with 3 Logical Volumes
    Example 1: I have installed Windows XP in a Primary Partition & Windows 7 in a Logical Volume under Extended Partition


    Example2:  Here the Hard Disk is partitioned into
    • 2 MBR Primary Partition
    • 1 Extended Partition with 5 Logical Volumes
    Example 2


    Example3:  Here the Hard Disk is partitioned into
    • 3 MBR Primary Partition
    • 1 Extended Partition with 2 Logical Volumes
    Example 3

    Note1: In some cases by default System Reserved Volume was created during Windows installation and act as a primary partition. In order to avoid this unnecessary primary partition, delete this partition using GParted Ubuntu LiveCD. So that you can have a complete usage of four MBR primary partitions.

    Note2: May or may not loss of data occurs during partition. So that backup your data to other external hard disks before partition.

    Available link for download


    Read more »