Showing posts with label drives. Show all posts
Showing posts with label drives. Show all posts
Thursday, February 2, 2017
How to display empty drives in Windows 7
How to display empty drives in Windows 7
By default Windows 7 doesnt show empty drives like card readers but if we need it there is a way.
1] Open My Computer > press Alt+T+O keys combination to open Folder Options box.
2] Select View tab > clear the tick mark near Hide empty drives in the computer folder.

3] Click Apply and OK.
1] Open My Computer > press Alt+T+O keys combination to open Folder Options box.
2] Select View tab > clear the tick mark near Hide empty drives in the computer folder.
3] Click Apply and OK.
Available link for download

Tuesday, December 6, 2016
USB Flash Drives and the Digital Age
USB Flash Drives and the Digital Age
Professional photographers today are faced with two choices when it comes to digital storage – DVDs or USB flash drives. Clients want to know that the storage device you use will keep their pictures safe and secure, and they also want a device that gives them easy access to those pictures. Given these considerations, USB flash drives are the better option every time. On paper, DVDs might look like the better choice – they can hold about 100 pictures more than a flash drive, and they are certainly less expensive. However, it takes a lot longer to upload large blocks of information to a DVD and DVDs are more vulnerable to damage. Conversely, flash drives allow for a quicker upload of information, safer portability, and they are compatible with all kinds of devices, from smartphones to tablets. And in our digitally connected world, clients truly appreciate the convenience of being able to upload photographs instantly to their social media sites!

Created by the marketing team at Custom USB, this infographic provides detailed information and a comparison between DVDs and USB Flash Drives.
Available link for download
Thursday, October 20, 2016
How to create MBR partition table on USB Flash drives like mp3 player
How to create MBR partition table on USB Flash drives like mp3 player
Creating MBR Partition table on USB flash drives like mp3 player, video player makes your audio and video files playable with your player. If your USB flash drives partition table is corrupted or partitioned with GPT/MSDOS/PC98 partition table, sometimes it makes all your files unplayable with your player and the player reports with File system Error or No valid file format. Using Disk Part Utility in MS Windows we can easily create the MBR Partition table.
Solution:
[Last updated on July 8, 2012]
DISKPART
LIST DISK
SELECT DISK 1 (here my flash drive disk no. is Disk 1)
4. Now you are leaving the Disk Part tool but Don’t close the command prompt as we need to execute two more commands at the next step. Just minimize it.
5. Next insert your Windows7/Vista DVD into the optical drive and check the drive letter of the DVD drive. Here my DVD drive letter is “G:” and USB drive letter is “H:”
6. Now type each cmd in command prompt and hit Enter key.
7. Now "All the file(s) were written successfully on the targeted volume" message will be displayed.
8. Finally your USB Flash drive was successfully partitioned with MBR partition table with NTFS file system. You can format to FAT32 filesystem if NTFS does not works.
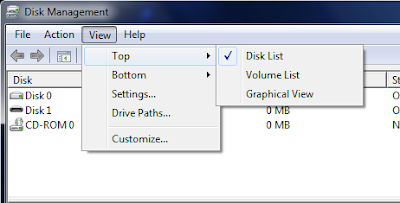
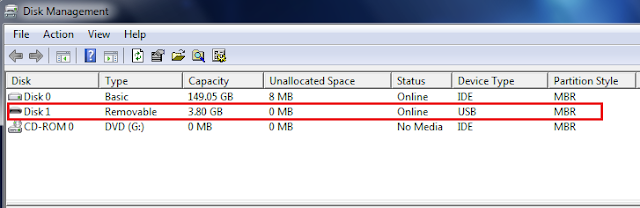
9. Now you can check this by opening Disk Management > Select View menu > Top > Disk List.
Note: Make sure that your USB Flash drive is not set to Read only mode. It may create an error while formatting the disk.
Solution:
[Last updated on July 8, 2012]
Requirements:
* USB Flash Drive (mp3/video player).
* USB Flash Drive (mp3/video player).
* Windows 7/Vista Setup DVD.
Method:
1. Backup all your data from USB Flash drive to your Hard disk.
Method:
1. Backup all your data from USB Flash drive to your Hard disk.
2. Open Command Prompt with administrator rights.
- Type cmd in Start menu search box and hit Ctrl+ Shift+ Enter. (Or)
- Go to Start menu > All programs > Accessories, right click on Command Prompt and select Run as administrator.
DISKPART
LIST DISK
SELECT DISK 1 (here my flash drive disk no. is Disk 1)
CLEAN
CREATE PARTITION PRIMARY
SELECT PARTITION 1
ACTIVE
FORMAT FS=NTFS (Format process may take few minutes)
ASSIGN
EXIT4. Now you are leaving the Disk Part tool but Don’t close the command prompt as we need to execute two more commands at the next step. Just minimize it.
5. Next insert your Windows7/Vista DVD into the optical drive and check the drive letter of the DVD drive. Here my DVD drive letter is “G:” and USB drive letter is “H:”
6. Now type each cmd in command prompt and hit Enter key.
G: CD BOOT
BOOTSECT.EXE /NT60 H:
7. Now "All the file(s) were written successfully on the targeted volume" message will be displayed.
8. Finally your USB Flash drive was successfully partitioned with MBR partition table with NTFS file system. You can format to FAT32 filesystem if NTFS does not works.
9. Now you can check this by opening Disk Management > Select View menu > Top > Disk List.
Note: Make sure that your USB Flash drive is not set to Read only mode. It may create an error while formatting the disk.
Available link for download
Subscribe to:
Posts (Atom)