Showing posts with label more. Show all posts
Showing posts with label more. Show all posts
Monday, March 6, 2017
10 ways to get more out of Yosemite
10 ways to get more out of Yosemite
Yosemites Spotlight shows you everything
You can now Spotlight search for just about anything. Try searching for a recent film and you will get movie showtimes, iTunes Store links, trailer previews, Wikipedia information and links to any documents on your Mac that mention that particular movie (Calendar events, Mail and Messages that mention it).
The new Spotlight isnt just physically more central; its going to become a much more fundamental part of the Mac OS X experience.

Network Disconnection
Want to disconnect from a wireless network? Prior to Yosemite this was a bit of a hassle involving either switching off Wi-Fi entirely, or delving into System Preferences.
On Yosemite all you need do is hold down Alt (or Option on some keyboards) and click the Wi-Fi icon at the top right of the screen. Beneath the name of the currently in-use Wi-Fi base station will be a disconnect option. (This option also appears when you connect to an iPhone/iPad via Personal Hotspot, although in this case there’s no need to hold down Alt/Option because it appears in the main menu.)
Recording output
Ever needed to create a tutorial or walkthrough for something on iOS? Or do you just fancy projecting your iPhone or iPad screen onto your Mac’s display?
Previously the only way to do so was complicated setups involving AirPlay mirroring and third-party software. With Yosemite all you need do is attach the device to your Mac via USB and then open QuickTime Player. Then select File > New Movie Recording.
QuickTime will default to your Mac’s iSight camera (assuming it has one), but click the small down arrow alongside the record button and your iPad or iPhone will show-up as an option.
Of course, you haven’t got to record anything, and can simply expand the QuickTime Player window to full-screen for some cool game-play mirroring! You can also select the New Audio Recording option in QuickTime Player to record only audio via your phone or tablet’s microphone. (Sadly, recording video/audio in this works only with Lightning connections and not the older iPod-style cables.)
iCloud free space
In Yosemite a detailed view of the free space available in your iCloud account can now be viewed by clicking the iCloud option in System Preferences, and looking at the bottom of the window.
Hover the mouse cursor over each block in the bar graph to see a tooltip showing what that block represents.

Highlighting in brown or pink

Okay, so this is a really small detail, but it’s one worth knowing if you truly like to personalise your Mac’s interface! Open System Preferences, click the General icon, then look under the Highlight Color dropdown list.
You’ll find Brown and Pink have been added as options in Yosemite. The colour formerly known as Gold has also been renamed Yellow, and most colours are a touch duller than previously. All that glitters…
Flat, flat, flat
Flat, flat, flat. That’s the mantra for interface designers at Apple right now. At Apple’s HQ nobody is able to drive anywhere because even the car tyres are flat.
Not your taste? Open System Preferences, click the Accessibility icon, then ensure Display is selected at the left. Put a check alongside Increase Contrast.
The effects will be visible immediately, and this alternative look and feel has been compared to the plain and simple appearance of very early releases of Mac OS from the 1980s. (Plain colour wallpapers also might help if the translucency effect annoys you, and don’t forget the “Dark” UI option under the General section of System Preferences.)
Better annotation
The always-useful Preview app has gained a number of new annotation tools in Yosemite. To access the new tools, click the Toolbox icon at the right of the toolbar, alongside the Search field. The tools are:
Sketch: The pen icon lets you roughly draw a shape, which will then be autocorrected to its nearest canonical shape — draw a circle around something, for example, and it’ll be converted to a perfect circle. A floating toolbar will appear briefly offering the chance to switch back to your rough sketch. Note that this tool replaces the ability to hand-draw circles and squares — although see the next item in this list.
New shapes: Yosemite lets you add stars and polygons to images or documents, in addition to straight-up rectangles and circles. Click the shapes icon and a dropdown list will appear. Shapes are now dropped onto the canvas and you can move them around by clicking and dragging. Blue handles on each allow resizing but note the smaller green handles on each, by which the shape or nature of the item can be adjusted — dragging the green handle on the polygon lets you adjust how many sides it has, for example, even allowing you to create triangles.
Shaded mask: At the bottom left of the shapes dropdown list that appears when you click the shapes icon on the toolbar is the new mask tool. It lets you define an area of the image for highlighting. It does this by making the rest of the image shaded. This is confusingly similar to the Crop tool on some image editors, but totally unrelated.

Loupe: If you need to magnify an area of the image to show detail, you can place a loupe at that spot. This tool lives the bottom right of the shapes dropdown list, as mentioned above. You can place loupes over the top of each other to further magnify the image. Again, it might seem this is simply a magnifying tool offered by Preview to help with editing, but each loupe you place is saved-out with the image, and other items can be placed over the top of them.
The new tools in Preview are actually part of Yosemite’s Markup feature, featured prominently within Mail and used to annotate attachments (click the arrow at the top right of any image/PDF mail attachment). In actuality, however, Markup is available system-wide, and not just in Mail. This can be demonstrated by adding a picture to a TextEdit or Stickies document — the same Markup option will appear at the top right of the image (although curiously the Notes app is an exception to this rule).
Preview files
Finder has always offered a preview pane as part of the Columns view mode. As you might expect, this showed a preview of the currently clicked-upon file.
In Yosemite the preview can be activated inany view mode – icon, list, column, or Cover Flow.
To activate the preview window, click View > Show Preview. Alternatively, tap Shift+Cmd+P.
Click the same button or hit the same keyboard combo to hide it again.

Website update feeds
Back in the old days, Safari had the ability to tune into news feeds (that is, it was compatible with RSS/Atom update feeds provided by some websites). Unfortunately, the feature was then pulled in OS X Mountain Lion.
In Yosemite its back, and integrated very neatly with the Shared Links feature that pulls links from your friends Twitter feeds. Just click on the RSS/Atom link on any web page and youll then be asked if you want to add the site to your collection.
To view Shared Links, click the Sidebar button on the Safari toolbar (next to the back/forward icons), and then click the @ icon. Note that shared links, regardless of their source, are sorted by the date and time they were posted.
To unsubscribe from a site, again click to show the Sidebar in Safari, then click the @ icon, and click the Subscriptions button at the bottom. Click the X icon to the left of any site you want to remove.

Get Java
Considering the security risks presented by the Java Runtime add-on, Apple has perhaps wisely removed it entirely from Yosemite - even if you already had it installed in Mavericks.
However, this decision stops certain apps from running. There’s a twist in the tail, however, because simply installing the latest Java release from Oracle might not provide the solution.
Certain apps like Minecraft and Adobe Photoshop CS5 require the version of Java provided by Apple, even though this is a little ancient. The solution is to install both Apple and Oracle’s versions, and the two can exist in harmony side-by-side. Apple’s Java can be found and installed via here, while Oracle’s up-to-date version of Java can be found here (select to download the JRE version).

Sign using your trackpad
If you’ve got a finger and a MacBook or Magic Trackpad then you can now sign PDFs within Preview. Admittedly, the signature you come-up with is only likely to be a representation of the real thing, but it might be enough.
Start by clicking the toolbox icon at the top right of the Preview toolbar (next to the search field), and then click the signature icon beneath (sixth from the left).
Then click Create Signature, ensure the Trackpad tab is selected, and then click to begin as directed. When you’ve finished you can select the signature from the menu, then drag it to wherever you want it to appear.
If you intend to make good use of this feature then you might want to use a touchscreen stylus, which will works just as well on a trackpad as it does on an iPhone or iPad. (A biro wont work, so dont try it!)

Available link for download

Sunday, October 23, 2016
7 Tips To Get More Out Of Your WiFi Router
7 Tips To Get More Out Of Your WiFi Router
Wireless routers are a bit like relationships. You don´t notice the problems until things go really wrong and they send you crazy. This behaviour is normally accompanied by naming calling and huge sighs! And at times, you can´t understand what has gone wrong – but you blame the router anyway!
However, sometimes is not the routers fault – it is yours. It´s about time you accepted the blame and fix things pronto!
Naturally, if you live in a densely populated area, you could have any number of rivals competing for space on this limited band. The only real solution for now is getting a router that operates on dual bands simultaneously. Newer routers will often run on 2.4GHz and 5GHz bands at the same time, allowing the latest Wi-Fi devices to connect on the much less congested 5GHz band. Of course the other thing to consider is that your neighbours may be intentionally reducing your bandwidth by hogging it for themselves!
However, sometimes is not the routers fault – it is yours. It´s about time you accepted the blame and fix things pronto!
1. Did you read the manual?
Remember all the times you wished your other half came with instructions? Yet you expect your router to perform miracles automatically! In your defence, we’ve all done it, but just like your partners, routers are all different and need a little TLC. A quick read of the instructions will make sure you treat it right! If you didn´t get a manual with your router you can download users guides from the supplier’s website.2. You didn’t learn the basics
You will be amazed how much better you get on with your wireless router if you have a basic understanding of its needs. This all may sound very complicated and techy, but the truth is its child´s play. Check out our friends at lifehacker.com who give a very unintimidating intro to the basics in Lesson 1: Router Hardware 101.3. You never change
It´s easy to get stuck in your ways, but you have to keep things fresh. Keep your router up to date, your ISP will often allow you to upgrade to a new model for free if it becomes their standard issue for new customers, additionally firmware updates from the manufacturer can help find and fix any bugs and generally improve the performance of your device.4. You’re using the wrong technology for your needs
You might want to consider exactly what you need from your service and if your expectations are reasonable. Are you a seriously competitive online gamer? Chances are you should be connecting to your router with a wired ethernet connection. Always on the move for business but need to stay plugged into the web? You’re going to need a service specifically for international wireless roaming. Take some time to think about what you actually need from your service before committing to a plan.5. You’re embarrassed to be seen with it
Wireless routers are not the sexiest device you will ever own, but its what´s on the inside that counts! And tucking your box in the corner out of the way may not be the best place to keep it. Ideally, it needs to be in range of all devices you use it for, and preferably an open space where it can breathe.6. Something is interfering
This problem is more common than you realise. Routers work from a 2.4GHz band – the same as many other household devices such as cordless phone, microwave and baby monitors. It could be that they are interfering with your router and effecting its performance.7. Interfering neighbours
One of the most common interference patterns for routers comes from next door. The chances are your neighbours connect over the same frequency as you and just like your own household devices. Might be sharing the same 2.4GHz frequency as you.Naturally, if you live in a densely populated area, you could have any number of rivals competing for space on this limited band. The only real solution for now is getting a router that operates on dual bands simultaneously. Newer routers will often run on 2.4GHz and 5GHz bands at the same time, allowing the latest Wi-Fi devices to connect on the much less congested 5GHz band. Of course the other thing to consider is that your neighbours may be intentionally reducing your bandwidth by hogging it for themselves!
Available link for download
Friday, October 14, 2016
How to create more than four partitions in a Hard Disk
How to create more than four partitions in a Hard Disk
In general a Basic disk with MBR partition table can support
Solution:
1] Download Ubuntu LiveCD and burn the image file to a CD to make it a bootable one.
2] Boot the PC with this CD by setting priority in your BIOS menu or Boot options @ startup.
3] Choose the option "Try Ubuntu without making changes to your Hard Disk".
4] Go to Administration > Preferences > GParted.
5] It will display all empty free space as Unallocated in grey color. If you have already installed 4 primary partitions, you must delete one partition in order to have unallocated space for creating an extended partition.
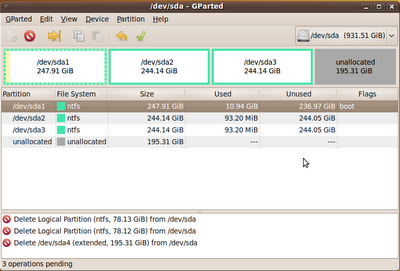
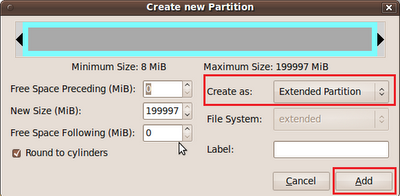
6] Right click on Unallocated partition > Create New Partition > Create as Extended Partition > Click Add button.
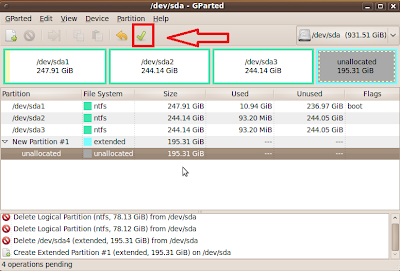
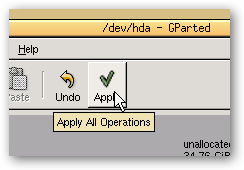
7] Now Click Apply all operations button to complete the process. This also can be done after completing all the steps.
8] Now Right click on Unallocated under Extended File system > Create New Partition > set Create as Logical Partition and set the File System as ntfs and allocate your New Size in MB by reducing it > Click Add button.
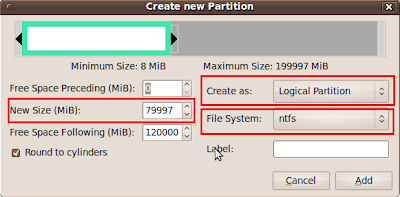
9] Like this your remaining Unallocated space under Extended File system can be divided upto 128 Logical Volumes including the above.
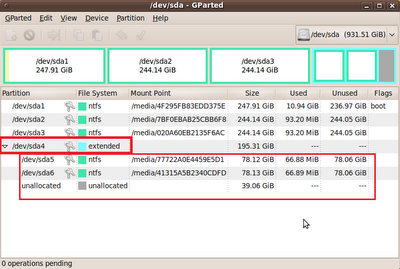
10] After all Click Apply all operations button to complete the process.
11] Once completed Restart your PC and take the Ubuntu LiveCD out.
12] After rebooting into Windows you can check using Disk Management utility.
Example1: Here the Hard Disk is partitioned into
Example2: Here the Hard Disk is partitioned into
Example3: Here the Hard Disk is partitioned into
Note1: In some cases by default System Reserved Volume was created during Windows installation and act as a primary partition. In order to avoid this unnecessary primary partition, delete this partition using GParted Ubuntu LiveCD. So that you can have a complete usage of four MBR primary partitions.
Note2: May or may not loss of data occurs during partition. So that backup your data to other external hard disks before partition.
- 4 MBR Primary partitions. Here u can install upto 4 operating systems in each partition like Windows XP in partition0, Vista in partition1, Se7en in partition2 and Ei8ht in partition3 where the Earlier versions must be installed first.
- 3 MBR Primary partition and 1 Extended partition with 128 Logical volumes in the extended partition. Here it is safe to install more than 4 operating systems including Linux based operating systems like Ubuntu, Fedora, RedHat etc.
Solution:
1] Download Ubuntu LiveCD and burn the image file to a CD to make it a bootable one.
2] Boot the PC with this CD by setting priority in your BIOS menu or Boot options @ startup.
3] Choose the option "Try Ubuntu without making changes to your Hard Disk".
4] Go to Administration > Preferences > GParted.
5] It will display all empty free space as Unallocated in grey color. If you have already installed 4 primary partitions, you must delete one partition in order to have unallocated space for creating an extended partition.
6] Right click on Unallocated partition > Create New Partition > Create as Extended Partition > Click Add button.
7] Now Click Apply all operations button to complete the process. This also can be done after completing all the steps.
8] Now Right click on Unallocated under Extended File system > Create New Partition > set Create as Logical Partition and set the File System as ntfs and allocate your New Size in MB by reducing it > Click Add button.
9] Like this your remaining Unallocated space under Extended File system can be divided upto 128 Logical Volumes including the above.
10] After all Click Apply all operations button to complete the process.
11] Once completed Restart your PC and take the Ubuntu LiveCD out.
12] After rebooting into Windows you can check using Disk Management utility.
Example1: Here the Hard Disk is partitioned into
- 1 MBR Primary Partition
- 1 Extended Partition with 3 Logical Volumes
 |
| Example 1: I have installed Windows XP in a Primary Partition & Windows 7 in a Logical Volume under Extended Partition |
Example2: Here the Hard Disk is partitioned into
- 2 MBR Primary Partition
- 1 Extended Partition with 5 Logical Volumes
 | |
| Example 2 |
Example3: Here the Hard Disk is partitioned into
- 3 MBR Primary Partition
- 1 Extended Partition with 2 Logical Volumes
 |
| Example 3 |
Note1: In some cases by default System Reserved Volume was created during Windows installation and act as a primary partition. In order to avoid this unnecessary primary partition, delete this partition using GParted Ubuntu LiveCD. So that you can have a complete usage of four MBR primary partitions.
Note2: May or may not loss of data occurs during partition. So that backup your data to other external hard disks before partition.
Available link for download
Subscribe to:
Posts (Atom)