Showing posts with label connect. Show all posts

Monday, January 30, 2017

Connect All your Computers with Single Mouse and Keyboard


Connect All your Computers with Single Mouse and Keyboard


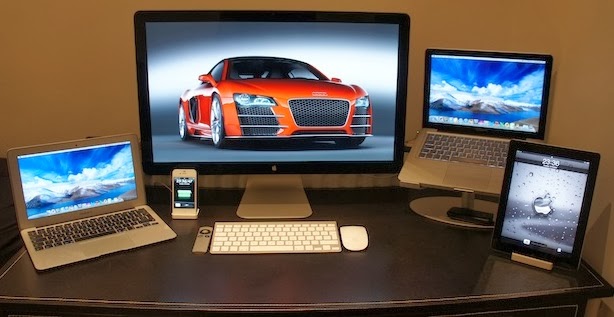
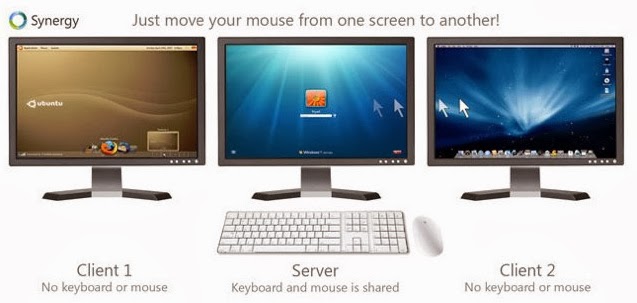
        Every computer has a keyboard, mouse, and monitor but now there is no need to have mouse and keyboard for every computer. If one computer has Keyboard then it can be used on other computers too without disconnecting the mouse and keyboard. So one mouse and keyboard are sufficient to manage all the things on multiple computers. This is made possible by Synergy.

single+keyboard+for+different+PCs

About Synergy:

Synergy is a small and powerful tool which lets you to use the mouse and keyboard on your different computers as a single mouse for all your computers.
Using synergy is so simple,It has simple user user interference which makes the users to understand the settings easily.
Synergy supports all the three major desktop operating systems Linux,Windows and MAC Os,(Under development for Mac OS X Mavericks). It is available for both 32 bit and 64 bit computers in respective formats.
connect+pc+with+single+mouse+and+keyboard

Here are great features of Synergy:

  • Supports encryption of information between your computers. (This way you can portect your files from bad guys in your network).
  • Simply move the mouse to the computer on which you want to work with your keyboard.
  • Copy the files to clipboard and share the files in other computers!.
  • Drag and Drop feature is avaible for Windows and MAC computers.
  • Only a local network connection is needed which establishes the connection between your computers.

Once look at below things:

  • Before you continue further make sure that the computers you want to use are on the same local network.
  • Make sure you turn on the network discovery and your computers are visible on local network.
  • And you need to know these terms that will be used here in this tutorial.
Server System: Here the server system is your main computer to which the mouse and keyboard are connected.
Client System: Here the client system is your secondary computer to which there is no mouse and keyboard connected. There can any number on client systems.

Installing-Configuring Synergy on your Computers

  • Now Download the Synergy software respective to your Operating systems.
  • For example if you are running Windows then you need to get the Windows version on Synergy from here [official link].
  • And if you are using Linux or MAC OS then you can get the Synergy verison which supports from here [Official link]
  • First Download this Synergy on to the server system ( which is connected with mouse and keyboard).

Configuring the server system:

  • After installation when you run Synergy on your computer you are allowed to choose the type of the computer(server or client).
  • As you have installed this software first on the system which is going to act as server. we are showing on configuring the server.
  • Click on the "configure server".
  • As you hit on "Configure Server" You will be presented with a new window titled server configuration.
2
  • Here in this screen shot Linux-Mint is my server computer and Windows 7 is my client computer (which doesnt have mouse and keyboard connection).
  • If you know what you are doing with the settings then you can play with the other advanced settings else leave them.
  • Now hit on save to complete your server configuration!.
  • And note down the server  IP address shown in the window.

Configuring the client computer:

  • Client computer is your another computer which doesnt have the mouse and the keyboard.
  • You need to install the synergy software on client system too.
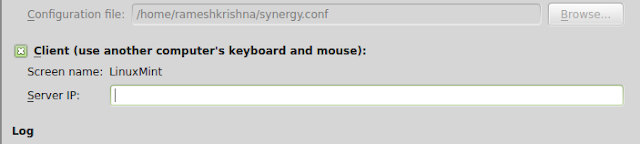
  • Configuring the client computer is same as configuring server machine.except choosing the client option instead of server option (in server configuration).
4
  • After selecting it enter the server ip address. Click on apply.
  • To starting sharing the computer.open your server computer and click on start then click on start on the client computer.
Thats it you are now done and you can share the single mouse and keyboard on multiple computers.
If you have liked this open source software..Please support them by donating.
If you feel this is hard to setup you can try the ShareMouse software which does the same work as Synergy.

Available link for download


Read more »

Saturday, December 10, 2016

Enable USB Debugging on Android Phone and Connect to PC in fastboot adb


Enable USB Debugging on Android Phone and Connect to PC in fastboot adb


This tutorial explains 1. how to prepare your Android device for USB debugging and
 2. How to connect it to PC in Fastboot adb Mode.


Part 1: ENABLE USB DEBUGGING ON PHONE
Enabling the USB debugging is the very first step of unlocking the Bootloader and Rooting your Android Phone.

1. To do so, simply navigate to Phones Settings > About Phone > scroll to the bottom > tap Build number seven (7) times. Youll get a short pop-up in the lower area of your display saying that youre now a developer.


2. Go back and now access the Developer options menu, check ‘USB debugging’ and click OK on the prompt.


for some old Gingerbread Phones go to Setting > Application > Development > check on USB DEBUGGING

Part 2: How to connect to PC in Fastboot Mode and ADB

1. Now Install the appropriate Drivers for your Android device like for HTC Phones,
install HTC sync manager from their Official Website HTC
for Samsung phones go to Samsung
for motorola phones go to Motorola

2. Now download ADB_FASTBOOT_android_tools.rar>>
It contain all the Tools required for Rooting etc.

extract the .rar File to Desktop


3. Now open the folder and double click on "cmd". it should look similar to this:


4. Now enter into Phones Bootloader Mode.
There are Different methods for Different device Manufacturers to entering into Bootloader mode.
 Method for HTC, Motorola and Samsung Devices is given below.


 Bootloader Menu for HTC and Motorola phones
Hold the Power button on your device for 5 seconds to completely turn it off.

Now Press Volume Down and Power to start the device into Bootloader mode.

Use the Volume buttons to select up or down. Highlight Fastboot and press the Power button to select.


For Samsung phones

For the Galaxy S2 and Tab 2 switch off the phone, then you will need to hold Volume Up and Power at the same time until you see the Samsung logo appear. Then release.


For the Galaxy S3 switch off the phone,then you will need to hold the volume up, home, and power button at the same time until you see the Samsung logo, and then release. 


For other Samsung phones,Switch off the phone,then hold "Menu" key + "Volume Down" + "Power" together and release/


5. After entering into Bootloader mode Connect your device to the computer via a USB cable.


wait for 2 minutes until PC configured itself for new device.

6. To check weather PC detects your phone or not, write this Code in "cmd" and press Enter:
Code:
fastboot devices


If "cmd" prints something like this then you can Proceed to Unlock the Bootloader.

FJDH45C3S8 fastboot


 Unlock Bootloader of any HTC Phone here>>


If it doesnt print anything then you have to configure your PC drivers to Support your Phone. follow Fastboot problems on Windows 8 and 8.1>>

Available link for download


Read more »