Thursday, October 13, 2016
Dual Boot Windows 7 and OS X Snow Leopard Using Chameleon
Dual Boot Windows 7 and OS X Snow Leopard Using Chameleon
Posted by tonymacx86 on Thursday, November 26, 2009
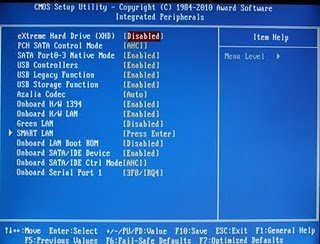
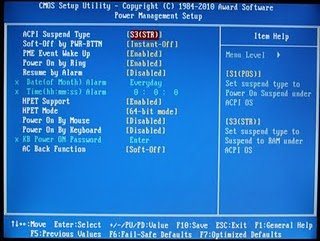
You will need to set your BIOS to ACHI mode and your Boot Priority to boot from CD-ROM first. This is the most important step, and one many people overlook. Make sure your bios settings match these. Its not difficult- the only thing I did on my Gigabyte board besides setting Boot Priority to CD/DVD first was set Optimized Defaults, change SATA to AHCI mode, and set HPET to 64-bit mode.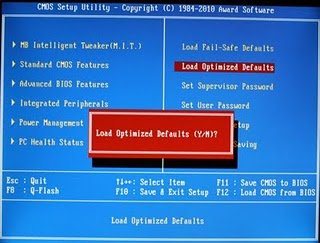
STEP 2: PARTITIONING HARD DRIVE
STEP 3: INSTALL SNOW LEOPARD
The next step is to install Snow Leopard to Partition 2.

(Modified by MACWIN to make it more simpler and comfortable on Nov 01,2011)
Using Chameleon as your bootloader, you can boot an infinite amount of operating systems on your PC. Its simple to use a separate hard drive for each operating system.
The following guide will show you how to put OS X Snow Leopard and Windows 7 on the same hard drive. You can then use Chameleon to select either Snow Leopard or Windows 7 at boot time. Its a bit trickier, as the Windows installer will set itself as the active partition automatically The latest MultiBeast will take care of choosing boot0hfs instead of boot0 to automatically boot from hfs partition, even if its inactive.
YOU WILL NEED
- A computer running an Intel Processor.
- A blank CD
- A Mac OS X Snow Leopard Retail DVD
- A Windows 7 Installation DVD (Retail/OEM)
- Its easy to get frustrated, but dont give up! There are a community of users with similar hardware in the tonymacx86 Forum to provide support if you get stuck.
BEFORE YOU BEGIN
- If you have greater than 4gb of RAM, remove the extra RAM for a maximum of 4gb. You can put back any extra RAM in after the installation process.
- Use only 1 graphics card in the 1st PCIe slot with 1 monitor plugged in.
- Remove any hard drives besides the blank drive being used for OS X.
- Remove any USB peripherals besides keyboard and mouse.
- Remove any PCI cards besides graphics- they may not be Mac compatible.
- If using a Gigabyte 1156 board, use the blue Intel SATA ports- not the white Gigabyte SATA ports.
- Its best to use an empty hard drive- you will have to partition and format the drive.
- Always back up any of your important data.
STEP 1: BIOS SETTINGS
You will need to set your BIOS to ACHI mode and your Boot Priority to boot from CD-ROM first. This is the most important step, and one many people overlook. Make sure your bios settings match these. Its not difficult- the only thing I did on my Gigabyte board besides setting Boot Priority to CD/DVD first was set Optimized Defaults, change SATA to AHCI mode, and set HPET to 64-bit mode.


STEP 2: PARTITIONING HARD DRIVE
In order to boot the Mac OS X Retail DVD, youll need to download and burn iBoot. For desktops and laptops using unsupported Intel CPUs and graphics, a legacy version of iBoot can be downloaded here. (HP Users Use Legacy iBoot or Boot with CPUS=1) Download iBoot
- Burn the image to CD
- Place iBoot in CD/DVD drive
- Restart computer
- Boot to iBoot CD and then eject iBoot

- Insert your Mac OS X Snow Leopard Retail DVD and press F5
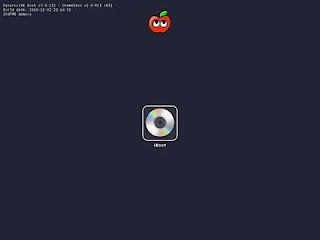
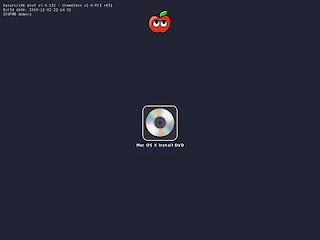
- When you see the screen below, press enter to begin the boot process

- When you get to the installation screen, open Utilities/Disk Utility. NOTE: If you cannot get to the installation screen, retry from Step 4, type PCIRootUID=1 before hitting enter. If that doesnt work then try PCIRootUID=1 -x or just -x which will enter Mac OS X Safe Mode and will allow you to proceed.
8. If you have unsupported Graphics Card boot with –X . { E.g. At Bootloader screen select OSX install Disk and hit Spacebar and type cpus=1 –x –v and hit enter. )
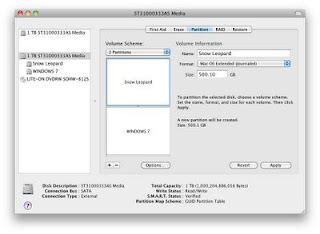
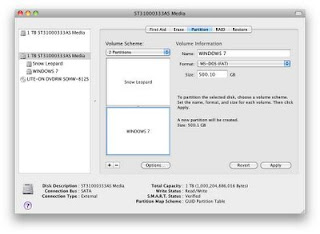
9. First thing to do is format and partition the hard drive. When you choose 2 partitions with a GUID Partition Table, OS X will format the drive with 3 partitions. Partition 1 is EFI, Partition 2 will be Snow Leopard and Partition 3 will be Windows 7. The EFI partition is a very small (200mb) hidden partition that holds the OS X bootloader and BIOS information on a real Mac.
10. Open Applications/Utilities/Disk Utility
1. Select your hard drive in the left column. Click the Partition tab
2. Under Volume Scheme: separate your hard drive into 2 Partitions. You can make them any size you want.
3. Click Options... choose GUID Partition Table, then click OK.
4. Click Untitled 1. Under Name:type Snow Leopard. Under Format: choose Mac OS Extended (Journaled).

5.
6. Click Untitled 2. Under Name: type Windows 7. Under Format: choose MSDOS (FAT).

7.
8. Click Apply and close Disk Utility.
9. Insert Windows 7 DVD in tray.
10. Unplug all hard drives except this one and reboot.
STEP 2: INSTALL WINDOWS 7
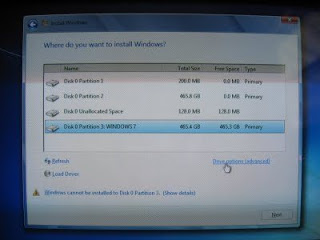
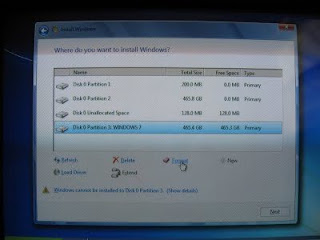
Now you will install Windows 7 to Partition 3. Youll have to reformat it to NTFS in the Windows 7 installer before Windows will let you install. We labeled it Windows 7 in the previous step.
Now you will install Windows 7 to Partition 3. Youll have to reformat it to NTFS in the Windows 7 installer before Windows will let you install. We labeled it Windows 7 in the previous step.
- Wait for Windows to begin installation process.
- Accept license agreement.
- At Which type of installation do you want, choose Custom (Advanced)
- At Where do you want to install Windows, choose Partition 3: Windows 7.
- Click Drive options (advanced).
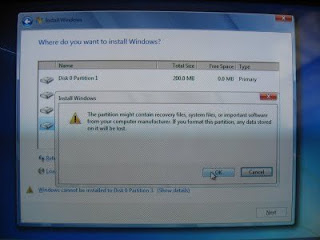
- Click format.
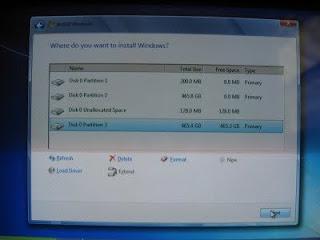
- Click OK.
- Click Next.


At this point, Windows 7 will install to Partition 3. The installer will reboot the computer a few times- just leave it until you complete the installation process and see the Windows desktop.
STEP 3: INSTALL SNOW LEOPARD
The next step is to install Snow Leopard to Partition 2.

iBoot + MultiBeast- Install OS X on any Intel-based PC
1.Available link for download